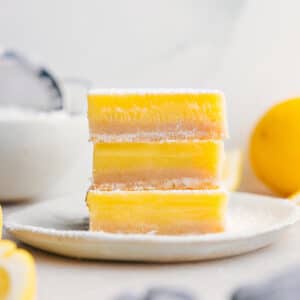
The Best Lemon Bars Recipe with a buttery shortbread crust and a tangy, sweet lemon topping. A dusting of powdered sugar takes them over the top!


Author’s Notes
My Mom’s Famous Lemon Bars Recipe!
I grew up on my mom’s lemon bars, which were truly legendary. Everyone always said they were the best lemon bars recipe they’d ever had.
Her secret was a splash of heavy cream in the filling. It gave the bars a custardy texture and a smoother mouthfeel, taking the edge off the tartness.
This recipe is only slightly adapted from hers. I added a bit of almond extract to the crust for extra flavor and tweaked the method to make it more foolproof. Sometimes the flour in the filling would clump, and straining it meant losing all that lemon zest flavor. Blending everything instead keeps the zest, smooths out the filling, and gives you that strong lemon flavor in every bite.
I can’t wait for you to try these!


How To Make The Best Lemon Bars Recipe
The full recipe is below, but here are my best tips for this recipe:
- Use a glass or ceramic pan: Metal can give the bars a metallic flavor.
- Line with parchment paper: Makes it easier to lift and slice cleanly.
- Stick with fresh lemons: Better flavor, and you’ll need the zest anyway.
- Let them chill completely: Ensures the custard sets and deepens the flavor.
- Blend briefly: Over-blending adds air bubbles to the filling
Featured Comment
“Honestly the BEST. I’ve tried a lot of lemon bar recipes, and right now this is my favorite.”
– Tamala
What Are Classic Lemon Bars Made Of?
A few ingredients worth going into detail about:
- Lemon Zest: Avoid the bitter white part, only zest the yellow skin using a microplane.
- Lemon Extract: A strong lemon flavor booster, like vanilla extract.
- Butter: High-quality butter means better flavor. Use unsalted to control the salt.
- Vanilla: Vanilla bean paste adds more flavor, but vanilla extract works too.
- Heavy Cream: This helps balance the tartness and makes the custard creamier.

chelsea’s recipe tip
My Secret To Getting More Juice Out Of Lemons!
- Microwave the lemons for 15-20 seconds.
- Knead the lemons with your hand against the counter for 20-30 seconds.
- Cut the lemon in half horizontally and juice the lemon using a juicer.
Quick Tip
How to cut this lemon bars recipe cleanly: Chill bars in the fridge until firm. Use a hot knife—run it under hot water, dry, cut, and repeat for clean slices.
Storage
Yes! The crust and custard freeze at different speeds, so they need space to freeze properly.
- Cut the bars and place them on a lined baking sheet with space between them.
- Freeze for 2-3 hours until solid.
- Wrap each bar in plastic wrap, then store in a bag or container for up to 3 months.
For short-term storage, keep them in an airtight container in the fridge for 4-6 days.
More Of My Mom’s Famous Recipes:
Lemon Bars
Video
Equipment
- 9 x 13-inch ceramic baking pan (skip metal pans, it can make the bars taste metallic)
- Stand mixer or hand mixer
Ingredients
- Cooking spray
- 16 tablespoons unsalted butter at room temperature, see note 1
- 2 cups granulated sugar divided
- 1 teaspoon vanilla bean paste or 1-1/2 teaspoon vanilla extract
- 2 cups + 3 tablespoons flour divided
- 1 teaspoon salt divided
- 4 to 5 large lemons see note 2
- 4 large eggs
- 1/4 teaspoon lemon extract optional, see note 3
- 1/3 cup heavy cream
- Powdered sugar for topping bars
Instructions
- Line a ceramic 9×13-inch pan with parchment paper, leaving an overhang on the sides. Lightly spray with cooking spray and set aside.
- In a stand mixer or with a hand mixer, beat the butter and 1/2 cup granulated sugar until smooth and creamy, about 2-4 minutes. Scrape the bowl as needed. Add 3/4 teaspoon salt and vanilla. Mix until integrated. Finally, add 2 cups flour. Mix until a thick dough forms. If the dough is too soft, add 1 to 3 tablespoons more flour.
- Press dough evenly into the prepared pan, going about 1/2 inch up the sides. Make sure the crust is pressed tightly into all edges to prevent leaking. Freeze for 15 minutes. Meanwhile, preheat oven to 350°F. After freezing, press edges again to ensure a tight seal. Bake crust for 22–25 mins, or until lightly golden at the edges.
- Zest the lemons to get 2 teaspoons zest (avoid the white pith). Juice the lemons to get 2/3 cup juice.
- In a blender, combine the remaining 1½ cups sugar and the zest. Pulse 5 times (1 second each) to slightly break down the zest. Add remaining 3 tablespoons flour, lemon juice, remaining 1/4 teaspoon salt, eggs, cream, and lemon extract (if using). Blend for 10 seconds or just until smooth. Do not overblend. Stir the mixture with a spatula and set aside.
- Remove crust from oven and stir filling mixture again. Pour right over the hot crust, slowly and evenly on top. Bake for another 20–25 mins or until the center is just set and jiggles slightly (like firm Jell-O).
- Let the bars cool at room temperature for 2 hours, then chill in the fridge for at least 2 more hours, until fully set. Lift the bars out using the parchment paper. Run a knife under hot water, dry, make one cut, and repeat for clean slices. Dust with powdered sugar through a fine sieve. Return any leftover bars to the fridge.
Recipe Notes
Nutrition
Nutrition information is automatically calculated, so should only be used as an approximation.
Reader’s Notes & Tips
Tips & Variations from Chelsea’s Messy Apron’s Community
- Doubled for a Crowd: Lena used a half sheet pan and said it was the best lemon bar she’s ever made.
- Meyer Lemons: Lisa used backyard lemons and loved the bright flavor.
- Almond Flour Swap: Heather used almond flour in the crust and said it worked well.
- Fan Favorites: Lena, Tamala, Sarah, and others said these are their go-to lemon bars.
- “The best lemon bars I’ve ever had!” – Krystal
Quick Tip
If you loved this recipe, you’ve got to try my Lemon Tart!
Best Lemon Bars Recipe FAQs
The center should jiggle slightly, like firm Jell-O, and the top should look set and matte, not wet.
Line the pan with parchment paper, leaving extra hanging over the sides. Use it to lift the bars out easily for cutting.
It likely wasn’t baked long enough or didn’t chill fully. Give it more time in the fridge. Return leftover bars to the fridge promptly.
Not with this method. Blending breaks everything down without removing flavor.


Looks delicious
Thanks Guram!
Made these for first time, used vanilla extract. So good, followed recipe exactly, and any little extra steps are worth it.Definite keeper. Thank you!
Delish! So glad you’re loving this recipe! Thanks Deb! 🙂