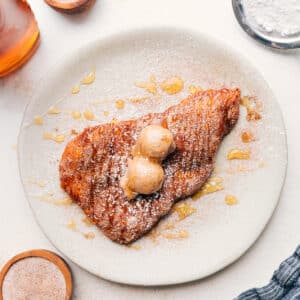
Utah Scones are unlike scones anywhere else in the world! Unlike European scones that are served with clotted cream and tea or American biscuits, these scones are deep-fried pieces of a puffy flatbread that are enjoyed with a sprinkle of powdered sugar, honey, and butter.

From inventive dipping sauces (hello Fry Sauce!), to desserts passed off as salads (cough, cough, strawberry pretzel salad), to funeral potatoes, way too much Jell-O, and soda shops on just about every street corner, I present to you another Utah specialty: Utah Scones!
What Is A Utah Scone?
In most places around the world, the name “scone” means a cookie or biscuit-type treat that is served with tea. In Utah though, scones are pieces of fried dough served hot and finished with a myriad of sweet toppings. These scones are a cross between donuts and Fry Bread. They’re typically eaten with powdered sugar, honey, and butter.
This Utah Scone recipe is unbeatable! The dough puffs up as it’s fried, creating a deeply golden treat with a lightly crisp exterior and a soft chewy interior. The toppings add a nice sweetness, making this an irresistible dessert — that yes, is sometimes passed off as breakfast in Utah!

What Is The Difference Between Fry Bread And Utah Scones?
The two are similar, but one is savory while the other is sweet.
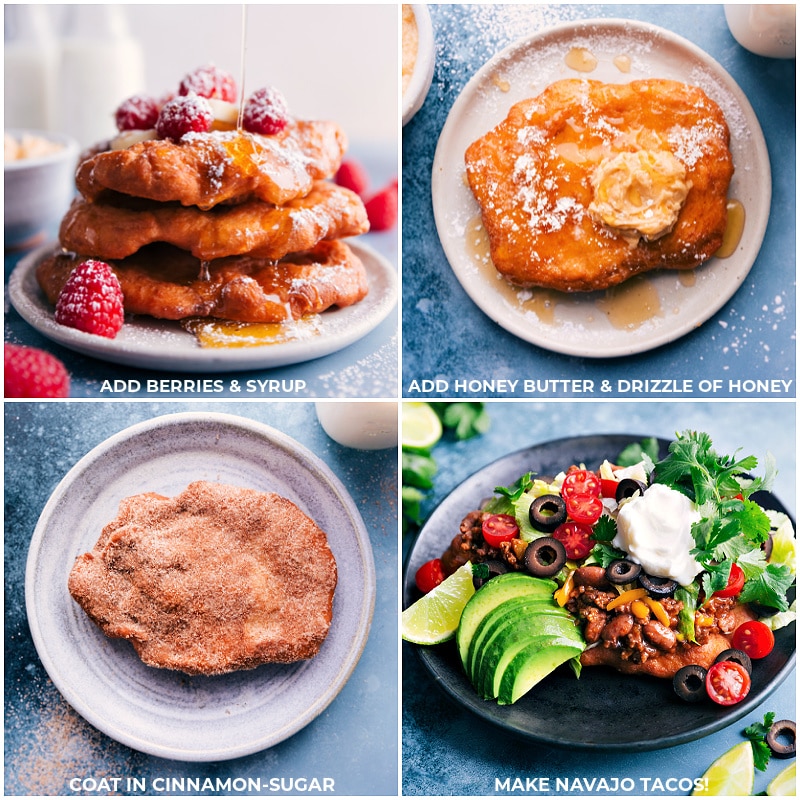
Fry Bread is typically enjoyed as part of a savory meal — usually replacing bread for sandwiches or replacing tortillas for tacos (like in Navajo Tacos). It can also be used to dunk in your favorite chili or soup recipe.
On the other hand, Utah Scones are sweet. Right out of the fryer they’re drizzled with a combination of a couple of the following: honey, honey butter, jam, pancake syrup, a vanilla sauce, a sprinkle of powdered sugar. They can also be dredged in cinnamon sugar right out of the fryer. (Fried scones with honey butter and a sprinkle of powdered sugar seem to be the most prevalent topping throughout Utah.)
Quick Tip
Utah Scones are typically enjoyed as a sweet treat, but you can leave off the sweet toppings and enjoy them as a savory meal instead! There are practically endless applications for how to use this recipe.
What Do Scones Taste Like?
If the deep-fried scones are coated in cinnamon sugar, they taste similar to a donut. They’re hot with a crisp outside and ultra-soft chewy interior. With honey and butter on top, they taste like sweet fried dough.

Where Can You Buy Scones In Utah?
If you happen to be visiting Utah, be sure to try one of our famous scones! Here’s a list of food trucks and restaurants where you can find Utah Scones.
But if you can’t make it out to the Beehive state to find a Utah Scone near you, don’t worry, these scones are surprisingly quick and easy to make. So much quicker than making donuts from scratch! In fact, one of my favorite things about these scones is there is no kneading and no rising time required. Unlike when you’ve got to wait for white bread, honey whole wheat bread, or dinner rolls to rise, these scones can be made shortly after the dough is finished.
How To Make Utah Scones
The dough for these scones comes together quickly and doesn’t require rising time — hooray! That said, we do recommend resting the dough for 15-20 minutes to allow the gluten to relax–this makes it easier to form pieces of dough before frying.
Once the dough has rested, it’s time to fry. A couple of different options here:
- Use a deep fryer (We love this deep fryer). It makes frying very easy and less messy than using a pot– thanks to the deep fryer lid. It also ensures the temperature stays consistent (you can set a temperature and forget about it!), which is important for even frying.
- If you don’t have a deep fryer, you’ll want a heavy-bottomed deep pot (I recommend using a large (5 quart) cast iron pot) and thermometer to gauge the temperature of the oil and ensure it maintains the right heat throughout frying. We want to ensure the temperature stays consistent and doesn’t get too hot (or too cool) which will affect how the bread fries.
- If you don’t have access to a thermometer, try this trick: Stand a wooden spoon handle in the hot oil. When bubbles gather around the stick, the oil is ready to fry.
- Another trick: Add a kernel of popcorn. Popcorn kernels pop into popcorn at 350 degrees F, so if it pops, you know the oil is ready!
Quick Tip
By using a large, deep pot instead of a shallow skillet, you’ll have much less mess! The oil won’t pop out on you or all over your stove.

Utah Scone Recipe Notes
- Yeast. There is yeast in this deep-fried scones dough recipe, but it does not require rising time.
- Kneading. No kneading is required for this dough! In fact, the less you touch the dough, the better.
- Whole milk. We’ve tried all different kinds of milk and whole milk is our favorite in terms of richness and flavor. While you can use 2% or 1%, we don’t recommend skim milk or plant-based milk alternatives.
- Dough texture. The dough is shaggy and rough looking. It is supposed to be sticky, but not so sticky that you can’t work with it. Add a touch of extra flour if needed, but avoid adding too much extra. On the flip side, if the dough is too dry, you may need a touch more milk. (There are always going to be variations due to climate, humidity, and individual measuring discrepancies).
- Rustic is the goal. The more bubbles and bumps on the scone, the better! This is the perfect surface area to add lots of toppings! Roughly press the dough out with your hands. Don’t use a rolling pin– it’s not needed!
Storage
How Long Will Utah Scones Keep?
Like most fried foods, scones are the absolute best right out of the fryer! I don’t recommend frying ahead of time, but the dough can be prepared ahead of time.
Make–ahead: Cover the dough tightly and refrigerate for up to 8 hours. When ready to fry, remove dough from the fridge and allow it to come to room temperature before frying.
Keep it warm: Add an oven-safe cooling rack to the top of a sheet pan. Place fry bread pieces straight from the fryer onto the cooling rack in a single layer. Place sheet pan in a 200 degree F heated oven until the rest are fried.
Store: Store scones (before topping with butter/honey/etc.) loosely wrapped with plastic wrap for 1-2 days. Texture and flavor do suffer the longer the scones have been out of the fryer.
More Favorite Utah-Inspired Recipes
- Honey and Banana Sandwich with mascarpone cheese
- Crumbl Oreo Cookies (did you know Utah is the home to Crumbl® cookies?!)
- Mint Brownies why just have brownies when you can also have frosting and a ganache on top?!
- Cafe Rio Dressing the best cilantro-lime ranch dressing
- Sparkling Raspberry Lemonade inspired by a local soda shop
Utah Scones
Video
Equipment
- Deep fryer or a large/deep pot with thermometer, see note 1
Ingredients
- 2 tablespoons unsalted butter melted
- 2-1/3 cups all-purpose flour
- 2 teaspoons baking powder
- 2 teaspoons granulated sugar
- 1/2 teaspoon instant yeast or active dry yeast
- 1/2 teaspoon salt
- 1 cup warm milk I use whole milk
- 1 tablespoon vegetable oil plus more for frying
- Toppings as desired see note 2; pick what sounds best to you!
Instructions
- Melt butter in the microwave and let cool back to room temperature (it’s important it’s not hot!) Microwave milk until just warmed (see note 3) but not hot. Mix together melted butter and milk and set aside. In a large bowl, add flour, sugar, baking powder, yeast, and salt. Whisk to combine. Add milk mixture to the dry ingredients and stir with a wooden spoon until a dough comes together.
- Dough should be rough, shaggy, and fairly sticky, but not so sticky you can’t work with it. Lightly flour your hands and knead dough just a few times to shape it into a ball, being careful to not overwork/over-handle the dough. In the same bowl you used for mixing, drizzle a tablespoon vegetable oil in the bowl. Rub oil on the bottom and slightly up the sides. Add dough ball back in the bowl and turn it to coat in the oil. Cover bowl with a damp kitchen towel. Let rest about 15–20 minutes. We don’t need the dough to rise, just the gluten to relax!
- Add 1 inch oil to a large cast-iron pot and heat to 350°F (see note 1). Divide the rested dough into 8 equal portions (cut the ball of dough in half then half again to get 4 large triangle pieces. Cut each triangle into 2 pieces to get 8 equal triangles). Lightly flour your hands and work with one dough piece at a time (keep the rest of the dough portions covered). Holding the piece of dough with your hands, gently work the dough into a circle, pressing it out with your fingers (don’t roll out the dough with a rolling pin or flatten on the table). The dough should make a thin 5 to 6-inch circle and doesn’t need to look pretty—it’s supposed to look rustic!). The thinner the pieces, the better, keep working the dough outwards, being careful to not rip it.
- Gently drop only one piece of dough at a time in fully heated oil. Fry about 30 seconds up to 1 minute per side (if not using cast-iron pot, it will be longer). Fry pieces to a deep golden-brown color, flipping the dough with 2 forks (or tongs) halfway through. Use a large slotted spoon (or tongs) to remove dough onto a paper-towel-lined plate. Repeat to fry remaining dough.
- Enjoy the scones right out of the fryer! Either dredge all sides in a blend of 1/2 cup white sugar with 2 tablespoons cinnamon sugar or top with butter, honey butter, honey, jam, syrup, berries powdered sugar, etc.
Recipe Notes
-
-
- Use a deep fryer
- If you don’t have a deep fryer, you’ll want a heavy-bottomed deep pot (I recommend using a large (5 quart) cast-iron pot) and thermometer to gauge the temperature of the oil and ensure it maintains the right heat throughout frying. We want to ensure the temperature stays consistent and doesn’t get too hot (or too cool), which will affect how the bread fries. If you don’t have a thermometer, try this trick: add a wooden spoon handle in the hot oil. When bubbles gather around the stick, the oil is ready to fry.
-
Nutrition
Nutrition information is automatically calculated, so should only be used as an approximation.


These are absolutely delicious. 30+ years ago I worked in a restaurant that served them and I was obsessed with them! I have been looking for a recipe for years. Thank you so much for posting this recipe. My husband has already asked me to make them again tomorrow!
Yay, this is so happy to hear! Thanks for your comment Laura!
We used to make scones and chili every Halloween, I want to start that tradition again with my kids, but my mom can’t find her recipe. We tested this one this afternoon and it’s perfect, thank you for sharing!
So thrilled to hear this! Thanks so much Daphne!
You do not need this much ingredients for Scones. Youtubes better
This one is so dang delicious, you have to give it a try!
Made these and they are so good!’
So happy to hear this! Thanks so much Marissa! 🙂
So… I’ve been wondering for a few days if you could do these in an air fryer? I love this kind of scone@ i didn’t realize they were unique to Utah… I grew up with them in CA, but my mom was raised in Utah, as we’re generations before her…
Sorry I don’t think this recipe will work well in an air fryer unfortunately!