Classic White Bread Recipe made with just six simple ingredients you probably already have on hand, so no grocery run needed!


author’s note
Fluffy White Bread in One Afternoon!
I grew up on white bread, and sometimes, nothing else hits quite like it. But now that I have kids, I can’t ignore the long list of ingredients in store-bought versions.
So, I decided to create my own simple recipe with ingredients I can actually pronounce. Let me tell you—this bread is better than anything from the store and easier than making a grocery run!
While it takes a little rise time, the hands-on work is minimal. With just six simple ingredients, this is a recipe you’ll want to save.


White Bread Recipe Ingredients
| Ingredient | Easy swaps or tips |
|---|---|
| Warm milk | Use water for a leaner loaf. Whole milk gives the best flavor and texture. |
| Yeast | Instant or active dry both work. Be sure it foams before adding more ingredients. |
| Honey | Swap for sugar (1:1) or maple syrup. |
| Flour | Bread flour makes it chewier. All-purpose keeps it softer. |
| Butter | Use neutral oil if needed, but cool melted butter gives the best taste. |
| Salt | Use fine sea salt. If using table salt, use slightly less. |

How To Make White Bread Recipe
- Start Yeast: Warm milk, mix with yeast and honey, and wait until it bubbles.
- Make Dough: Add flour, salt, and melted butter to the yeast mix. Stir into dough.
- Knead: Knead until smooth and stretchy, about 8-10 mins.
- Let Rise: Cover dough and let it sit in a warm spot until it doubles, about 1 hour.
- Shape: Push down dough, shape into a loaf, and put in a greased pan.
- Rise Again: Let it sit again until puffy, about 30 minutes. Bake until golden.
- Cool Down: Let it cool before cutting. Add some apple or honey butter and enjoy.

What’s Proofing All About?
Proofing is when the bread rises. White Bread rises twice: first after kneading and then after shaping it into a loaf.
- The first rise helps yeast and gluten work, while the second rise makes the loaf taller and airy.
- Letting the dough rise too long can cause odd flavors, an odd-shaped crust, holes, and a poor texture. Not letting it rise enough can make the bread heavy, dry, and not rise well.
- To make Overnight White Bread, let it rise in the fridge for around 12 hours. More details here!
Quick Tip
Once you’ve mastered making this soft White Bread recipe, try this Honey Whole Wheat Bread or Dinner Rolls!

What Bread Pan To Use
I’ve tested this white bread recipe in both 8.5 x 4.5-inch and 9 x 5-inch loaf pans.
For more shape and height (like you’d see in a classic American white bread recipe) use the 8.5 x 4.5-inch pan.

chelsea’s recipe tip
My Top White Bread Recipe Tips
- Flour: Start with 1/2 cup less than the recipe says. Add more slowly until the dough pulls away from the bowl and feels slightly sticky, not wet. Scoop flour into the cup with a spoon and level it off. Don’t pack it.
- Kneading Surface: Don’t add more flour. Use cooking spray on your hands and counter. A dough scraper can help with sticky spots.
- Kitchen Temp: Keep it between 65°F and 75°F to help the yeast rise.
- Kneading Check: The dough should feel smooth, a little sticky, and soft.

Storage
- This White Bread Recipe doesn’t last as long as store-bought but at my house it doesn’t last long anyways!
- Room Temp: Store in a cool, dry spot for 3-5 days in an airtight bag. Avoid heat, humidity, and the fridge—it dries out faster.
- Freezer: Freeze leftover slices for up to 3 months. Toast directly from the freezer or thaw at room temperature for amazing white toast!

Ways To Use Homemade White Bread:

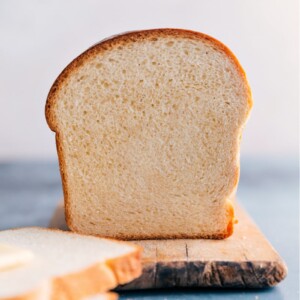
White Bread
Video
Equipment
- 2 8.5 x 4.5-inch bread pan or 2 (9 x 5-inch) bread pans
Ingredients
- Cooking spray olive or coconut oil
- 2 cups warm milk see note 1
- 1 tablespoon active dry yeast or instant yeast, see note 2
- 1/2 cup honey
- 6-1/2 cups all-purpose flour or bread flour, divided, see note 3
- 1 tablespoon salt see note 4
- 6 tablespoons unsalted butter melted and cooled
- 1 teaspoon granulated sugar optional
- 2 tablespoons butter optional
Instructions
- If using instant yeast: In the bowl of a stand mixer, add the warm milk (see note 5; if it is too hot, it will burn the yeast). Add instant yeast and 1 teaspoon white sugar (optional) directly on top and stir to combine. Let stand 3 minutes. Skip to step 3.
- If using active dry yeast: In the bowl of a stand mixer, add the warm milk (see note 5; if it is too hot, it will burn the yeast). Sprinkle active dry yeast over the milk and the sugar (if using). Stir, then let stand 5–10 minutes or until yeast is foamy. If yeast doesn’t foam up, it is dead (either bad yeast or too hot of milk). You’ll want to dump everything out and start again; otherwise the bread won’t develop properly.
- Pour in honey and 2 cups (260g) flour. Use the beater blade to stir just until the flour is moistened, about 1 minute, scraping the sides with a spatula as needed. Let mixture sit undisturbed 10 minutes.
- As the mixture sits, melt 6 tablespoons butter in the microwave. Let butter cool to room temperature (it’s important it’s not even warm!), then stir in 1 tablespoon salt. Set aside.
- Once dough has sat 10 minutes, add in melted and cooled butter/salt mixture (use a spatula to scrape every bit into the stand mixer). Add 4 more cups (495g) flour (see note 6). Swap to a dough hook. Stir on low speed (speed 2) until mixture is all combined and begins to gather around the dough hook (about 2–3 minutes). If dough is sticking to the sides, gradually add in remaining 1/2 cup (60g) flour. You can continue to add a little more flour, up to 1 tablespoon at a time, but avoid adding too much extra flour unless it really is too sticky (still sticking on edges of bowl instead of collecting around dough hook).
- Once dough has gathered around dough hook, increase speed to medium (speed 4–6) and mix 10 minutes. Don’t go too far; your stand mixer might dance off the table. (If you don’t have a stand mixer, you can knead the dough by hand for about 10–12 minutes). We are looking for a dough that is smooth, satiny, soft, and tacky to the touch (but not sticky or dry).
- Once dough has been kneaded, place it on a clean work surface. Knead with your hands for about 20 seconds to shape it into a large even ball. Generously grease the mixing bowl with coconut or olive-oil-based spray. Place dough in the bowl and turn it to coat in the oil. Cover dough with a damp cloth and place bowl in a warm place (~70℉) to rise until it doubles in size, about 1 hour.
- Remove damp cloth and punch into the dough to release the air. Divide the dough into 2 equal parts (I recommend a food scale to make sure you’ve got the same amount of dough in each half). Shape dough into two loaves (see note 7) and place in greased 8.5×4.5-inch bread pans (see note 8). Cover pans with a damp cloth and let them rise in a warm place for another hour or until about doubled in size. Do not let bread rise longer than needed; this will cause the bread to develop a yeasty taste.
- Bake at 375℉ 32–40 minutes (see note 9). Right out of the oven, optionally rub remaining 2 tablespoons butter on the tops of the loaves. Let bread cool in the pan 10 minutes. Then transfer to a wire cooling rack and let cool for at least 30 minutes before slicing. (The bread is still cooking even out of the oven.) Slice and serve.
Recipe Notes
Nutrition
Nutrition information is automatically calculated, so should only be used as an approximation.