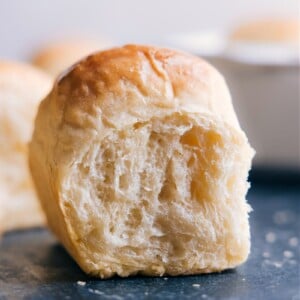
Life-Changing No-Knead Dinner Rolls

This post may contain affiliate links. Please read my disclosure policy.

Our favorite Life-Changing No-Knead Dinner Rolls are made easy with no stand mixer, no hand mixer, and no kneading required! These rolls rise high with big soft centers and perfectly crisp edges. Yes, really, these rolls are life-changing!

If you’ve never made homemade rolls before, don’t worry – I’ll walk you through each step with lots of detail. Plus, I’ll provide all the tips and tricks I’ve picked up over the years.

Image of a Life-Changing No-Knead Dinner Roll, ready to be enjoyed

Why You Need This Dinner Roll Recipe In Your Life

These are the best Dinner Rolls! They’re ridiculously big, ultra soft, wonderfully flavorful, and perfectly buttery. Nothing is better than one of these rolls right out of the oven, slathered with butter (or Honey Butter) and jam!

And while taste always reigns supreme in my recipe creation, these also happen to be the easiest rolls to make. This No-Knead Bread recipe is consistently made more than any other bread at my home because it is just so simple! I wanted to create a siimilar recipe, but with rolls.

So let’s break down the magic of these dinner rolls:

  • Minimal ingredients are needed — in fact, only seven total ingredients!
  • No stand or hand mixer needed
  • The dough is fully mixed by hand with just a spatula (yes, really!).
  • No kneading required
  • Rolls can be made ahead of time and baked when needed or prepared the same day

Below are step-by-step photos and detailed instructions, so you can make these dinner rolls — even if you don’t have much baking experience. If you get a chance to try these, let me know what you think in the comment section!

Process shots-- images of the butter, yeast, and honey being added to a bowl with warm water

How to make Dinner Rolls

Step One: Warm the water and proof the yeast.

  • Warm the water to 105 – 115 degrees F. 
  • Next, we proof the yeast, which means that we activate it. To do this, pour the warm water over the yeast and honey and let it stand for 5-10 minutes.
  • Activated yeast will have a bubbly foam on the surface. If you don’t get the foamy yeast, you’ll need to start again or you’ll end up with dense homemade dinner rolls. The two most common reasons for the yeast not activating are old/bad yeast, or the water being too hot. 

QUICK TIP

Why do they call it ‘proofing’ the yeast? Just think about it: Yeast that doesn’t rise won’t make good bread. So, when you put the water, honey, and yeast together, you’re proving that it’s all fresh. And that’s proof! To be grammatically correct, we should probably call this process ‘proving’ instead of ‘proofing!’

Step Two: Combine Ingredients

  • In a separate bowl, whisk together melted (but not hot) butter, eggs, and remaining honey.
  • In a separate very large bowl, combine flour and salt. Make a well in the center and pour in the butter mixture and then the egg mixture. Use a spatula to scrape every bit of these two mixtures into the flour.
  • Use a strong, sturdy spatula to mix everything together to get a thick, shaggy dough. No kneading! (Shaggy dough? That’s another way of saying dough isn’t smooth and soft. There will be chunks hanging off and an uneven texture. Don’t worry; the shaggy dough will turn into wonderful rolls! See the photos later in this blog post.)

Process shots of Life-Changing No-Knead Dinner Rolls-- images of the honey, eggs, melted butter, flour, and salt all being added to a bowl

Step Three: Let the dough rise.

  • Cover dough and let rise until doubled– about 1½ to 2 hours— in a warm, draft-free environment.
  • The ideal rise temperature is 70 degrees Fahrenheit. Higher temperatures might kill the yeast and keep the dough from rising while lower temperatures will slow the yeast activity (which will increase rise time).

QUICK TIP

While dinner rolls will develop a better flavor the longer they have to rise, there are a few ways to speed up the rising process. The dough will rise faster in a warm (not hot!) environment. Either put the rising dough in front of a fireplace on low heat or heat your oven to 170 degrees F, turn it off, place the bowl of dough on the oven rack, and keep the oven open just a crack.

Process shots-- images of the dough being covered and allowed to rise

Step Four: Shape Dinner Rolls and let the dough rise again.

  • Once the dough is about three times the initial size, transfer it to a clean, lightly floured work surface. Shape it into a rectangular log. 
  • Cut the log into four equal pieces and each piece into thirds (for a total of 12 dough pieces).
  • Take each piece and pull top to bottom pinching the bottom underneath. Roll each piece on the work surface, shaping with your other hand.
  • Place shaped rolls in a greased 9×13-inch pan and let rise for about 30-45 minutes
  • Near the end of the rise time, preheat the oven to 350 degrees F.

Step Five: Bake and enjoy!

  • Bake the dinner rolls!
  • Using a pastry brush, rub some melted butter over the tops of the rolls as they come out of the oven. 
  • And….enjoy every single bite! This amazing dinner roll recipe is intended to be served warm, right out of the oven!

Process shots-- images of how each dough roll is formed

Dinner Rolls FAQs

1What is the point of dinner rolls?

Dinner rolls are a type of bread that is prepared as a small, individual-sized “loaf” to accompany a meal as a side.

Their original purpose traces back to being an easily passed dinner food!

2What is different about dinner rolls?

There can be lots of variations in dinner rolls from being crusty to soft, chewy or dense, different flours, etc.

That said, typically a classic dinner roll is puffy with a soft crumb, soft crust, and a subtle butter flavor. Classic dinner rolls are typically made with white, all-purpose flour.

3How do you dress up dinner rolls?

Looking to jazz up the rolls a little? Try one of the following:

  • Brush baked rolls with butter then sprinkle with finely chopped fresh herbs (think thyme, parsley, oregano, rosemary).
  • Add a really great butter and jam.
  • Brush baked rolls with butter then sprinkle with sea salt flakes.

4Why are my dinner rolls not light and fluffy?

A few possible culprits:

  • inactive/dead yeast
  • too much flour
  • not enough proofing (rising) time

5What are some types of roll shapes?

There are many ways to shape rolls; three of the most popular ways:

  1. Single Knot Rolls
  2. Butterfly Rolls
  3. Crescent Rolls

(This recipe does best as a standard round roll and isn’t intended for shaping!)

6How do you serve dinner rolls?

  • Enjoy ’em warm! My kids would tell you: eat the whole pan in 10 minutes! It’s impressive how quickly they can down these! And honestly, rolls are best the same day they’re made anyways. 🙂
  • Serve them alongside a meal. These rolls are spectacular alongside this Vegetable Pasta and a big Caesar Salad!
  • Make a quick dinner melt. Use leftover rolls for these Tuna Melts or Chicken Melts. Any open-faced sandwich is great with leftover rolls (just be sure to toast/broil them first!) to create sliders.
  • Re-purpose stale leftovers. If you have leftovers that have become stale or hard, use them in a Bread Pudding Recipe or French Toast casserole, or make homemade croutons or breadcrumbs.

Process shots-- images of the rolls rising in the pan

VARIATIONS

As written, there is a very subtle sweetness in these rolls from the honey added in. And especially if you add jam on a roll — they’re plenty sweet! That said, if you want to make a sweet soft dinner rolls recipe, add a few tablespoons of sugar to the flour mixture.

Up-close overhead image of Life-Changing No-Knead Dinner Rolls

STORAGE

Storing Dinner Rolls

These rolls are definitely best the same day they’re made, as is true with most home-baked yeast bread.

It’s important that the rolls are fully cooled before being stored. Place rolls on a cooling rack and leave them at room temp for about an hour. When they’re fully cooled, you can store them. Wrap individually or store in a large airtight bag. Store at room temperature. (Cool air from the fridge will make them go stale quicker.)

How to freeze the dinner rolls: Let them fully cool before wrapping them all together in foil. Place foil-wrapped rolls in an airtight bag and freeze. To thaw frozen dinner rolls: Remove rolls the night before, letting them thaw at room temperature overnight. Loosen the foil and then re-warm (in foil) for about 10 minutes in a 300-degree F oven. Serve immediately while warm (they dry out as they cool).

Heads-up: Dinner rolls do lose texture and flavor the next day or after being frozen and thawed.

What To Serve With Dinner Rolls

Any sauce that needs dunking or sopping up is begging for a good dinner roll! Serve these soft dinner rolls alongside some of our favorite hearty dinners: Shepherd’s Pie, Crock Pot Roast, or Spaghetti Bolognese. Or use them to dunk in a favorite soup recipe: Broccoli Cheddar Soup, Creamy Vegetable Soup, or this Tortellini Soup.

 Below are some of my other favorites:

Overhead image of the dinner rolls in the pan ready to be enjoyed

QUICK TIP

Because this is a bit of a unique/untraditional dinner roll recipe, we recommend watching the quick video tutorial and giving the recipe a quick read before starting!

FOLLOW ALONG! Subscribe to my newsletter and follow along on Facebook, Pinterest and Instagram for the latest updates, recipes and content.

Dinner Rolls

5 from 5 votes
Our favorite Life-Changing No-Knead Dinner Rolls are made easy with no stand mixer, no hand mixers, and no kneading required! These rolls rise high with big soft centers and perfectly crisp edges. Yes, really, these rolls are life-changing!
Print Recipe

Dinner Rolls

5 from 5 votes
Our favorite Life-Changing No-Knead Dinner Rolls are made easy with no stand mixer, no hand mixers, and no kneading required! These rolls rise high with big soft centers and perfectly crisp edges. Yes, really, these rolls are life-changing!
Course Appetizer, Bread, Side Dish
Cuisine American, Vegetarian
Keyword dinner rolls, dinner rolls recipe
Prep Time 15 minutes
Cook Time 45 minutes
Rising Time 2 hours
Total Time 3 hours
Servings 12 rolls
Chelsea Lords
Calories 400kcal
Cost $4.12

Ingredients

  • 5 tablespoons unsalted butter, divided
  • 3 teaspoons instant yeast (or active dry --see Note 1)
  • 3 tablespoons honey, separated
  • 1½ cups warm water
  • 2 large eggs
  • 4½ cups (615g) white, all-purpose flour, plus more for shaping rolls
  • 2 teaspoons fine sea salt

Instructions

  • BUTTER: In the microwave, melt 4 tablespoons butter in a medium-sized microwave-safe bowl and set aside to come to room temperature.
  • YEAST: Meanwhile, in a medium-sized bowl add 3 teaspoons yeast and 1 tbsp. honey. Pour 1½ cups warm water over (Note 2). Whisk and let sit for 5-10 minutes (It should look creamy/foamy after 5 minutes (see photo). If not, the yeast is either dead or the water was too hot and you'll need to begin again or rolls won't rise.
  • BUTTER: To the melted butter bowl, add the remaining 2 tbsp. honey and 2 large eggs. Whisk until smooth and completely combined.
  • FLOUR AND SALT: In a very large bowl add 4½ cups flour (weighing 615 grams if you have a scale!) and 2 tsp salt. Whisk. Make room in the center to add wet ingredients. Use a spatula to scrape every bit of the butter mixture and then the yeast mixture into the middle of the flour. Stir with a strong rubber spatula until a thick, shaggy dough forms with no dry streaks of flour (see photo -- it is sticky/wet). Cover with plastic wrap.
  • Two options for how to proceed:
    MAKE ROLLS TODAY: Let dough rise in a draft-free environment (~70 degrees F) for 90-120 minutes or until nearly tripled in size. (This is always 90 minutes at my home).
    MAKE ROLLS TOMORROW: Let dough rise in a draft-free environment (~70 degrees F) for 30 minutes. Then place on the bottom shelf of a fridge and refrigerate for 8 hours up to 12 hours (no longer). Remove and let stand at room temperature for 30 minutes or until dough is about 3 times the initial size.
  • SHAPE ROLLS: Spray a 9x13-inch pan generously with cooking spray.
    Sprinkle a large clean work surface with flour then tap all your fingers in flour. Dip a spatula in the flour. Use the flour-dusted spatula to scrape all the dough onto the floured surface. Sprinkle flour on top and then shape dough into an even-sized rectangular log. Cut into 4 equal pieces (just eyeball it!) and then each piece into 3 more pieces. (You will have 12 balls of dough.) Dust fingers and knife liberally as needed with more flour so the dough doesn't stick.
  • SHAPE ROLLS, CONT.: Working with one piece of dough at a time, use your fingers to pull the dough from the top, keeping a smooth top, and pinching it underneath. Place the pinched side on the work surface and gently roll the ball using your other hand to guide it into a round ball (the video is helpful here). Set shaped balls into prepared pan. Repeat with remaining dough balls to get a tray filled with 4 rows of 3 rolls each. Lightly spray plastic wrap with cooking spray and set over rolls. Let rise for 20-30 (up to 45) minutes or until nearly doubled in size.
  • BAKE: While rolls are rising, preheat the oven to 350 degrees F. Once the rolls have risen, remove plastic wrap and bake for 45-50 minutes or until the surface is golden brown and the rolls sound hollow when tapped. Remove from the oven and brush on the remaining 1 tablespoon of butter.
  • ENJOY: Let slightly cool and then dig in! Rolls are best served same day, warm.

Video

Recipe Notes

Note 1: Yeast: Instant yeast is best here, but you can use active dry. Just note that rise times are typically a bit longer with active dry yeast.
Note 2: Water temperature: Drizzle a few drops of the warmed water onto the inside of your wrist. If it is warm and comfy for you, it will be perfect for the yeast. If it is not warm and instead feels hot, it will be too hot for the yeast. Too cold and the yeast will simply remain dormant.
Note 3: Storage: These rolls are best the same day they're made. It's important that the rolls are fully cooled before being stored. Place rolls on a cooling rack and leave them at room temperature for about an hour. When they're fully cooled, you can store them. Wrap individually or store in a large, airtight bag. Store at room temperature (cool air from the fridge will make them go stale quicker).
Note 4: How to freeze dinner rolls: Let rolls fully cool before wrapping them all together in foil. Place foil-wrapped rolls in an airtight bag and freeze. To thaw frozen dinner rolls: remove rolls the night before, letting them thaw at room temperature overnight. Loosen foil and then re-warm (in foil) for about 10 minutes in a 300-degree F oven. Serve immediately while warm (they dry out as they cool). Heads-up: Dinner rolls do lose texture and flavor the next day or after being frozen and thawed.

Nutrition Facts

Serving: 1serving | Calories: 400kcal | Carbohydrates: 72g | Protein: 11g | Fat: 7g | Saturated Fat: 3g | Polyunsaturated Fat: 1g | Monounsaturated Fat: 2g | Trans Fat: 0.2g | Cholesterol: 44mg | Sodium: 405mg | Potassium: 148mg | Fiber: 3g | Sugar: 3g | Vitamin A: 191IU | Vitamin C: 0.01mg | Calcium: 27mg | Iron: 4mg

We do our best to provide accurate nutritional analysis for our recipes. Our nutritional data is calculated using a third-party algorithm and may vary, based on individual cooking styles, measurements, and ingredient sizes. Please use this information for comparison purposes and consult a health professional for nutrition guidance as needed.

DID YOU MAKE THIS RECIPE?

I love hearing from you when you've made one of my recipes! Tag me on Instagram at @ChelseasMessyApron or leave me a comment below.

FREE BONUS

FREE BONUS

EASY MEAL SECRETS:
How to Make Mealtime Hassle Free!

5 secrets to easy, fast and delicious dinners.

[gravityform id="2" title="false" description="false"]

Leave a Comment:

Your email address will not be published. Required fields are marked *

Recipe Rating


12 Comments

    1. Let rolls fully cool before wrapping them all together in foil. Place foil-wrapped rolls in an airtight bag and freeze. To thaw frozen dinner rolls: remove rolls the night before, letting them thaw at room temperature overnight. Loosen foil and then re-warm (in foil) for about 10 minutes in a 300-degree F oven. Serve immediately while warm (they dry out as they cool). Heads-up: Dinner rolls do lose texture and flavor the next day or after being frozen and thawed.

  1. I’ll have my oven set for 350 for Thanksgiving. Can these bake at 350 if they stay in a bit longer? Will that cause any issues?

  2. In the description above the recipe you talk about warming milk, but the actual recipe calls for warm water. Is one better than the other? Obviously milk (except skim) has more flavor/fat than water, but which one were you intending to use for this recipe?
    Thank you.

  3. The ingredients list does not list honey, but the instructions talk about honey. What is the measurement of honey needed?

  4. Maybe consider amending the recipe to call for 4 tablespoons of butter, not 5. This recipe requires a lot of reading and it is very easy to forget that you do not need all 5 tablespoons of butter for the recipe.

  5. 5 stars
    These were my first ever dinner rolls, and they exceeded my expectations in every way! Easy, fluffy, perfectly browned, and delicious! Thank you for sharing your tips and tricks for this newby to succeed! I’m hooked now. Love these!!!!

Never Miss a Recipe

[gravityform id="3" title="false" description="false"]