These Pretzel Bites are unbelievably good! Brush ’em with butter and sprinkle with coarse salt or enjoy them dipped in cinnamon sugar! Dip salted pretzels in an easy cheese sauce or cinnamon sugar pretzels in a cream cheese glaze.

Overhead image of the Pretzel Bites

Our Favorite Pretzel Bites

I blame my younger sister for my family’s complete obsession with soft pretzel bites! Her favorite treat is Auntie Anne’s® pretzel bites (or cinnamon pretzel bites) and she got my kiddos hooked on them this past summer. She took them on a few outings to a nearby mall that recently finished building a new play place. Each time they went, she got them a batch (or two) of pretzel bites. And now, they constantly ask ME to go to the mall but only for the pretzel bites — they could care less about the play place, ha!

In my attempt to save some driving time and those high sticker prices, I’ve created and refined our ideal Pretzel Bites recipe. These bites are soft inside with a crisp exterior — they practically melt in your mouth! They’re perfectly buttery and salted and completely irresistible when dipped in the cheese sauce! No need to get restaurant pretzel bites–nothing beats homemade!

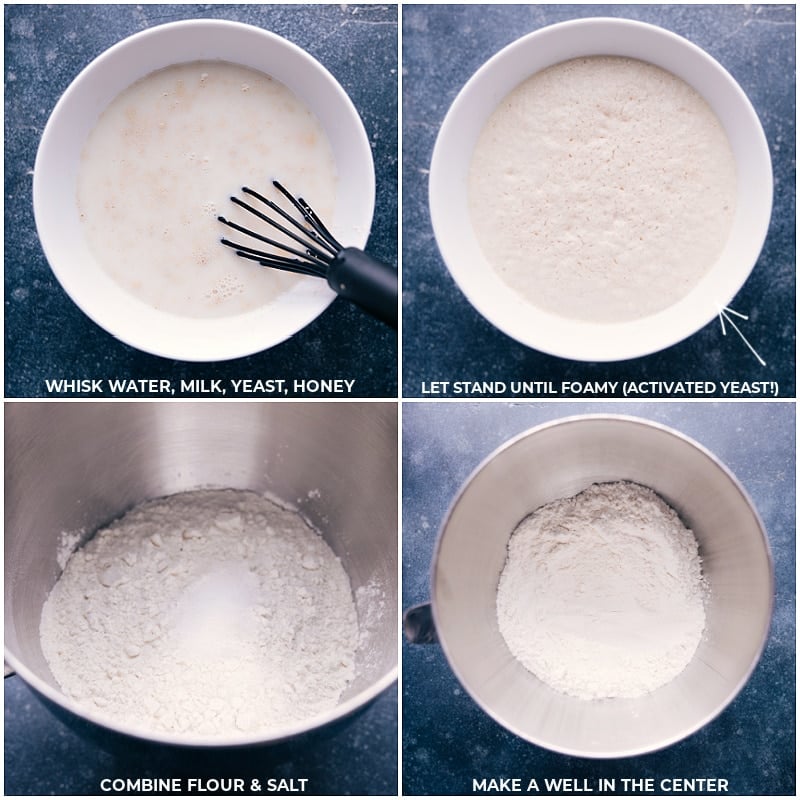
Process shots-- images of the water, milk, yeast, and honey being added to a bowl and rising; then flour and salt being added

What are Pretzel Bites Made Of?

Pretzel bites only require 8 main ingredients — yeast, flour, salt, butter, honey, milk, water, and baking soda.

Most of these ingredients you probably already have on hand (especially if you like making yeasted breads like French Bread, White Bread, or Honey Whole Wheat Bread from scratch).

Here’s a quick breakdown:

  • Milk: We recommend whole milk, but 1% or 2% will also work. Avoid skim or plant-based milks — neither will deliver the richness we’re looking for.
  • Water: Warm, not hot, water works best. Drizzle a few drops of the warmed water onto the inside of your wrist. If it is warm and comfy for you, it will be perfect for the yeast.
  • Honey: We love the subtle sweetness the honey delivers to these bites — not too much is needed, so don’t skimp here!
  • Yeast: Both instant and active dry will work, but active dry can make the rise time a bit longer.
  • Flour: We’ve tested this recipe with both all-purpose and bread flour. While either works, bread flour is the hands-down winner. Bread flour has a higher protein content which yields a superior chewier texture.
  • Salt: We add some salt to the dough then some to top the pretzels with later.
  • Butter: Again, some goes in the dough and then some is brushed on top! Use unsalted butter to perfectly control the amount of salt in these Pretzel Bites.
  • Baking soda: We mix baking soda with boiling water to create a “bath” for the Pretzel Bites.

Process shots of Pretzel Bites-- images of the butter and yeast mixture being whisked together

How To Make Pretzel Bites

A great thing about Pretzel Bites is that they only require one rise! These bites come together nice and easy with a few kitchen tools (But don’t worry, they’ll still work without this suggested equipment!):

  • Dough scraper and/or a sturdy rubber spatula are great for scraping the sides and transferring dough from surface to bowl.
  • Silicone liners or Parchment paper is important for even browning –especially on the bottom crust. Be sure you’re using parchment paper– not foil or wax paper. Wax paper will melt in the oven! (We love these sheets of parchment paper for ease!)
  • stand mixer is invaluable when making Pretzel Bites!
  • We love these flour sack towels for covering the dough as it rises.
  • A flexible measuring tape helps ensure the dimensions of the dough are on track.

Step One: Warm the milk and water, then proof the yeast.

  • Warm the milk to 105 – 115 degrees F.
  • Next, we proof the yeast, which means that we activate it. To do this, pour warm milk and warm water together. Sprinkle on top the yeast and honey. Whisk together and let it stand for 5-10 minutes.
  • Activated yeast will have a bubbly foam on the surface. If you don’t get the foamy yeast, you’ll need to start again or you’ll end up with dense Pretzel Bites. The two most common reasons for the yeast not activating are old/bad yeast, or the milk/water being too hot. 

Quick Tip

Why do they call it ‘proofing’ the yeast? Just think about it: yeast that doesn’t rise won’t make good bread. So, when you put the milk, water, honey, and yeast together, you’re proving that it’s all fresh. And that’s proof! To be grammatically correct, we should probably call this process ‘proving’ instead of ‘proofing!’

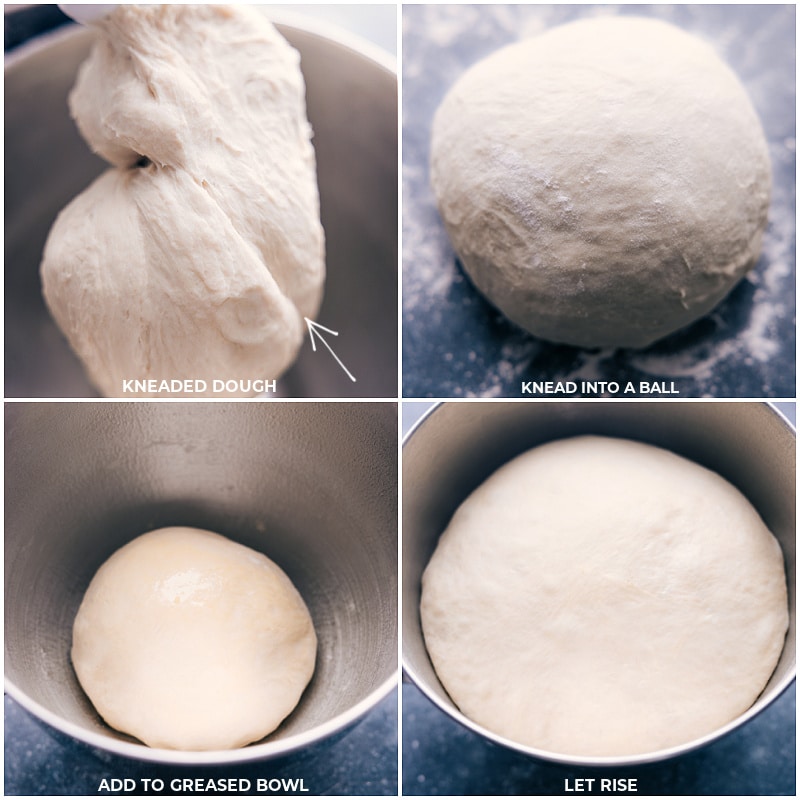
Process shots-- images of the dough being kneaded and risen

Step Two: Combine Ingredients

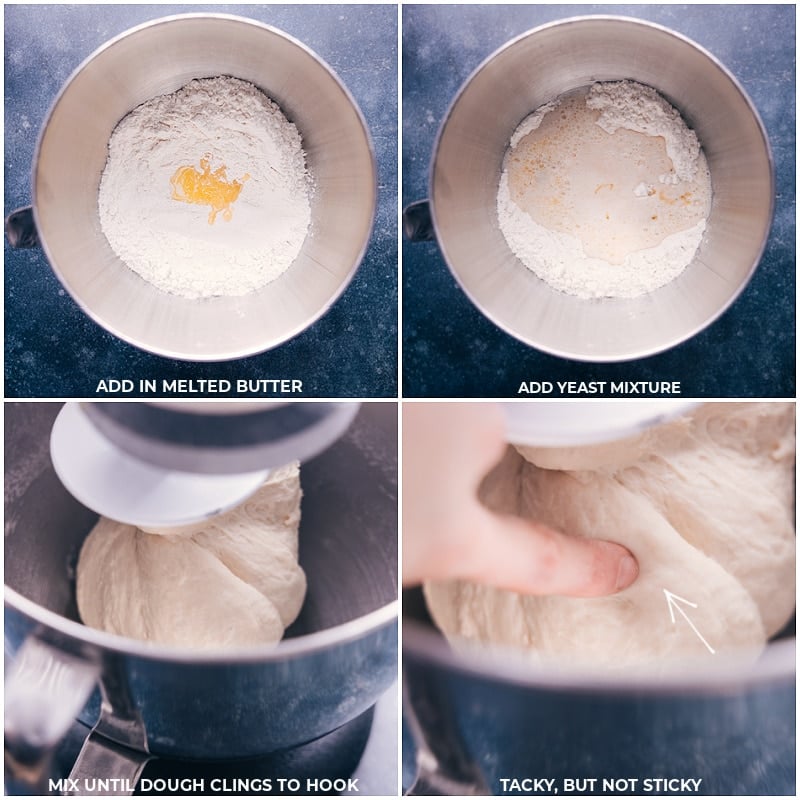
  • In a separate bowl (that attaches to a stand mixer), combine flour and salt. Make a well in the center and pour in the melted butter and then the yeast mixture. Use a spatula to scrape every bit of these two mixtures into the flour.
  • Mix until the dough gathers around the paddle attachment, adding extra flour if needed. It’s tricky to give an exact flour measurement for yeasted recipes as measuring flour can greatly vary from person to person, plus there are variations due to altitude and humidity. Watch for dough that is smooth and tacky. When you touch it, your finger should face a little resistance but shouldn’t stick in the dough. Add flour slowly– you can always add more, but you can’t take it away!

Quick Tip

We also tested this Pretzel Bites recipe using a hand mixer. While a bit more work, they’ll do the job!

Step Three: Let the dough rise.

  • Cover dough and let rise until doubled– about 1 and 1/2 hours— in a warm, draft-free environment.
  • The ideal rise temperature is 70 degrees Fahrenheit. Higher temperatures might kill the yeast and keep the dough from rising while lower temperatures will slow the yeast activity (which will increase rise time).

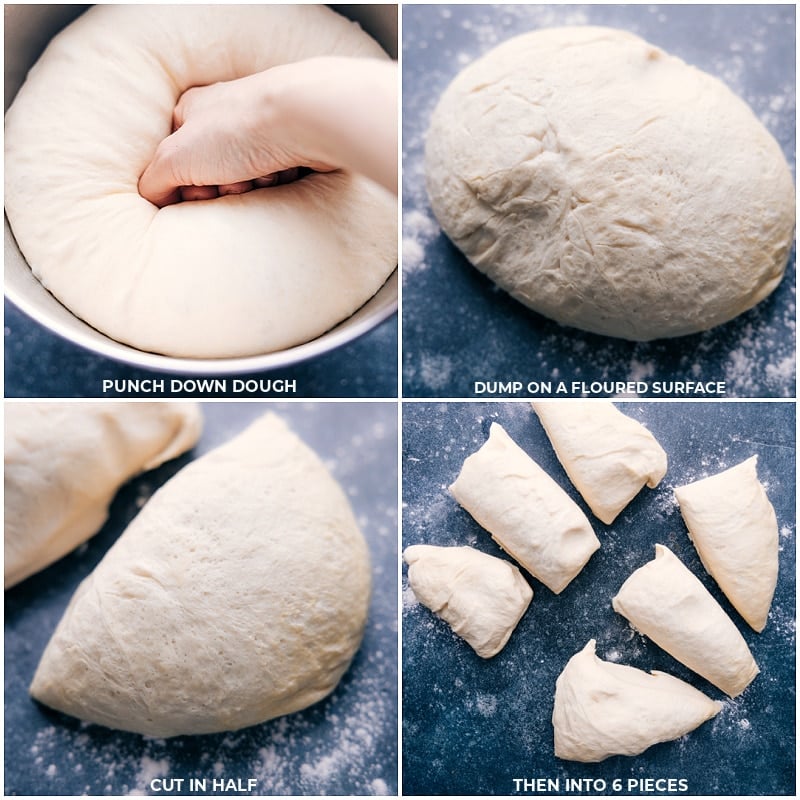
Process shots of Pretzel Bites-- images of the dough being cut up

Step Four: Roll out dough, cut out Pretzel Bites, add to a baking soda bath

  • Once the dough is risen, give it a nice punch to deflate all those air bubbles. Transfer dough to a lightly floured surface.
  • Cut the dough into 2 equal pieces and each piece into thirds (for a total of 6 dough pieces). Take out one piece of dough and cover all the rest with a towel.
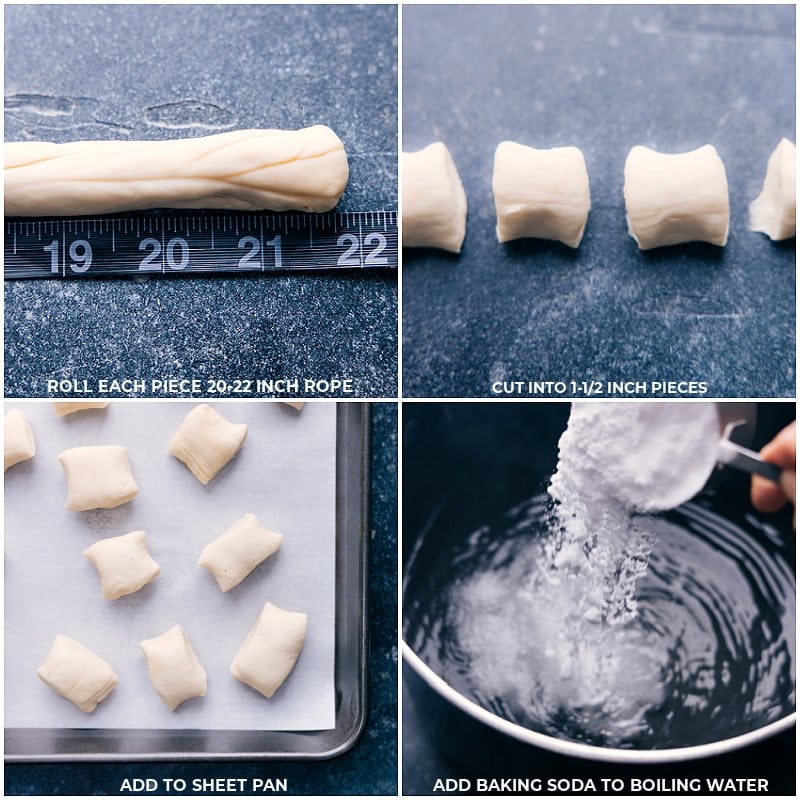
  • Working with one piece, roll it into a long snake-like rope, about 20-22 inches in length.
  • Cut the rope into it 1-1/2 inch pieces
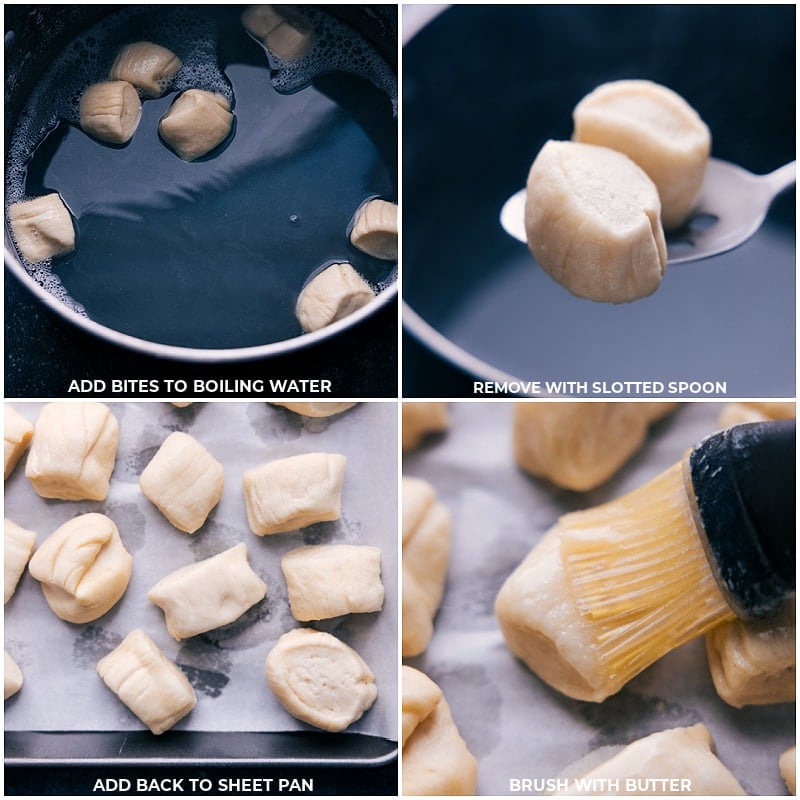
  • While cutting out the dough, bring a large pot of water to a boil. Mix in baking soda (see “quick tip” below) and then add in the bites. Just a quick “bath” in the water–too long and the dough will take on a metallic flavor.

Quick Tip

Why add dough to a baking soda bath? The baking soda water enables the pretzels to develop their distinctive color and texture (crispy on the outside and chewy on the inside).

Step Five: Butter, salt, bake, and enjoy!

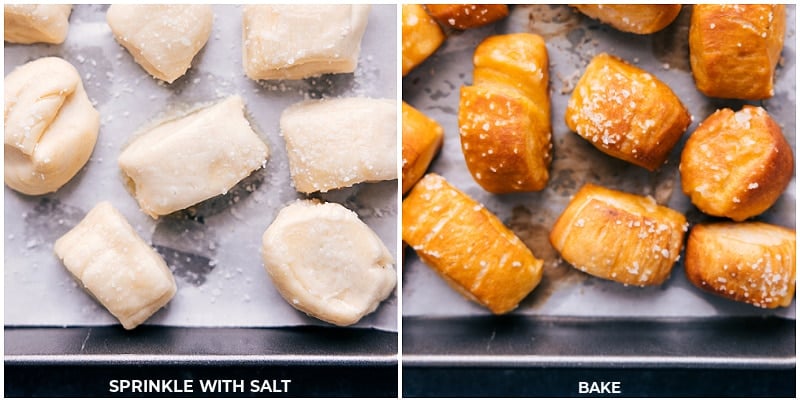
  • Once the pretzel bites have been removed from the baking soda bath, use a pastry brush to rub melted butter on top. Sprinkle with coarse sea salt and bake!
  • And then….enjoy every single bite! These Pretzel Bites are at their very best served warm, right out of the oven!

Process shots-- images of the dough being cut and added to the baking soda and boiling water

We’re sharing two Pretzel Bites recipes — buttery and salted with a cheese sauce OR buttery and sprinkled in cinnamon sugar with a cream cheese glaze.

Pretzel Bites Toppings

  • Brush on melted butter and sprinkle with “pretzel salt” or coarse salt. Pretzel salt is also known as coarse food grade salt — sometimes called bagel salt, kosher salt, coarse sea salt. We’re looking for coarse large-grained white salt that is uniform in size without additives. This ensures the salt will stick nicely to the pretzels, adding that classic salted topping.
  • Brush on melted butter and dip in cinnamon sugar. For cinnamon sugar pretzels, bake the bites without the butter or salt. Right out of the oven, brush butter on the bites (don’t dip or dredge them!) then dredge in the cinnamon-sugar mixture.

Process shots of Pretzel Bites-- images of the dough being transferred from the boiling water to a tray and being covered in butter

Pretzel Bite Dips

  • Cheese sauce. If making the buttery-salted pretzels, you’ll love them with the cheese sauce! This sauce is very mild, but you can kick it up a notch by adding in some hot sauce or cayenne pepper for a spiced cheese sauce. It’s similar to our favorite Queso Dip recipe, where we use evaporated milk which delivers the best possible results. Evaporated milk has 60% of the water removed, so it will deliver a more flavorful and creamy cheese sauce with less chance of dip separation.
  • Cream cheese sauce. If making the cinnamon-sugar pretzels, nothing beats this dipping sauce! It’s reminiscent of Cream Cheese Frosting delivering a Cinnamon Roll-esque treat when paired with the cinnamon-sugar coated pretzels. Use leftover cream cheese and butter from this sauce to make the frosting that coats this Cinnamon Roll Cake.

Overhead image of the Pretzel Bites being baked

Pretzel Bites FAQs

What goes well with Pretzel Bites?

These Pretzel Bites are great as an appetizer, treat, or snack. All you need is a good dipping sauce!

If you’re throwing a party, Pretzel Bites go well with other appetizers like Totchos, chips and Salsa, or sliders (Monte Cristo SlidersCuban Sliders, or Ham and Cheese Sliders).

How do you get salt to stick to pretzels?

Brush with melted butter before baking and immediately add the salt. This will ensure the salt sticks.

What makes a good pretzel?

The key to delicious pretzels is dipping the dough in a baking soda bath before baking. Without it, the pretzels turn into dense rolls that don’t taste like pretzels.

Up close overhead image of the snack

Storage

How Long Do Pretzel Bites Last?

Pretzels are definitely best the same day they’re made, and very best when they’re still warm. (As is true with most home-baked yeasted recipes.)

It’s important that the pretzels are fully cooled before being stored. Place them on a cooling rack and leave them at room temp until fully cooled. Then, you can store them together in a large airtight bag. Store at room temperature for 3 up to 5 days. (Cool air from the fridge will make them go stale quicker.)

Heads-up: Pretzel Bites lose texture and flavor the next day. Reheat in the oven, microwave, or air fryer the next day to crisp up a bit. To reheat, microwave for a few seconds or bake in a 350 degrees F oven for 5 minutes.

Image of the pretzel bites being dipped in cheese sauce

Use Leftover Yeast In One Of These Recipes:

5 from 2 votes

Pretzel Bites

These Pretzel Bites are unbelievably good! Brush 'em with butter and sprinkle with coarse salt or enjoy them dipped in cinnamon sugar! Dip salted pretzels in an easy cheese sauce or cinnamon sugar pretzels in a cream cheese glaze.
Prep Time: 45 minutes
Cook Time: 15 minutes
Resting Time: 1 hour 30 minutes
Total Time: 2 hours 30 minutes
Servings: 45 pretzel bites

Ingredients  

  • 1 cup warm water
  • 1/2 cup warm milk (whole milk recommended)
  • 2-1/4 teaspoons instant yeast (or use active dry -- See Note 1)
  • 2 tablespoons honey
  • 5-7 tablespoons unsalted butter, separated
  • 1 teaspoon fine sea salt
  • 3 up to 4 cups bread flour, plus more for dusting surface (See Note 2) (450-500g)

Baking Soda Bath

  • 8 cups water
  • 1/4 cup baking soda
  • Coarse salt, for topping (or make cinnamon-sugar pretzels with cream cheese sauce -- See Note 3)
  • Optional, for serving: cheese sauce (See Note 4)

Instructions 

  • QUICK TIP: It may be helpful to watch the tutorial video in this recipe post before starting!
    YEAST: In a medium bowl, whisk 1 cup warm water, 1/2 cup warm milk (Note 5), 2-1/4 tsp. yeast, and 2 tbsp honey and let sit 5-10 minutes. It should look creamy/foamy after 5 minutes (see photo). If not, your yeast failed and you'll need to begin again. (Either the yeast is dead or the water/milk was too hot.)
  • DOUGH: In the bowl of a stand mixer (or large bowl if you don't have a stand mixer) combine 3 cups bread flour and 1 tsp salt. Stir to combine then make a well in the middle of the bowl. Pour in the 1 tbsp melted and cooled butter. Then use a spatula to scrape every bit of the yeast mixture right on top. Attach paddle or dough hook and beat on low speed, scraping the sides as needed with a rubber spatula, until combined. Increase speed and if needed, (See Note 6) add in up to 3/4 cup more flour, adding 1/4 cup at a time until the dough comes together on the dough hook and pulls away from the sides of the bowl while mixing. After mixing for about 2 minutes, if the dough is still sticky (sticking to sides of the bowl instead of around hook) add the last 1/4 cup flour.
  • KNEAD AND RISE: Once dough is gathering around the hook, knead on low speed for 5 minutes or knead by hand on a lightly floured surface. Knead and shape dough into a ball. Spray a large bowl with oil cooking spray, turn the ball to coat in the oil then cover the bowl with a towel and let rise in a draft-free warm (70 degree F) environment for 1 hour 30 minutes or until doubled in size.
  • SHAPE PRETZEL BITES: Preheat the oven to 450 degrees F. Line an extra-large (15x21-inch) sheet pan (or 2 smaller pans) with silicone baking mats (preferred) or parchment paper (lightly grease with cooking spray). Set prepared pan(s) next to the dough. Punch down the dough and dump onto a lightly floured surface. Cut dough into 6 equal pieces (just eyeball it). Take one piece for now, covering the other 5 pieces with a towel. Use your hands to roll the piece into an even long rope, about 20-22 inches in length. Cut the rope into 1.5-inch pieces. Place pieces on prepared sheet pan. Repeat with remaining dough until all dough is cut into pieces.
  • BAKING SODA: While cutting out the last 3 ropes, bring 8 cups water in a large pot to a boil. Once boiling, add in 1/4 cup baking soda and whisk until completely dissolved. Take 8 pretzel bites at a time in both hands and gently place (at the same time) in the boiling water. Count to 10 and then use a large slotted spoon to lift up the pretzel bites, tapping against edge of the pot to allow excess water to drip off. Place the bites back on the prepared baking sheet. Repeat until all bites have gone in the boiling water (if the water is getting foamy, reduce the heat). When returning bites to the baking sheet, make sure they are well spaced out, not overlapping, but they can be relatively close together (see picture).
  • BAKE: Melt 4 tablespoons butter and use a pastry brush to brush butter generously over all the pretzel bites (should use all or most of it). Sprinkle with coarse salt (about 1 tsp total) and bake for 12-18 minutes or until golden brown on top, lightly browned on bottom, and baked through. (If you don't bake the entire batch of pretzels at once, bake time will be quicker). Remove from the oven. Optional: for extra buttery bites, melt remaining 2 tablespoons butter and brush on bites right out of the oven, adding a touch more salt if desired. Serve warm.
  • STORAGE: Pretzels are best the same day theyโ€™re made, and very best when they're still warm. Cool fully before storing: place on a cooling rack and leave them at room temp until fully cooled then store in a large airtight bag for 3 up to 5 days. Reheat in the oven, microwave, or air fryer the next day to crisp up a bit. To reheat, microwave for a few seconds or bake in a 350 degrees F oven for 5 minutes. (Heads-up: each day of storing they lose more texture)

Video

Recipe Notes

Note 1: Yeast: We prefer using instant yeast, but active dry will work. Just note the rise time is typically longer!
Note 2: Bread flour: Bread flour has a higher protein content which delivers such a better chew and texture to these Pretzel Bites. You can use all-purpose flour, but they are slightly less pretzel-like.
Note 3: Cinnamon sugar: Bake the Pretzel Bites completely plain without butter or salt. While the pretzel bites bake, melt 4 tablespoons unsalted butter and set aside. In a separate bowl whisk together 3/4 cup granulated sugar and 2 teaspoons ground cinnamon. Once the pretzels are finished baking (and still warm) use a pastry brush to brush each with butter (don't dunk in butter) and then generously dip in the cinnamon sugar-- immediately transferring to a wire cooling rack. These are best served warm, they'll get soggy after a couple of hours. Here's our favorite cream cheese sauce: In a large bowl, using a hand mixer (or a stand mixer) whisk together 4 ounces softened cream cheese with 2 tablespoons butter until smooth. Add in 1 cup powdered sugar, a dash of vanilla, pinch of salt, and 2 tablespoons heavy whipping cream. Beat until smooth.
Note 4: Optional Cheese Sauce:
  • 1 tbsp unsalted butter
  • 1/2 tsp fine sea salt and paprika
  • 1/4 tsp pepper and garlic powder
  • 1 tbsp white flour
  • 1 can (12 oz.) evaporated milk
  • 2 cups sharp (or extra sharp) freshly grated Cheddar cheese (6 oz. cheese)
  • For more flavor/some heat: add in hot sauce or ground cayenne pepper (add slowly to taste)
In a small pot, over low heat, melt the butter. Once melted, whisk in salt, paprika, pepper, and garlic powder. Sprinkle in flour then whisk to combine. Cook for 1 minute. Increase heat to medium and add in evaporated milk very gradually while whisking constantly. Once combined, cook until thickened. Reduceย  to medium-low heat and add in the cheese. Switch to a wooden spoon and stir constantly until cheese is melted. (This takes a bit of time.) You may be tempted to increase the heat, but don't -- this is how you get a grainy dip. Once the cheese is fully melted, taste for seasoning and adjust. Dip will thicken and harden as it cools (just like any melted cheese-filled recipe). It's great right off the stovetop, but will get thicker and thicker the longer it stands. Keep it in dipping consistency by adding to a small crockpot or warmer.
Note 5: Water and milk temperature: I take 1/2 cup milk straight out of the fridge and pour into a bowl then get very hot tap water and mix the two together. Test and it should be perfectly warm. Drizzle a few drops of the warmed water onto the inside of your wrist. If it is warm and comfy for you, it will be perfect for the yeast. If it is not warm and instead feels hot, it will be too hot for the yeast. Too cold and the yeast will simply remain dormant.
Note 6: Flour: It's tricky to give an exact flour measurement for bread as measuring flour can greatly vary from person to person. Too little flour and the dough will be too wet/sticky; too much and the pretzels will be overly dense. If you have a food scale, I highly recommend pulling it out for the measurement. No food scale? Make sure to completelyย fill up the measuring cup then level the top off with the back of a table knife. Even still, the amount of flour you add to the dough can vary based on humidity, altitude, etc. so it's best to add flour gradually watching for these cues:
Flour visual cues:
  • Dough shouldย gather around the paddleย attachment instead of sticking to the sides of the bowl.
  • Dough will beย slightlyย sticky, but ultimatelyย smoothย andย tacky. When you touch it, your finger should face a little resistance but shouldn't stick in the dough.
  • Add flour slowly-- you can always add more, but you can't take it away!ย Resist the urge to add too much additional flour as this will take away from the softness of the dough.ย 

Nutrition

Serving: 1serving | Calories: 46kcal | Carbohydrates: 7g | Protein: 1g | Fat: 1g | Saturated Fat: 1g | Polyunsaturated Fat: 0.1g | Monounsaturated Fat: 0.4g | Trans Fat: 0.1g | Cholesterol: 4mg | Sodium: 238mg | Potassium: 15mg | Fiber: 0.2g | Sugar: 1g | Vitamin A: 43IU | Vitamin C: 0.01mg | Calcium: 7mg | Iron: 0.1mg

Nutrition information is automatically calculated, so should only be used as an approximation.
Meet Chelsea


Hi there! Iโ€™m Chelseaโ€“the recipe developer, photographer, writer, and taste tester behind Chelseaโ€™s Messy Apron (although my little ones help me out quite a bit with the taste testing part!). I LOVE getting creative in the kitchen and then posting my creations here for you to enjoy.

Thanks again for stopping by!

More Recipes You'll Love

5 from 2 votes (1 rating without comment)

Leave a comment

Your email address will not be published. Required fields are marked *

Recipe Rating


2 Comments

  1. Tina says:

    5 stars
    These are delicious!

    1. Chelsea says:

      Thanks so much! ๐Ÿ™‚