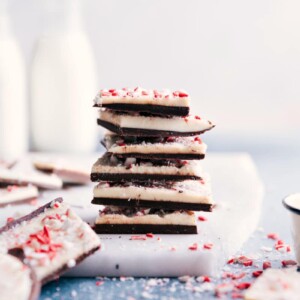
This is our favorite Peppermint Bark recipe, complete with three types of chocolate and crushed peppermint — do holiday treats get any better than this?!
Try some of our favorite peppermint goodies like these Peppermint Bark Pretzels, Peppermint Muddy Buddies, and Peppermint Bark Cookies!

My Favorite Peppermint Bark Recipe
In our home, Christmas celebrations can’t begin without a batch of Peppermint Bark — it’s our favorite holiday treat!
Growing up, December was a time to bake nonstop with Mom (these Carmelitas or 7 Layer Bars were the favorites), but we’d typically skip the candy making and grab a bag of Ghirardelli® peppermint bark.
After the last few years of getting my kiddos involved with candy making (they like this Buttercrunch Candy best while Toffee is my favorite), I decided it was time to skip the packaged peppermint bark and make our own!
Once you make your own, you can mix and match all sorts of chocolate, make it as pepperminty (or not) as you’d like, and break the pieces as big (or little). It’s true — nothing ever compares to homemade! 🙂
Why Do They Call It Peppermint Bark?
“Bark” typically refers to a layer of chocolate or hard candy with various things (candy, nuts, etc.) embedded in it. The result is a vague resemblance of a rough tree bark which is where the name is thought to have originated from.
So what is Peppermint Bark? A holiday chocolate confection that typically consists of a base layer of dark chocolate with white chocolate on top. Peppermint candy pieces are embedded on top.

Peppermint Bark Recipe Ingredients
When making this candy, the quality of the ingredients makes all the difference. To be successful in making the best Peppermint Bark that doesn’t separate, streak, discolor, or become crumbly, you’ll want to use high-quality baking bars. For this recipe we use:
- 2 white chocolate baking bars
- 1 semi-sweet baking bar
- 1 milk chocolate baking bar (or use 1 dark chocolate baking bar)
- Vegetable or coconut oil
- 3 candy canes

How To Crush Peppermint
Before starting on the bark, crush the peppermint so it’s ready to go!
Both candy canes and hard peppermint candies work. For peppermint bark, we want coarse, not fine crumbs/powder. The best way we’ve found to do this is to add the unwrapped candies to a large plastic bag (or two; the peppermint has a tendency to rip through plastic bags as it is crushed), seal the bag without air in it, and then crush with a rolling pin or meat mallet until coarse crumbs are formed. Using a blender or food processor can leave you with candy dust, and that’s not what we’re after.

How To Make Peppermint Bark
The full recipe card is below, but here are my top tips. With these tips and good ingredients, the foray into candy making should be seamless.
- The “secret” to managing the temperature of the chocolate: Once most of the chocolate in the bowl is melted, add in some unmelted chocolate bits. The heat from the melted chocolate will then melt this added chocolate while also lowering the heat of the chocolate all together. Why is this important? It keeps the chocolate is stable and gives it a smooth, glossy finish. This also keeps the bark from melting on your fingers and helps set it up beautifully! (For more info, check out the “quick tip” below.)
- Microwave the chopped chocolate in sturdy, heat–safe bowls instead of using plastic or melamine.
- To avoid scorching the chocolate, microwave for 15 seconds at a time, and stir for at least 15 seconds between each microwave burst. Remember, the chocolate is still melting from residual heat even after it has been removed from the microwave. When making homemade Peppermint Bark, it’s important the chocolate never gets too hot!

Quick Tip
Melting the chocolate slowly and stirring often helps create the right kind of sugar crystals, keeping the bark smooth without streaks. Adding a bit of unmelted chocolate at the end cools the mixture and helps it set properly, making it firm and smooth at room temperature.

Peppermint Bark FAQs
Can I Speed Up The Process By Refrigerating?
You might be tempted to put the pan in the fridge between layers but his can cool the chocolate too quickly, leading to a streaky appearance.
How Do You Cut Peppermint Bark?
To cut this white peppermint bark instead of breaking it, use a large, sharp knife. Heat the knife under hot water, dry it with a towel, and make a quick, firm cut. Repeat for each cut.
How Do You Keep Layered Peppermint Bark From Separating?
Several factors can cause separation:
1. Chocolate with palm kernel oil, often found in chips/morsels, can prevent layers from bonding.
2. Letting the first layer set too long before adding the second. Start the second layer as soon as the first is done!
3. Not allowing the finished bark to set long enough. The longer it sets, the less likely the layers will separate.
4. Breaking the bark before it reaches room temperature. If it’s too cold, it’s more likely to separate.
5. Chilling or refrigerating the bark.

Storage
Homemade Peppermint Bark Storage
Chocolate Peppermint Bark, when properly stored, is best eaten within two weeks Store in a tightly sealed container in a cool, dark place at room temperature. It does not need to be refrigerated.
More Christmas Treats
- Christmas Snack Mix with red and green M&M’s
- Christmas Oreo Pops decorated as a penguin, snowflake, reindeer, and a candy cane
- 3 Ingredient Christmas Cookies
- 6 Easy Christmas Gifts with free printables
- Santa Cookies with red and green M&M’s
Peppermint Bark Recipe
Ingredients
- 2-3 full-sized candy canes (about 1/3 cup when crushed)
- 8 ounces white chocolate baking bar Note 1
- 4 ounces semi-sweet baking bar
- 2 ounces milk chocolate (or more semi-sweet or dark)
- 1 teaspoon vegetable or coconut oil, separated
- 1/4 up to 1/2 teaspoon pure peppermint extract
Instructions
- CRUSH PEPPERMINT: Add the unwrapped candy canes to a large plastic bag (or two; the peppermint has a tendency to rip through plastic bags as it is crushed). Seal the bag without air in it, and then crush with a rolling pin or meat mallet until coarse crumbs are formed. Set aside.
- PREP: Line an 8×8 or 9×9-inch pan with parchment paper, leaving some as an overhang for easy removal. Set aside for now. Coarsely chop the white, semi-sweet, and milk chocolate. Top tip for snappy and beautiful bark: Be patient when melting the chocolate and avoid rapid temperature changes (don't microwave too long or excessively, stir too much, and don't refrigerate/freeze layers or finished bark).
- CHOCOLATE BASE LAYER: Add all EXCEPT 2 tablespoons (See Note 2) of the chopped semi-sweet and milk chocolate to a large microwave-safe bowl. Add 1/2 teaspoon oil. Microwave for 15 seconds and then stir vigorously for 15 seconds. Continue to do this until the chocolate is mostly melted. The key to not scorching and ruining the chocolate/bark is to melt in very short bursts and to stir a lot (so much melting happens outside of the microwave) We never want the chocolate to get hot, just warm enough to melt gradually; once it's smoothly melted, it should be room temperature. Once the chocolate is mostly melted, add the set-aside 2 tablespoons of chocolate and stir until it melts. Be patient and resist the urge to microwave unless it isn't melting after stirring for 1 minute. (Then you can microwave in bursts of 5 seconds at a time.) Once the chocolate is fully melted and smooth, pour in the 1/4 teaspoon (use 1/2 tsp for a stronger peppermint flavor) peppermint extract and mix to combine. Pour the chocolate mixture into the prepared pan and smooth in an even layer with an offset spatula or regular spatula. Do not refrigerate. Set aside at room temperature for now.
- WHITE CHOCOLATE TOP LAYER: Add all EXCEPT 2 tablespoons of the chopped white chocolate to a large microwave- safe bowl. Add 1/2 teaspoon oil. Follow the directions above for melting. Add in the reserved 2 tablespoons white chocolate and mix until melted. Once smooth, drizzle evenly on top of the chocolate base layer until all the chocolate is poured on top. Carefully and slowly smooth the white chocolate into an even layer with the back of a spoon being careful to not swirl the two layers together. Immediately, sprinkle the crushed candy canes on top (add as much or as little as you'd like). Set aside at room temperature (not in the fridge) until the bark is completely hardened, about 3-5 hours. Don't refrigerate the bark — we're trying to keep the chocolate at a consistent temperature to ensure glossy, snappy bark!
- BREAK APART: Once hardened, remove from the pan using the overhang. Break or cut (See Note 3) into pieces as big or small as you'd like. Enjoy!
- STORAGE: When properly stored, this bark is best consumed within 2 weeks Store in a tightly sealed container in a cool, dark place at room temperature. It does not need to be refrigerated.
Video
Recipe Notes
Nutrition
Nutrition information is automatically calculated, so should only be used as an approximation.