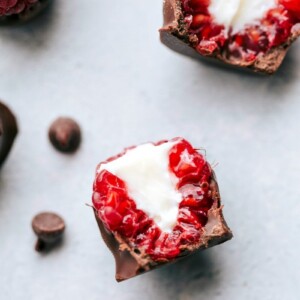
Chocolate Covered Raspberries

This post may contain affiliate links. Please read my disclosure policy.
CHEESECAKE FILLED RASPBERRiES! Only FOUR ingredients to make these amazing chocolate-dipped and cheesecake-filled raspberries. via chelseasmessyapron.com

Chocolate-Covered Raspberries are so fancy looking, but couldn’t be simpler to make! These pop-able treats are rich and chocolatey with a bright and sweet raspberry center.

Plus, we’re including an (optional) recipe for adding a creamy cheesecake filling that takes these treats to the next level!

Love chocolate-dipped desserts? Try our Chocolate-Covered Caramels, Chocolate-0Covered Oreos, or Oreo Balls next!

Overhead image of the cheesecake-stuffed raspberries

Chocolate Covered Raspberries

Step aside chocolate-covered strawberries, there’s a new boss in town! Chocolate-dipped raspberries are one of my all-time favorite treats–especially when you add in a creamy cheesecake filling.

The creamy cheesecake- esque filling is completely optional but totally tasty. With the cheesecake filling, the flavors on these raspberries are somewhat reminiscent of Tru Fru® chocolate-covered raspberries. (Which if you haven’t tried those bites of freeze-dried and chocolate-covered goodness, that is something to add to your grocery list stat!)

Overhead image of the chocolate used in this recipe

Chocolate Covered Raspberries Ingredients

  • Raspberries. Use the freshest and best raspberries you can find. Look for plump, firm berries that are bright red all over and avoid any berries with soft spots or discolorations. This recipe needs fresh, not frozen, berries.
  • Melting wafers or high-quality baking bars. We recommend chocolate made for melting like good quality baking bars (such as Baker®, Lindt®, or Ghiradelli®) or good quality melting wafers (such as Ghiradelli) for best results. (Both bars and melts are found in the baking aisle of the grocery store.) Melting wafers are much easier to work with and won’t seize up like chocolate chips might. 
  • Oil. A little coconut or vegetable oil helps thin the chocolate to make dipping easier and for the chocolate to go on smoother.

QUICK TIP

If you’d like milk-chocolate-covered raspberries, use milk chocolate bars or wafers. For dark-chocolate-covered raspberries, go with dark chocolate bars or wafers. OR you can combine equal amounts of both dark and milk chocolate for a unique and complex-tasting raspberry.

Why not use chocolate chips? Chocolate chips/baking morsels have stabilizers that keep them from melting completely smooth (which is good when you want them to retain their shape for cookies, but not so much when you want a pretty coating on raspberries). Chocolate chips will likely create a more grainy and matte coating instead of a smooth and shiny coating like chocolate bars/melting wafers will deliver. [/quicktip]

Process shots of the Chocolate-Covered Raspberries-- images of the chocolate being melted and the raspberries being dipped in it

How To Prepare Raspberries For Dipping In Chocolate

  1. Start with ripe and fresh raspberries without any soft spots.
  2. Wash very gently in cool water and carefully dry with paper towels.
  3. Let stand at room temperature for about 30 minutes to ensure the berries are completely dry and aren’t cold from being in the fridge.

Process shots-- images of the cheesecake filling being made and added into the raspberries

How To Make Chocolate Covered Raspberries

Once the raspberries are prepped, it’s time to melt the chocolate and dip. Below are our top chocolate melting tips.

  • Microwave the chocolate in sturdy, heat-safe bowls, not plastic or melamine. 
  • To avoid scorched chocolate, microwave for 15 seconds at a time, and stir for at least 15 seconds between each microwave burst. Remember, the chocolate is still melting from residual heat even after it has been removed from the microwave. To avoid streaky chocolate-coated raspberries, it’s important the chocolate never gets too hot!
  • Manage the temperature of the chocolate: Once most of the chocolate in the bowl is melted, add in some unmelted chocolate. The heat from the melted chocolate will then melt this added chocolate while also lowering the heat of the chocolate all together. Why is this important? It helps to ensure the chocolate is stabilized–and it also gives it a smooth and glossy finish. (For more info, check out the “quick tip” below.)

QUICK TIP

Melting the chocolate slowly while stirring often promotes the formation of the most desirable type of crystals. It ensures that the chocolate cools and hardens before the cocoa butter (the natural white fat) can rise to the surface and make the raspberries look streaky. Adding unmelted chocolate to the bowl near the end of mixing not only cools down the overall chocolate temperature, but “seeds the batch” which encourages the chocolate to set with the right crystals which makes it smooth and hard at room temperature.

Process shots of the Chocolate-Covered Raspberries-- images of the the cheesecake being piped into the center

How To Decorate Chocolate Covered Raspberries

  • Fill with cheesecake filling: The cheesecake-like filling consists of cream cheese, sugar, and a touch of vanilla. It is so good inside these raspberries and whips together in minutes! Transfer this filling to a plastic bag, snip off the tip, and pipe it in the coated raspberries.
  • Fill with white chocolate: Instead of the cheesecake filling, melt some white chocolate to pipe inside the raspberries instead! You can then freeze the raspberries and you’ll end up with a treat similar to Tru Fru!
  • Salty-sweet: Add a sprinkle of Maldon sea salt flakes.
  • Topped with more sweets: Add cookie crumbs, graham cracker crumbs, sweetened coconut flakes, coarsely chopped candied nuts, crushed toffee, sprinkles, etc.
    • Add any of these toppings to the raspberries immediately after dipping them. The chocolate needs to still be wet so the sprinkles or toppings will stick as they dry. Either dip in the topping or sprinkle the topping atop the wet chocolate.
  • Add a chocolate drizzle: We love adding a contrasting flavor of chocolate to the dipped raspberries — white chocolate is especially pretty and tasty! Add melted chocolate to a plastic bag and snip off the tip then drizzle!

Up-close overhead image of the Chocolate-Covered Raspberries cut in half

STORAGE

Can I Make Chocolate-Covered Raspberries The Night Before?

Chocolate-covered raspberries are best eaten the same day they’re made. They last about 8-10 hours in a cool, dry place before they’ll begin to break down and start to leak/become sticky. (Raspberries ripen very quickly outside of the fridge!)

We don’t recommend refrigerating the raspberries; it will create condensation on the outside of the chocolate and cause the chocolate to break apart when you bite into the raspberry.

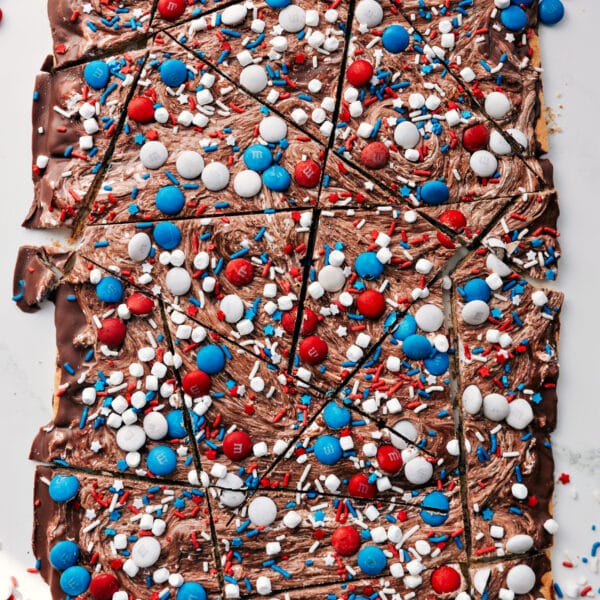
More Raspberry Treats

FOLLOW ALONG! Subscribe to my newsletter and follow along on Facebook, Pinterest and Instagram for the latest updates, recipes and content.

Chocolate-Covered Raspberries

5 from 4 votes
Chocolate-Covered Raspberries are so fancy looking, but couldn’t be simpler to make! These pop-able treats are rich and chocolatey with a bright and sweet raspberry center.
Print Recipe

Chocolate-Covered Raspberries

5 from 4 votes
Chocolate-Covered Raspberries are so fancy looking, but couldn’t be simpler to make! These pop-able treats are rich and chocolatey with a bright and sweet raspberry center.
Course Dessert, Snack
Cuisine American, Vegetarian
Keyword Chocolate Covered Raspberries
Prep Time 20 minutes
Setting Time 15 minutes
Total Time 35 minutes
Servings 50 raspberries
Chelsea Lords
Calories 20kcal
Cost $6.23

Ingredients

OPTIONAL Cheesecake Filling

  • 2 ounces full-fat cream cheese softened
  • 1 tablespoon + 1 teaspoon white sugar
  • Optional: 1/4 teaspoon vanilla extract

Instructions

  • RASPBERRY PREP: Wash raspberries very gently in cool water and carefully dry with paper towels. Let stand at room temperature for about 30 minutes to ensure the raspberries are completely dry and aren't cold. Don't dip raspberries unless they are 100% dry-- otherwise, chocolate will seize and become cloudy or won't stick to the berries.
  • PREP: Line a large sheet pan with parchment paper or wax paper and set aside. If using baking bars, coarsely chop the chocolate. Top tip for beautiful chocolate-covered raspberries: be patient when melting the chocolate and avoid rapid temperature changes. (Don't microwave too long or too many times; stir chocolate often as it is melting, and don't refrigerate/freeze coated raspberries -- let the chocolate harden at room temperature.)
  • MELT CHOCOLATE: (See Note 3.) Add all EXCEPT 2 tablespoons of the chocolate melting wafers to a large microwave-safe bowl. Add 1 teaspoon oil. Microwave for 15 seconds and then stir vigorously for 15 seconds. Continue to do this until the chocolate is melted. Once the chocolate is melted, add the reserved 2 tablespoons of chocolate and stir until it melts (Note 4). Be patient and resist the urge to microwave unless it isn't melting after stirring for 1 minute. (Then you can microwave in bursts of 5 seconds at a time.)
  • DIP: Once the chocolate is fully melted and smooth, gently dip the bottom 2/3rds of the raspberries into the melted chocolate Carefully slide the bottom of the raspberry against the edge of the bowl to remove any excess chocolate. Place the raspberry on the prepared parchment paper-lined tray. Repeat with remaining raspberries.
    If the melted chocolate is getting too hard to dip, heat it in the microwave for another 15 seconds and remix. You may need to add a 1/2 teaspoon or more of oil too.
    Optional -- add cheesecake filling! See next step. Alternatively, if not decorating, do not refrigerate, but set aside at room temperature until chocolate is firm.
  • OPTIONAL -- CHEESECAKE FILLING: In a medium-sized bowl, use a hand mixer to beat softened cream cheese, white sugar, and vanilla extract until completely smooth. Use a spatula to scrape every bit of this mixture into a plastic bag. Using scissors, cut off enough of the tip to pipe the mixture into raspberries. Pipe the cheesecake filling evenly among all of the raspberries. (Optional: Smooth the top with a table knife.)
  • STORAGE: Chocolate-Covered Raspberries are best eaten the same day they're made. They last about 8-10 hours in a cool, dry place before they break down and start to leak/become sticky. We don't recommend refrigerating the raspberries; it will create condensation on the outside of the chocolate and cause the chocolate to break apart when you bite into them.

Video

Recipe Notes

Note 1: Chocolate: Chocolate chips have stabilizers that keep them from melting completely smooth. We recommend chocolate made for melting like good quality baking bars (such as Baker's, Lindt, or Ghiradelli) or good quality melting wafers (such as Ghiradelli) for best results. (Both bars and melts are found in the baking aisle of the store; we find the melts are easier to work with). Use any type of chocolate you like -- milk, semi-sweet, dark, or white. We like an equal mix of dark and milk chocolate best!
Note 2: Raspberries: Grab the freshest raspberries you can find! Look for bright red, firm, and plump berries without any soft spots. I like to get a larger container so there are plenty of raspberries to pick through in case not all of them are in tip-top shape. The chocolate coats most of the raspberries, but you might have some leftover raspberries, depending on their size and how much chocolate is used to coat.
Note 3: Microwaving tip: The key to not scorching and ruining the chocolate is to melt in very short bursts and to stir a lot (so much melting happens outside of the microwave). We never want the chocolate to get hot, just warm enough to melt gradually and once it's smoothly melted, it should be room temperature).
Note 4: Why we add more chocolate after melting: Melting the chocolate slowly while stirring often ensures that the chocolate cools and hardens before the cocoa butter (the natural white fat) can rise to the surface and make the raspberries look streaky. Adding unmelted chocolate to the bowl near the end of mixing not only cools down the overall chocolate temperature but "seeds the batch" and encourages the chocolate to set with the right crystals which makes it smooth and hard at room temperature. Heating and cooling chocolate to stabilize it gives the chocolate a smooth, glossy finish, ensures it won't melt easily on fingers, and allows it to set up nicely.
Note 5: Calories do not include the optional cheesecake filling. With the cheesecake filling each raspberry comes out to be about 34 calories.

Nutrition Facts

Serving: 1serving | Calories: 20kcal | Carbohydrates: 3g | Protein: 0.3g | Fat: 1g | Sodium: 0.1mg | Fiber: 0.7g | Sugar: 2.2g

We do our best to provide accurate nutritional analysis for our recipes. Our nutritional data is calculated using a third-party algorithm and may vary, based on individual cooking styles, measurements, and ingredient sizes. Please use this information for comparison purposes and consult a health professional for nutrition guidance as needed.

DID YOU MAKE THIS RECIPE?

I love hearing from you when you've made one of my recipes! Tag me on Instagram at @ChelseasMessyApron or leave me a comment below.


More Recipes You'll Love

Cheesecake Bars

9 hrs

Cheesecake Bars

Click the Bookmark Icon to Add to Your Favories

Easy Chocolate Fondue

10 mins

Easy Chocolate Fondue

Click the Bookmark Icon to Add to Your Favories

Frozen Yogurt

10 mins

Frozen Yogurt

Click the Bookmark Icon to Add to Your Favories

Icebox Cake {With Oreos!}

30 mins

Icebox Cake {With Oreos!}

Click the Bookmark Icon to Add to Your Favories

FREE BONUS

FREE BONUS

EASY MEAL SECRETS:
How to Make Mealtime Hassle Free!

5 secrets to easy, fast and delicious dinners.

[gravityform id="2" title="false" description="false"]

Leave a Comment:

Your email address will not be published. Required fields are marked *

Recipe Rating


6 Comments

  1. Some Tru Fru varieties are freah raspberries that are frozen instead of freeze dried. Could you freeze this recipe to be a cold treat in the same way? Or are home freezers not cold enough for that to work?

    1. Home freezers can’t freeze dry fruit unfortunately. I do think these could be tasty as a frozen treat though!

Never Miss a Recipe

[gravityform id="3" title="false" description="false"]