Raspberry Thumbprint Cookie Recipe with buttery almond shortbread and a sweet raspberry jam center. A festive, must-make treat for any holiday cookie platter.


author’s note
300 Gone in 10 Minutes!
A few months ago, I was invited to share recipes at a department store’s grand opening. I brought these Raspberry Thumbprint Cookies and a Pistachio Cheese Ball, thinking the cheese ball would be the star of the table.
Instead, these cookies caused the biggest scene.
I’m not exaggerating when I say they disappeared in ten minutes. All 300 of them. People kept circling back after hearing about them and were genuinely upset when they realized they were already gone.
I had tested and retested this recipe so many times that I knew they were good, but seeing that reaction sealed it. These are the BEST Thumbprint Cookies I have ever made. The almond and raspberry combo is so classic and so delicious. They’re soft, buttery, melt-in-your-mouth, and they look beautiful on a holiday cookie platter.


Thumbprint Cookie Recipe Ingredients
| Ingredient | Tip or Swap |
|---|---|
| Unsalted Butter | Must be room temp, not melty. Soft butter is key for a smooth dough and soft cookie. |
| Granulated Sugar | Rolling the dough balls in extra sugar gives a sweet crunch and pretty sparkle. |
| Vanilla & Almond Extract | Almond makes these taste classic. You can skip it or reduce it if yours is strong. |
| Cornstarch | Gives the cookies a melt-in-your-mouth texture. Don’t skip. |
| Seedless Raspberry Jam | Seedless looks cleaner. Strawberry, blackberry, apricot, or lemon curd all work. |
| Powdered Sugar & Cream (for glaze) | Add cream or milk to make the glaze thicker or thinner. Thicker glaze sticks better. |

How To Make Thumbprint Cookie Recipe
- Mix Dough: Mix butter and sugar, then add flavorings, cornstarch, salt, and flour.
- Shape: Roll dough into balls, coat with sugar, press centers, add jam, and chill.
- Bake: Bake at 350°F for 8–10 minutes, then cool.
- Glaze: Whisk sugar, cream, almond extract, and salt into a smooth glaze.
- Enjoy: Add glaze to cooled cookies and let it set.
Quick Tip
Don’t use too much jam—just enough to fill the center without it spilling over when baking.

Thumbprint Cookie Recipe Tips
- Jam: Raspberry is great with almond, but any smooth, seedless jam works.
- Roll in Sugar: Coating the dough in sugar before chilling adds sweetness, crunch, and a nice look.
- Prevent Cracks: Shape first, chill, add jam, then chill again to keep them from cracking and help them hold shape.
- Cream Well: Beat butter and sugar really well for soft, fluffy cookies. Avoid margarine.

Variations
Switch Things Up
- Lemon Curd Cookies: Add lemon curd in place of the jam for a citrusy twist.
- Chocolate Twist: Add nutella in place of the jam or check out these Coconut Thumbprint Cookies.
- Caramel Center: Fill with caramel sauce or dulce de leche for a sweet, gooey treat.
- Glaze Variations: Add lemon, orange, or maple flavor to the glaze.

Storage
- Store the baked thumbprint cookie recipe in a sealed container at room temp, or keep glazed cookies in the fridge for up to 5 days. Don’t stack them.
- Freeze unbaked cookies before adding jam. Shape the dough, freeze on a tray until firm, then move to a sealed bag or container for up to 1 month.
More Delicious Cookie Recipes:

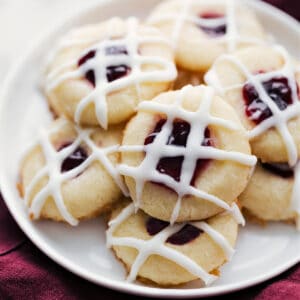
Thumbprint Cookies
Video
Equipment
- Stand mixer optional
Ingredients
- 16 tablespoons unsalted butter at room temperature
- 3/4 cup + 1/3 cup granulated sugar divided
- 1/4 teaspoon almond extract optional, see note 1
- 1 teaspoon vanilla bean paste or vanilla extract
- 1 tablespoon cornstarch
- 1/2 teaspoon salt
- 2-1/4 cups all-purpose flour see note 2
- 1/2 cup seedless raspberry jam or your favorite variety of jam
- 1 cup powdered sugar
- 3 to 4 tablespoons heavy cream or 2 tablespoons whole milk
- 1/8 teaspoon almond extract optional
- 1/8 teaspoon salt
Instructions
- In a large bowl or stand mixer fitted with a whisk attachment, add room-temperature (not melted or softened at all) butter and 3/4 cup granulated sugar. Beat at medium speed until smooth and creamy, scraping the sides as needed. Add almond extract (if using), vanilla, cornstarch, and salt. Mix until combined. Add flour. Beat together at low speed, scraping bowl as needed, until all ingredients are combined. Do not overmix dough.
- Shape dough into 1-tablespoon balls (use a tablespoon measuring spoon to form and measure balls), then roll dough balls in 1/3 cup granulated sugar until generously coated. Gently indent the center of each dough ball with your finger. Place cookies 2 inches apart on a sheet pan lined with a silicone baking mat or parchment paper. Cover and refrigerate 1 hour (or freeze for 30 minutes). Remove from fridge and preheat oven to 350°F. Add seedless jam to fill (but not overfill) the centers of all the cookies. Return cookies to the fridge 10 more minutes.
- Bake cookies 8–10 minutes or until very lightly browned underneath and tops are no longer glossy. Slightly underbake for soft and delicious shortbread cookies.
- Remove cookies to a cooling rack and allow them to cool completely. Meanwhile, prepare the glaze by whisking all glaze ingredients together in a bowl until smooth. (Add heavy cream or milk until you’ve reached your desired consistency; I like the glaze on the thicker side).
- Drizzle the glaze over the cookies (either drizzle with a spoon or transfer glaze to a resealable plastic bag and cut off the tip to pipe). Once added, allow glaze to set. Enjoy!
Recipe Notes
Nutrition
Nutrition information is automatically calculated, so should only be used as an approximation.