Crepes Recipe straight from a real French bakery, light and airy with tender edges and a soft bite. Fill with berries and cream or drizzle with warm Nutella for a tasty treat.


author’s note
A Crepe Recipe From A French Bakery!
Back in high school, we hosted the cutest exchange student from France. Her dad was a pastry chef at their family’s bakery, and of course, we begged for all their recipes.
The one we obsessed over most? Crepes. She showed us exactly how to make them and shared all her favorite ways to eat them. Safe to say, crepe nights became a regular thing. Like three times a week kind of regular.
Now I’m sharing a super easy step-by-step, all our go-to sweet and savory combos, and a few tips she taught us along the way.


Crepes Recipe Ingredients
| Ingredient | Swaps or Tips |
|---|---|
| Whole milk | 2% works. For richer, do half milk and half water for thinner crepes. |
| Eggs | Use large eggs. For extra tender, add 1 extra yolk. |
| All-purpose flour | For gluten-free, use a good 1:1 blend. |
| Sugar | Reduce or omit for savory. A touch of honey also works. |
| Unsalted butter (melted) | Ghee or neutral oil works. Cool before adding so it does not scramble eggs. |
| Salt | It makes flavors pop. Don’t underestimate it! |
| Vanilla | Skip for savory. Almond extract is a fun change. |

How To Make Crepes Recipe
- Blend: Combine milk, flour, sugar, salt, butter, vanilla, and eggs in a blender.
- Scrape: Scrape down the blender sides and blend a few more seconds if needed.
- Chill: Refrigerate the batter for at least an hour or overnight.
- Heat: Lightly butter a skillet. Heat it, pour batter, swirl to coat, flip when golden brown.
- Enjoy: Add fillings, fold in half, then in half again, or roll it up like a burrito or fold into triangles.
Quick Tip
One of the best parts of this recipe? It makes a bunch of crepes! Great for meal prep—they stay good in the fridge for 4–5 days. Just grab a few and make a fast breakfast (or snack) anytime.

Crepe Recipe Filling And Topping Ideas
- Sweet Crêpes
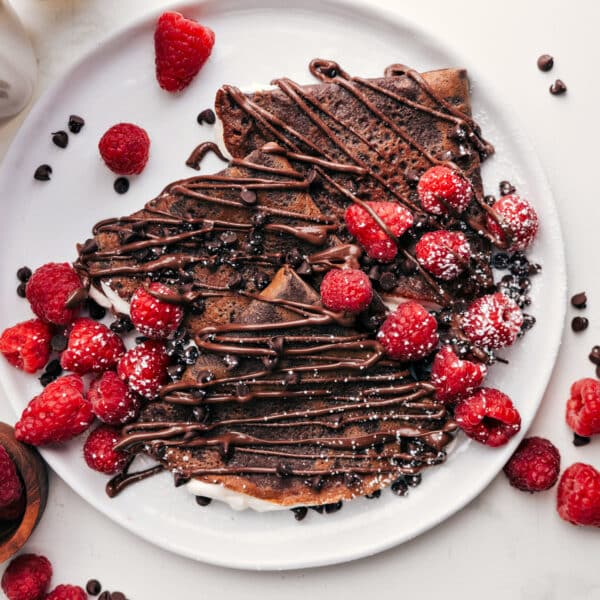
- Nutella: Nutella (or try my Nutella Crêpes recipe!)
- S’mores: Marshmallow creme, chocolate sauce, crushed graham crackers
- Berry: Whipped cream, fresh berries, vanilla sauce or blueberry syrup drizzle
- Savory Crêpes
- Garden Crêpe: Artichoke hearts, tomatoes, baby spinach, Parmesan
- Italian: Tomatoes, pesto, mozzarella
- Traditional Breakfast: Ham, scrambled eggs, pepper jack
- Egg & Cheese: Bacon, eggs, syrup drizzle, cheddar
Tips For Success
- Chill the batter: Rest in the fridge so the flour absorbs the liquid. This reduces bubbles and makes a smoother crepes recipe.
- Warm the pan slowly: Let it heat gradually. Avoid using high heat.
- Add butter: Lightly coat the pan once. You don’t need to add more each time.
- Wait to flip: Flip when you see brown spots, golden edges, and a dry-looking top.
- Swirl the batter: After pouring, swirl quickly to spread it into a thin layer.
More Breakfast Favorites:

Breakfast
Ham and Cheese Quiche

Desserts
Croissant Breakfast Bake

Muffins And Quick Breads
Healthy Chocolate Chip Muffins

How to Make Crepes
Video
Equipment
- Pan 8 to 10-inch, nonstick, see note 1
- Offset spatula or rubber spatula
Ingredients
- 2-1/2 cups milk whole milk recommended
- 2 cups all-purpose flour measured by spooning and leveling
- 1/4 cup granulated sugar
- 1/4 teaspoon salt
- 4 tablespoons unsalted butter melted and slightly cooled
- 2 teaspoons vanilla extract
- 4 large eggs
- 2 to 3 tablespoons unsalted butter melted, for cooking the crepes
- Toppings as desired see note 2
Instructions
- In a high-powered blender, combine milk, flour, sugar, salt, melted butter (cooled), vanilla, and eggs. Pulse on low speed until smooth and without lumps, about 10–15 pulses. Avoid over-beating.
- Scrape any flour sticking to the blender’s sides and bottom. Pulse a few more times if needed. Cover and refrigerate the batter for 1 hour or overnight (important for flavor and to reduce bubbling).
- Cut small squares of parchment paper to place between crepes and prevent sticking after cooking.
- Heat an 8 to 10-inch nonstick pan over medium to medium-low heat. Stir chilled batter and have a tray or platter nearby with a piece of parchment paper.
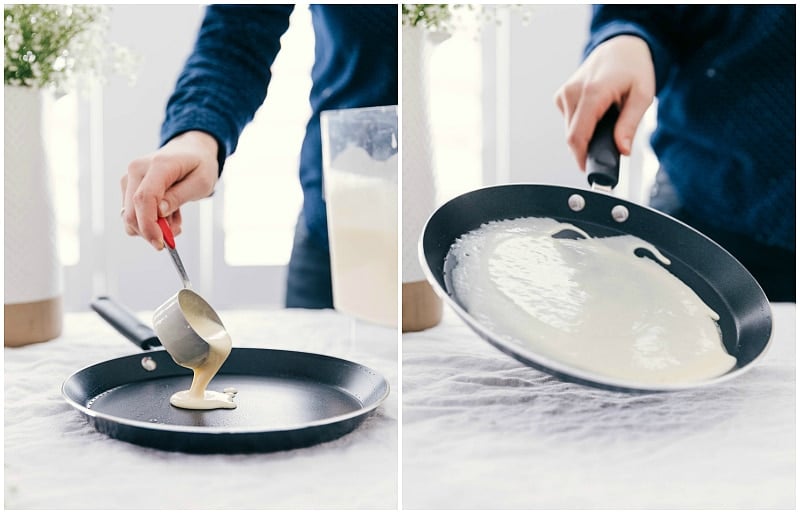
- Lightly butter the pan with melted butter using a pastry brush or a paper towel. Pour 1/4 cup crepe batter into the pan, immediately tilting and swirling it to evenly coat the bottom. Return the pan to the heat.
- Cook until the crepe is golden brown on the bottom (1–2 minutes). Lift an edge of the crepe with an offset spatula (or rubber spatula) and flip it. Cook until golden brown spots appear on the other side (another 1–2 minutes). Transfer crepe to the prepared plate/tray and cover it with parchment or wax paper.
- Repeat until all batter is used. Adjust the burner temperature as needed to control cooking speed.
- Fill the crepes with your preferred fillings, fold them in half, then in half again to form triangles. Sprinkle with powdered sugar, add whipped cream, and drizzle syrup as desired.
Recipe Notes
Nutrition
Nutrition information is automatically calculated, so should only be used as an approximation.
Crepes Recipe FAQs
To prevent crepes from sticking, thoroughly grease the pan with butter, coating the entire surface and sides, before heating. Using a nonstick pan also aids in preventing sticking.
Allow the cooked crepes to cool completely, then transfer them to a large resealable plastic bag. Seal the bag without any air inside and store it in the fridge for up to 5 days.
Yes, you can freeze crepes. Cool them, stack with wax paper in between, wrap tightly, and store in the freezer for up to two months. Thaw in the fridge or at room temperature and reheat before serving.


best crepes I’ve ever made!!! they turned out so perfectly!
I’m so thrilled to hear this! Thanks Heather!