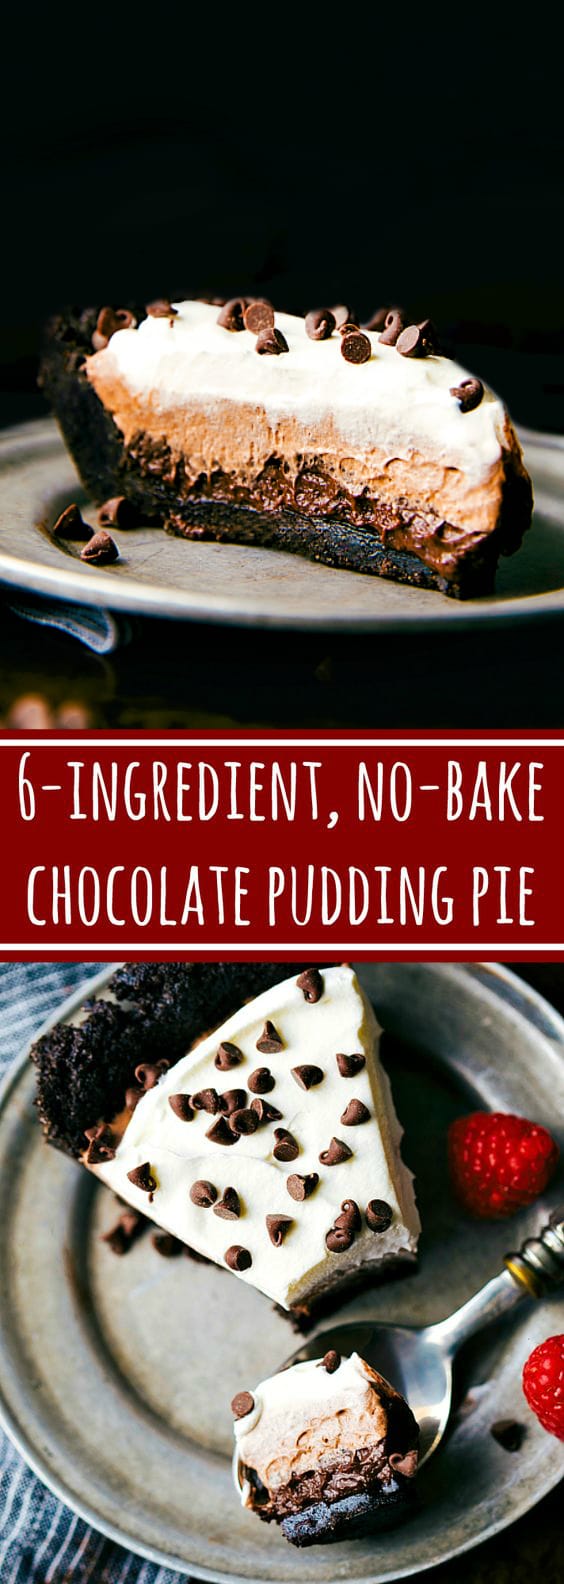
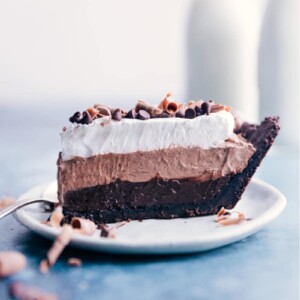
This Chocolate Pudding Pie is a total show stopper, yet couldn’t be easier to make! With only six ingredients and quick prep, it’s sure to impress. Made with an Oreo® cookie crust and three layers using the same three ingredients.
Use leftover pudding mixes in Turtle Pudding Cups, Cake Mix Cupcakes, Chocolate Chip Pudding Cookies, or this Eclair Cake.

The Best Chocolate Pudding Pie Recipe
This Chocolate Pudding Pie recipe is one of my go-to desserts — parties, potlucks, fun family nights — you name it! It always receives rave reviews with minimal effort. Everyone is shocked when they ask about the ingredients to find out the main ingredient is store-bought chocolate pudding mix!

How To Make Chocolate Pudding Pie
It may look elaborate or time consuming with the three different layers, but it couldn’t be easier to make. All three layers originate from just three ingredients.
I start with a simple Oreo cookie crust and then prepare the filling. The filling includes pudding mix, milk, and whipped topping. And the “magic” happens in mixing those three ingredients together in 3 different ways to create 3 unique layers.
The bottom layer is chocolate pudding mix made with milk, the middle layer is chocolate pudding mix with milk and some of the whipped topping added in, and the final layer is just whipped topping. And that’s it — an easy Chocolate Pudding Pie, ready to be devoured!

There are two components to this recipe — the instant chocolate pudding pie filling and the Oreo crust; we’ll break down each below.
Oreo Crust
To make this a true No-Bake Chocolate Pudding Pie, you’ll want to purchase an already prepared Oreo cookie crust at the store. These crusts don’t need to be baked beforehand — you can immediately add in the filling. These store-bought crusts are also nice to use if you’re in a rush or simply don’t want to make your own crust. That said, a homemade crust is always the tastiest! Below are a few tips:
- Crush the Oreos thoroughly. If there are big pieces of the cookies in the crust, it will still taste great, but the pie won’t cut and serve as nicely. I recommend a blender or food processor for crushing the cookies. Alternatively, you can add all the Oreos to a large plastic bag, remove any air from the bag, and break the cookies into crumbs with a rolling pin or meat mallet.
- Leave the creme filling. There’s no need to separate creme from the cookie; it adds structure and sweetness to the crust.
- Don’t add hot butter to the crushed Oreos. Let the butter cool slightly before mixing the two together. This avoids a greasy pie crust.
- Don’t add sugar. A lot of crust recipes (typically graham cracker crusts — like this Creamy Lemon Pie) call for sugar, but the Oreo creme sweetens the crust plenty in this Chocolate Pudding Pie.
- Press the crust down firmly. I like to use the bottom of a metal measuring cup to evenly press the crust down and up the sides of the pan.
- Don’t skip baking the crust. Baking the crust keeps it from getting soggy from the pudding and helps it remain firm so it slices nicely.

Jello Chocolate Pudding Pie Filling
As mentioned above, there are only three ingredients in the filling. I’ll break down each below:
- For the chocolate pudding mix in this recipe, be specific. Use chocolate instant pudding mix, not the cook-and-serve type, and avoid sugar-free or reduced-calorie versions. Get the small 3.9-ounce (110g) box. Follow the recipe directions; don’t prepare it as directed on the package.
- Use regular full-fat Cool Whip®, not reduced-fat or low-fat/sugar-free versions. They won’t set well or taste as indulgent. If you’re okay with a softer pie for fewer calories, try reduced-fat options. Make sure your frozen whipped topping is fully thawed before using it; otherwise, it won’t mix properly.
- Whole Milk: I’ve tried this pie recipe with all different kinds of milk and whole milk is always the best in terms of richness and pie thickness. While you can use 2% or 1% (for a less thick and sturdy pie), I don’t recommend skim milk or plant-based milk alternatives.
Quick Tip
Don’t want to make Chocolate Pudding Pie with Cool Whip? Use a store-bought alternative like TruWhip or make your own whipped topping following this recipe.

Recipe Notes
- If you prefer a dark chocolate pudding pie, use a dark chocolate pudding mix in place of the regular (chocolate or chocolate fudge).
- Use a sharp chef’s knife and make decisive cuts. Run the knife under warm water, dry it on a kitchen towel, and repeat for each cut.
- Any pie pan will work for this recipe! If you’d like a thicker and taller pie as featured in these photos, here is the pan I use.
- Garnish the top! Totally optional, but if you’d like to add some extra pizzazz to this Chocolate Pudding Pie, sprinkle on some miniature chocolate chips or add some edible chocolate curls (see “quick tip” box below.)
Quick Tip
Chocolate curls are so easy to make! Here’s how:
- Use a chocolate bar — I like to use a Lindt® Dark Chocolate Bar with Sea Salt (not sponsored).
- Unwrap the bar and use a vegetable peeler to peel down the side of the bar right on top of the pie.

Chocolate Pudding Pie FAQs
How do you thicken instant pudding for pie?
A few tips to ensure a good, thickened pudding:
- Use the right pudding mix! Choose instant pudding, not the cook-and-serve type.
- Follow recipe directions, not the directions on the box of the pudding mix.
- Add whole milk and avoid plant-based milk alternatives.
How do you keep Chocolate Pudding Pie from getting watery?
- Use full-fat products for the filling (lower fat/lite/sugar-free products tend to weep quicker).
- Bake the pie crust and allow it to fully cool before adding in the filling.

Storage
Can You Freeze Chocolate Pudding Pie?
I don’t recommend freezing this recipe. There is so much dairy in it (whipped topping and milk) that it will most likely change textures upon freezing and thawing. It also becomes quite watery and the crust will absorb the excess moisture– making it soggy.
This Chocolate Pudding Pie is best consumed within 2-3 days of making.
More Chocolate-Filled Desserts
- Our favorite Chocolate Cheesecake with a chocolate topping
- Ice Cream Pie with an Oreo cookie crust
- Chewy Chocolate Chip Cookies with a “secret” ingredient that makes them extra chewy
- Ice Cream Sandwich Cake with only four ingredients
- Chocolate Chip Cupcakes with a cookie crumb frosting
Chocolate Pudding Pie
Video
Equipment
- Pie pan 9-inch
Ingredients
- Cooking spray
- 24 Oreos
- 4 tablespoons unsalted butter melted
- 1/16 teaspoon salt optional
- 2 (3.9-ounce) packages chocolate instant pudding and pie filling see note 1
- 2 cups whole milk see note 2
- 1 (8-ounce) container frozen whipped topping thawed, see note 3
- mini chocolate chips optional
Instructions
- You can purchase a pre-made Oreo cookie crust or make one at home. To make your own, preheat oven to 350°F. Spray a 9-inch pie pan with cooking spray and set aside.
- In a powerful blender or food processor, blend the Oreos into crumbs. Once fully crumbled, measure to ensure you have a full 1-3/4 cups of crumbs, then transfer the crumbs to a bowl. Add the melted, room temperature butter and salt. Stir until a thick dough forms and press that mixture into the pie pan. Use the bottom of a 1/4-cup measuring cup to press the crust firmly into the bottom of the pan and up the sides. Bake for 10 minutes; remove and cool completely before using.
- Add both packages of instant pudding mix to a large bowl. Pour in milk and briskly whisk for 2 minutes. Mixture should be very thick. Remove 1-1/2 cups of this pudding mix and add it to the bottom of the cooled Oreo cookie crust. Spread evenly in one layer.
- Combine the remaining pudding with half the thawed whipped topping and spread evenly on top of the first layer.
- With a clean spatula, spread the remaining whipped topping evenly on top of everything. Chill pie in the fridge for 2–4 hours.
- When ready to serve, warm a very sharp knife under hot water, dry it, and make quick, clean cuts. Make sure to run the knife under hot water and dry it between each cut. If desired, sprinkle with mini chocolate chips. Enjoy!
Recipe Notes
Nutrition
Nutrition information is automatically calculated, so should only be used as an approximation.


Will whipping cream work for this?
Yes! If you can make 8 ounces of homemade whipped cream, that will work great.
DELICIOUS & SO EASY, even with a toddler running around CURAZY lol Wish I could post a picture of the dessert. I did everything according to the recipe & then garnished with some chocolate chip & butterscotch “dust” I made for an extra sweet fix lol Well done!!! 🫡👍🤘🏼
So happy to hear this! Thanks Matthew!
I just made this and for some reason my crust didn’t work out.
I used the exact amount of butter to cookie crumbs listed but the crust slid down off the sides of my pie dish and looks terrible. 🙁
I hope the filling covers the ugly.
I’m sure it will taste fine.
Hmm I’ve never had that happen. Was the butter super hot? And did you get the cookie crumbs blended super fine?
Made this pie for a friend’s birthday. It was very tasty. I used a pre-formed chocolate pie crust as a time saver. Then I crushed a couple Oreos and sprinkled on the crust before spreading
the pudding on (sprinkled some on the top too). I thought the pudding was going to be too thick but it worked fine. Everyone said they
never had a chocolate pie with layers, which
they loved. Quick, easy & delicious. Thank you
for sharing!
I am SO thrilled to hear this! Thanks so much Toni! 🙂