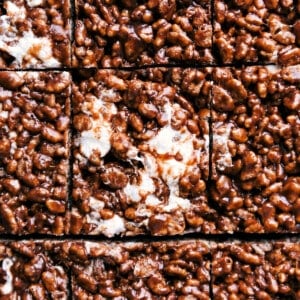
Buncha Crunch

This post may contain affiliate links. Please read my disclosure policy.

Homemade Buncha Crunch is made with just three simple ingredients and no baking! This delicious treat is perfect for satisfying your sweet tooth or adding a welcome crunch topping to desserts. The chocolate provides a smooth and creamy mouthfeel that complements the crispy crunch of the cereal to deliver a deliciously sweet, rich, and indulgent treat.

Overhead image of the buncha crunch

Make Your Own Buncha Crunch!

Do you remember Buncha Crunch? It’s a delicious treat of bite-sized clusters containing crispy rice cereal coated in chocolate. It used to be my go-to snack at the movies and one of my favorite candies growing up. It’s actually crumbled Nestle’s® Crunch Bars!

Recently, I’ve been making my own homemade version. Making your own Buncha Crunch allows you to customize the flavor to your liking and keep the ingredient list simple. You can use your favorite type of chocolate, whether it’s milk, dark, or white chocolate, and experiment with mix-ins like nuts or dried fruit for added texture and flavor. Bonus: Making it at home ensures that you’re using high-quality ingredients and can tailor the recipe to your specific preferences.

While the original Buncha Crunch is made with milk chocolate, I prefer dark chocolate, so I use that instead. And if you’ve tried my homemade Healthy Crunch Bars recipe, you’ll recognize the dark chocolate bar used in this recipe – it’s the same one! 

Ingredient shot-- image of the two ingredients used in this recipe

Buncha Crunch Ingredients

To make this delicious candy, you will need:

  • Rice Krispies® (or crisp rice) cereal
  • High-quality chocolate bar (dark, semi-sweet, or milk chocolate): I am hooked on Lindt® dark chocolate with sea salt bars — so good! And since there is salt added to this chocolate, there is no need to add any extra to the candies. Use whatever chocolate bar you like best, adding a pinch of salt if needed. Keep in mind: the better the quality of chocolate, the better the flavor will be overall.
  • Coconut oil: A little coconut or vegetable oil thins the chocolate and helps it to go on the cereal smoother. Plus, the candies have a better mouthfeel with the oil added in.
  • Optional: flaky sea salt (if you like it salty-sweet)

QUICK TIP

Trademark disclaimer: This recipe refers to some trademarked brands: Nestle’s Crunch, Rice Krispies, and Lindt.  We use these names for two reasons. 1) They’re high-quality products that we use in our test kitchens and 2) They create instant name recognition to illustrate steps in the recipe process. We respect trademarks and branding!

Process shots of Buncha Crunch-- images of the chocolate being melted and the Rice Krispies being added in

VARIATIONS

Variation Ideas

  • Try using different types of chocolate, like dark chocolate, semi-sweet chocolate, or white chocolate.
  • Add in your favorite mix-ins, such as finely chopped nuts, dried fruit, or candy pieces.
  • Try drizzling melted white or dark chocolate over the top of the candies for a fun and decorative touch.

Process shots-- images of the chocolate crunch being dropped on a sheet pan to let harden

Melting Chocolate

Melting chocolate in the microwave makes preparing the chocolate for these Buncha Crunch candies quick and easy. Here’s how to do it:

  1. Chop the chocolate into small, even-sized pieces. This will help the chocolate melt evenly and prevent burning.
  2. Place the chocolate in a microwave-safe bowl. Add a bit of oil to ensure the chocolate is nice and smooth.
  3. Microwave the chocolate in 30-second intervals. Stir well after each interval. Be careful not to overheat the chocolate, as this can cause it to seize or burn.
  4. Once the chocolate is nearly melted, remove it from the microwave. Stir until it’s fully melted and smooth.
  5. Use the melted chocolate immediately!

Also, be aware that white chocolate and milk chocolate tend to burn more easily than dark chocolate, so you need to be extra careful when melting those.

Overhead image of Buncha Crunch in a bowl ready to be enjoyed

STORAGE

Storing Buncha Crunch

To store Buncha Crunch candy, place it in an airtight container or resealable plastic bag. Refrigerate for up to a week or freeze for up to three months. Make sure the chocolate coating is fully hardened, and store it in a single layer to avoid sticking.

I don’t recommend keeping the candy at room temperature for too long; the chocolate gets quite melty.

Overhead image of the treat in a bowl

QUICK TIP

Use a silicone liner or parchment paper to line your baking sheet, as this will prevent the candies from sticking to a sheet pan.

More Easy Treats:

FOLLOW ALONG! Subscribe to my newsletter and follow along on Facebook, Pinterest and Instagram for the latest updates, recipes and content.

Buncha Crunch

5 from 1 vote
Homemade Buncha Crunch is made with just three simple ingredients and no baking! This delicious treat is perfect for satisfying your sweet tooth or adding a welcome crunch topping to desserts. The chocolate provides a smooth and creamy mouthfeel that complements the crispy crunch of the cereal to deliver a deliciously sweet, rich, and indulgent treat.
Print Recipe

Buncha Crunch

5 from 1 vote
Homemade Buncha Crunch is made with just three simple ingredients and no baking! This delicious treat is perfect for satisfying your sweet tooth or adding a welcome crunch topping to desserts. The chocolate provides a smooth and creamy mouthfeel that complements the crispy crunch of the cereal to deliver a deliciously sweet, rich, and indulgent treat.
Course Dessert, Snack
Cuisine American, Vegan, Vegetarian
Keyword Buncha Crunch
Prep Time 10 minutes
Chilling Time 30 minutes
Total Time 40 minutes
Servings 1 cup Buncha Crunch
Chelsea Lords
Calories 682kcal
Cost $5.89

Equipment

  • Sheet pan and parchment paper (or silicone liner)

Ingredients

  • 1 cup crisp rice cereal (like Rice Krispies)
  • 1 bar (3.5 oz.) chocolate bar use a good-quality bar (Note 1)
  • ½ teaspoon coconut oil or vegetable oil

Instructions

  • PREP: Start by preparing a baking sheet by lining with parchment paper or a silicone liner.
  • MELT CHOCOLATE: Coarsely chop the chocolate and place it in a microwave-safe bowl with the oil. Microwave the chocolate in 30-second intervals, stirring in between intervals until it is fully melted. Add the cereal to the melted chocolate and stir until cereal is well coated.
  • MAKE CLUSTERS: Use a spoon to immediately drop the chocolate-covered cereal into small clusters onto the prepared baking sheet. Place the baking sheet in the refrigerator for 30 minutes to allow the chocolate to harden.
  • STORAGE: Once the clusters have hardened, store them in an airtight container or resealable bag in the fridge. Refrigerate for up to a week or freeze for up to 3 months. Avoid storing them at room temperature as it can cause melting or loss of freshness.

Video

Recipe Notes

Note 1: Chocolate bar: Use a good-quality chocolate bar for the best flavor! Our favorite is Lindt® dark chocolate with sea salt--so good! But for a more "authentic" copycat flavor, use a 3.5 oz. milk chocolate bar instead. If the chocolate isn't salted, add a teeny pinch of salt to amp up all the flavors/balance sweetness.
Note 2: Jazz 'em up: You can also add in other ingredients such as nuts or dried fruits to give the clusters a different texture and flavor. You could even drizzle white chocolate over the finished clusters for a fun and unique twist.
Nutrition information is calculated for the whole batch.

Nutrition Facts

Serving: 1serving | Calories: 682kcal | Carbohydrates: 62g | Protein: 9g | Fat: 44g | Saturated Fat: 26g | Polyunsaturated Fat: 1g | Monounsaturated Fat: 13g | Trans Fat: 0.03g | Cholesterol: 3mg | Sodium: 21mg | Potassium: 731mg | Fiber: 11g | Sugar: 24g | Vitamin A: 39IU | Calcium: 74mg | Iron: 12mg

We do our best to provide accurate nutritional analysis for our recipes. Our nutritional data is calculated using a third-party algorithm and may vary, based on individual cooking styles, measurements, and ingredient sizes. Please use this information for comparison purposes and consult a health professional for nutrition guidance as needed.

DID YOU MAKE THIS RECIPE?

I love hearing from you when you've made one of my recipes! Tag me on Instagram at @ChelseasMessyApron or leave me a comment below.


More Recipes You'll Love

4 Easy Valentine's Day Treats

8 mins

4 Easy Valentine's Day Treats

Click the Bookmark Icon to Add to Your Favories

Brownie Trifle

2 hrs 20 mins

Brownie Trifle

Click the Bookmark Icon to Add to Your Favories

Caramel Stuffed Cookies

1 hrs 40 mins

Caramel Stuffed Cookies

Click the Bookmark Icon to Add to Your Favories

Chocolate Covered Raspberries

35 mins

Chocolate Covered Raspberries

Click the Bookmark Icon to Add to Your Favories

FREE BONUS

FREE BONUS

EASY MEAL SECRETS:
How to Make Mealtime Hassle Free!

5 secrets to easy, fast and delicious dinners.

[gravityform id="2" title="false" description="false"]

Leave a Comment:

Your email address will not be published. Required fields are marked *

Recipe Rating


0 Comments

Never Miss a Recipe

[gravityform id="3" title="false" description="false"]