

author’s note
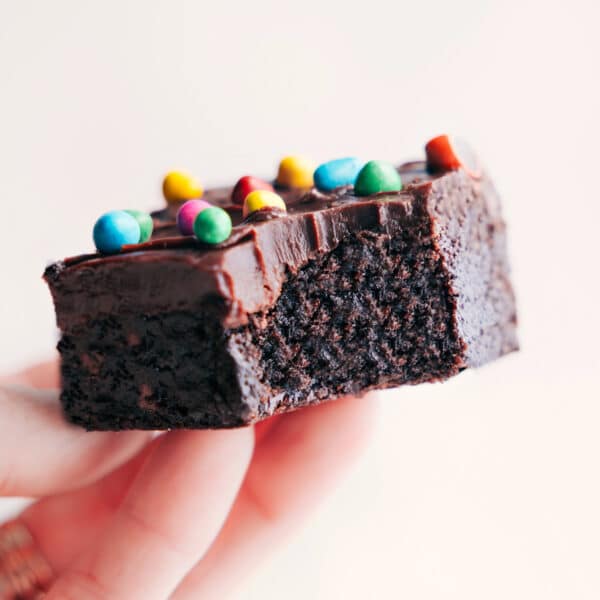
Reese’s Stuffed Peanut Butter Rice Krispie Treats!
I’ve loved Rice Krispie Treats since I was little. My mom made them often, and we always argued over who got to scrape the last marshmallow from the pot. When I started making them myself, I quickly learned how fun it was to play around with flavors. Once I added peanut butter, I knew I had found my favorite. Between the gooey marshmallows, the mini Reese’s cups tucked throughout, and the thick peanut butter chocolate topping, these bars are hard to beat.
If you want to try other fun versions, check out my Fruity Pebbles Rice Krispies Treats, Rice Krispie Ice Cream Bars, or my Chocolate Rice Krispie Treats. Each one is simple, unique, and so delicious.


Here’s What You Need:
| Ingredient | Swaps & Tips |
|---|---|
| Crisp rice cereal | Always use fresh cereal for best results. Stale cereal will make the bars taste off. |
| Unsalted butter | Salted butter works, just reduce the added salt. |
| Brown sugar | White sugar can be used, but flavor won’t be as rich. |
| Heavy cream | Skip milk, it won’t thicken the same. |
| Creamy peanut butter | Avoid natural peanut butter, it separates and won’t set right. |
| Mini marshmallows | Use fresh for best melting and gooey texture. |
| Mini Reese’s Cups | If you can’t find minis, chop Reese’s Miniatures. |
| Chocolate chips | Semi-sweet balances sweetness, milk chocolate makes them sweeter. |
Quick Tip
If you can’t find Reese’s Minis, chopped Reese’s Miniatures (cut into quarters) work great.

How To Make Peanut Butter Rice Krispie Treats
- Prep Pan: Line a 9×9-inch pan with parchment paper.
- Caramel Mix: Melt butter, add brown sugar, then heavy cream. Boil for 1 minute.
- Mix Ins: Stir in peanut butter, marshmallows, and salt. Remove from heat; add vanilla.
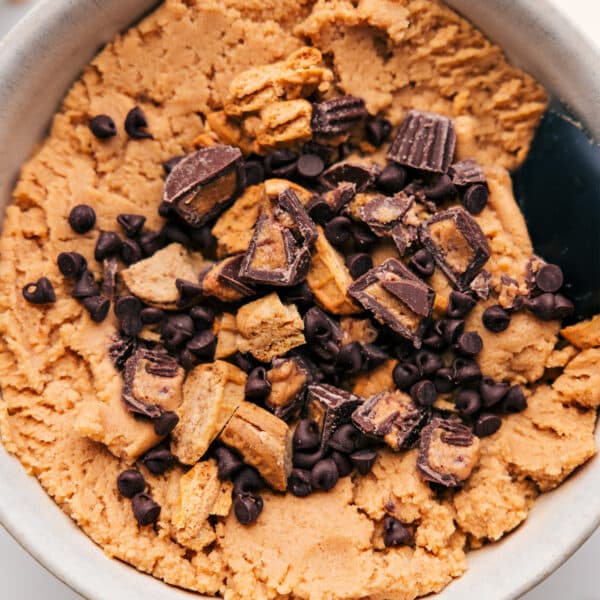
- Combine: Add cereal, mix well. Stir in extra marshmallows, then mini Reese’s cups.
- Press: Transfer to pan, press down gently into an even layer.
- Topping: Microwave chocolate chips and peanut butter; spread over the bars.
- Chill: Refrigerate for 30 minutes, then cut and serve.

Chelsea’s Recipe tip
My Top Peanut Butter Rice Krispie Treats Tips!
- Ingredients: Use fresh cereal and marshmallows for the best gooey treats.
- Watch the Heat: Don’t overcook the sugar mix, but don’t undercook it either. Too little boiling, and the treats won’t set properly. Too much boiling and they’ll be hard.
- Mix Fast: Work quickly when mixing the cereal to keep it from cooling too much.
- Press Lightly: Gently press the mix into the pan to keep the bars soft.
- Clean Cuts: Use a sharp knife, warmed under hot water, and make firm cuts through the bars.
Storage
- Best Fresh: These peanut butter rice krispie treats taste best the first day they’re made. Store in an airtight container at room temperature.
- Freezing: Cut, wrap, and freeze individual bars in a resealable bag for up to three months.
More Dessert Bar Recipes:

Peanut Butter Rice Krispies Treats
Video
Equipment
- 9 x 9-inch baking pan
- Parchment paper or aluminum foil
Ingredients
- Cooking spray
- 5 cups rice krispies cereal like Rice Krispies
- 1/2 cup unsalted butter
- 3/4 cup light brown sugar packed
- 1/3 cup heavy cream
- 1/2 cup creamy peanut butter
- 2 cups miniature marshmallows
- 1/8 teaspoon salt
- 1 teaspoon vanilla extract
- 1/2 cup miniature marshmallows
- 3/4 cup Reese’s minis see note 1
- 1-1/2 cups chocolate chips see note 2
- 2-1/2 tablespoons creamy peanut butter
Instructions
- Line a 9×9-inch pan with parchment paper (or foil), leaving an overhang for easy removal. Lightly spray with cooking spray. Set aside.
- In a very large pot over medium-high heat, melt the butter. Add the brown sugar and stir until fully dissolved, about 1–2 minutes. Stir in the heavy cream, bring to a boil, and continue stirring constantly for 1 minute. Reduce heat to medium-low.
- Add in peanut butter, marshmallows, and salt. Stir until the marshmallows are melted. Remove from heat and stir in vanilla extract if using.
- Add the cereal to the pot and stir until fully coated. If using, stir in 1/2 cup marshmallows. Allow the mixture to cool slightly, then gently fold in the mini Reese’s cups. They’ll get pretty melty.
- Pour the mixture into the prepared pan. Lightly spritz your hands with cooking spray and gently press the cereal mixture into an even layer. Avoid pressing too hard to keep the bars from becoming too dense.
- In a small microwave-safe bowl, combine chocolate chips and peanut butter. Microwave in 15-second intervals, stirring in between, until melted and smooth. Spread the chocolate-peanut butter mixture evenly over the bars.
- Chill the bars in the fridge for 30 minutes to set the chocolate. Remove from the fridge, let them come to room temperature, cut into bars, and serve. To cut, use a sharp knife warmed under hot water and dried off, then make firm slices.
Recipe Notes
Nutrition
Nutrition information is automatically calculated, so should only be used as an approximation.


As Chelsea’s employee I have made these and can confirm they are next level delicious! The flavor combo is unbeatable!
Does the nutritional information say 611
Calories?? Each or the entire amount of servings?
That’s per serving, I hope this helps! Thanks Jenny! 🙂
lol rice krispies are my mom’s thing too! She always just keeps it classic but I LOVE how these pb cup ones look!!! I think I may need to dethrone her with these 😛
these look insane! I don’t think I’ll ever look at a regular rice krispie bar the same again after seeing it with Peanut Butter and Chocolate! 😉
Wow this looks very good.
Thank you so much Olivia!