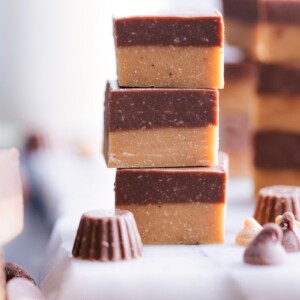
Reese’s Fudge has layers of peanut butter and milk chocolate, made on the stovetop in under 30 minutes, no thermometer required!

Reese’s Fudge
There’s something magical about combining chocolate and peanut butter as evidenced (in part) with this Peanut Butter Meltaways, Buttercrunch Candy, Chocolate Peanut Butter Snack Mix, and Chocolate Peanut Butter Muffins. The two flavors just work together. And that’s why Reese’s® candies are so popular and it’s also why this fudge has been a huge hit with everyone that has tried it. It’s creamy, smooth, rich, and the perfect blend of chocolate and peanut butter.
If you love Reese’s candies, you are going to be obsessed with this fudge!

Ingredients
- Butter: Adds richness and makes the fudge smooth and creamy.
- Peanut Butter Chips: Brings the classic peanut butter flavor and a creamy texture.
- Sweetened Condensed Milk: Split evenly for each layer; using a food scale can help if you have one.
- Fine Sea Salt: Even a tiny pinch makes a huge difference.
- Vanilla Extract: Stir it in after taking the pan off the heat to keep its full flavor.
- Milk Chocolate Chips: Add leftover baking chips into pancake batter, muffin batter, chocolate cookies, or enjoy them by the handful!
How To Make Reese’s Fudge
- Prep: Line an 8×8 pan with parchment or foil.
- Peanut Butter Layer: In a pot, melt half the butter with peanut butter chips, half the condensed milk, and a pinch of salt. Stir until smooth.
- Spread In Pan: Take off the heat, add vanilla, and pour into the pan. Chill.
- Chocolate Layer: Melt the rest of the butter, chocolate chips, condensed milk, and salt on low, stirring until smooth.
- Spread Last Layer: Take off the heat, add vanilla, and pour over the peanut butter layer. Spread it out evenly.
- Chill: Put in the fridge for 4-8 hours until firm.
- Serve: Cut into small squares and enjoy!

Tips For Success
- Line the pan: Use parchment or foil with an extra hanging edge for easy Reese’s fudge removal.
- Use a food scale: Splitting the sweetened condensed milk is easier with a scale—each layer needs 198 grams. Eyeballing works, but a scale gives the exact amount.
- Same pot for layers: Use the same nonstick pot for both layers, but dry it completely after washing to avoid chocolate turning cloudy or clumping.
- Stir constantly: A heat-resistant spatula is best. Stir and scrape the bottom often, then use the spatula to smooth each fudge layer in one flat layer.
Storage
Leftover Reese’s Fudge
Serve Reese’s Fudge straight out of the fridge; nothing beats chilled fudge!
Make sure to store the fudge in an airtight container; cold air will dry out the fudge quickly. It will last up to 3 weeks in the fridge.
More tasty desserts
- Peanut Butter Brownie Bites using a brownie mix
- Brown Sugar Cookies soft and chewy cookies
- Muddy Buddies peanut butter and chocolate snack mix
- Oreo Balls covered in chocolate
- Turtle Candy chocolate, pecan, and caramel candy
Reese’s Fudge
Video
Equipment
- Medium pot nonstick
Ingredients
- 4 tablespoons unsalted butter divided
- 1-1/2 cups peanut butter baking chips
- 1 (14-ounce) can sweetened condensed milk divided
- 1/4 teaspoon fine sea salt divided
- 2 teaspoons vanilla extract divided
- 1-1/2 cups milk chocolate chips see note 1
Instructions
- Line an 8×8-inch pan with parchment paper, leaving an overhang for easy removal (or line with foil). Do not skip this step or the fudge won’t remove nicely. Cut butter into 1-tablespoon-sized pieces.
- In a thick-bottomed, nonstick pan, heat 2 tablespoons of the butter, Reese’s peanut butter baking chips, half the sweetened condensed milk (198g—use a food scale if you have one!), and 1/8 teaspoon salt on low. Using a heat-resistant spatula, stir the mixture constantly, scraping the sides and bottom as needed. Resist the urge to increase the heat—your patience will pay off!
- As soon as the mixture is melted, remove the pan from heat. Stir in 1 teaspoon of the vanilla extract; mix well by folding the extract into the fudge with the spatula. Pour into the prepared pan and use the spatula to smooth and press the fudge into an even layer. Place the pan in the fridge while preparing the milk chocolate top layer.
- Quickly clean and thoroughly dry the pan. Heat the remaining 2 tablespoons of the butter, milk chocolate chips, the remaining half of sweetened condensed milk, and the remaining 1/8 teaspoon salt on low. Using a heat-resistant spatula, stir the mixture constantly, making sure to scrape the sides and bottom. Once melted, remove from heat and fold in remaining 1 teaspoon vanilla extract. Mix until well combined. Remove the other fudge from the fridge and pour the milk chocolate layer on top. Use the spatula to gently coax and spread the fudge to fully cover the bottom layer.
- Cover and refrigerate for 4–8 hours or until fudge is firm.
- Remove from the pan using the overhang of parchment paper. Cut the fudge with a hot, very sharp knife. (Run it under hot water, dry, then make quick cuts.) I recommend cutting the fudge into small pieces—it’s rich!
Recipe Notes
Nutrition
Nutrition information is automatically calculated, so should only be used as an approximation.


I made this for our Church Ladies Christmas Party in Dec.2021. It was the first time that I’ve ever made them. They were a BIG hit. I made another batch to share for Christmas goodie bags for several families at church and friends that live beside us. Again it was a BIG hit! I cut it in small pieces because it is rich. I had enough left over for my husband and me. We both live it!! I will definitely be making it again for Christmas from now on!!
I am so happy to hear this! Yay! Thanks Brenda! 🙂
When I added the vanilla, butter seemed to leech out for each layer. Maybe I let them go too long?? My peanut butter layer also did not seem as pourable as the one in the video–although the chocolate was very similar. Final taste test will be in four hours.