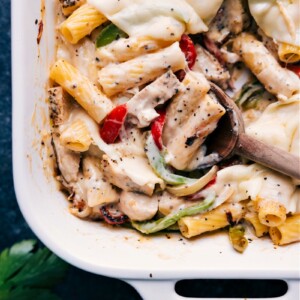
Creamy, cheesy Baked Ziti with Chicken is packed with pasta, peppers, seasoned chicken, and melty Provolone—like a chicken cheesesteak in pasta form.
If you’re craving a tomato-based sauce, try my original Baked Ziti recipe!

Baked Ziti With Chicken
This recipe is slightly adapted from Lauren Grier’s cookbook, Modern Comfort Food. When you want delicious, hearty comfort food without using canned soup, this book is perfect! Lauren’s Baked Ziti with Chicken is amazing—ultimate comfort food that still tastes fresh.
This casserole is incredibly delicious—cheesy, flavorful, and has a great mix of textures. If you like Philly cheesesteak with chicken, you’ll recognize those flavors in this dish.
Quick Tip
A few of our other favorite comfort-food meals to put on your list to try next: Sausage Rigatoni, Creamy Beef and Shells, or Chicken Divan.

Baked Ziti With Chicken and Vegetables
There are four components to this recipe: 1. vegetables, 2. chicken, 3. pasta, and 4. the cheesy cream sauce.
The pasta is boiled in a separate pot, but we then cook the vegetables, chicken, and sauce all in the same pan at different times. By cooking each component in the same pan, we’re building and layering flavors, which will enhance the final dish. When the chicken gets removed from the pot, make sure to leave behind all those lovely browned bits. Those will get whisked into the sauce to add an incredible depth of flavor to the final dish.

How To Make Baked Ziti With Chicken
- Boil pasta in salted water so the pasta is seasoned and the dish does not taste flat.
- Sauté veggies until nicely charred. Use high heat and stir occasionally.
- Cook chicken. Slice chicken in half widthwise so the thinner pieces cook faster.
- Make the cream sauce in the same pan. Whisk butter and flour, then add milk and cheese. It is ready when it coats the back of a spoon and you can draw a line through it that holds.

Baked Ziti With Chicken Recipe Tips
- Use ultra-thin sliced Provolone cheese. We’ve tried this recipe with regular Provolone slices and the thin slices. With the thicker slices, the cheese is a bit overwhelming and tends to take over. Use these ultra-thin slices for best results! And if you can’t find them, we’d recommend topping the casserole with freshly grated Parmesan cheese instead.
- Don’t use pre-shredded cheese in the cream sauce. Pre-shredded packaged cheese has a cellulose coating that keeps it from melting as smoothly. It tends to make the sauce overly gummy.
- Under-boil the ziti. Since we’ll bake the ziti after it’s been cooked, make sure to drain it 1 minute before the package suggests for al dente. This way, as it bakes it will end up perfectly tender instead of perhaps mushy.
- Season at every step. Seasoning is very important for this dish and we want to season as we cook (while also keeping in mind that the cheese adds more saltiness to the dish as a whole). I like to salt the pasta water as the ziti cooks (thus seasoning the ziti), seasoning the vegetables, seasoning the chicken, and seasoning the cream sauce. Taste all the elements as you cook and add a dash more if any of the flavors seem flat.


Baked Ziti With Chicken FAQs
This dish isn’t covered during baking. As long as all the pasta is thoroughly coated in sauce, it shouldn’t dry out.
Boil the pasta first in this recipe, but subtract a minute from the usual cooking time since it will bake later in the sauce.
Baked Ziti With Chicken is quite filling, so the side dishes can be light:
A quick salad like this Garden Salad, this everyday Salad Recipe, or Quinoa Salad Recipe
Life-Changing No-Knead Dinner Rolls or a crusty bread (like this artisan-style No-Knead Bread)
A veggie side like Roasted Vegetables or The Best Green Beans Ever
Any similar pasta shape to ziti or rigatoni will work in this creamy baked ziti with chicken. Penne is a great substitute.

Variations
Want a spicy Baked Ziti With Chicken? Add some red pepper flakes to the cream sauce — as much or as little as you’d like!

Storage
This Baked Ziti With Chicken is best enjoyed the minute it comes out of the oven! (As are most pasta dishes!)
Leftovers are still very flavorful, but note the pasta continues to absorb the sauce as it stores, leaving it a bit softer.
Can I freeze Baked Ziti with Chicken? Because of the pasta and dairy in this dish, it isn’t a great candidate for freezing and thawing.
More Comfort Food Favorites:
Baked Ziti With Chicken
Video
Equipment
- Large pan nonstick
Ingredients
- 8 ounces uncooked ziti pasta or rigatoni pasta, 3 cups
- 2 tablespoons olive oil
- 2 medium boneless, skinless chicken breasts 1 pound, thinly-sliced in half widthwise
- 1 tablespoon Italian seasoning
- 4 tablespoons unsalted butter
- 4 tablespoons flour
- 2 cups whole milk
- 1 (7.6-ounce) package ultra-thin sliced provolone cheese divided, see note 1
- Chopped fresh parsley optional
Instructions
- Spray a 9×13-inch baking dish with cooking spray and set aside. Preheat oven to 400°F.
- Fill a large pot with water, bring to a boil, and add 2 teaspoons salt. Add pasta and cook per package instructions, minus 1 minute. Strain pasta and transfer to the prepared baking dish.
- Melt butter in a large nonstick pan over medium-high heat. Add onion, red and green peppers, and 1/2 teaspoon each of salt and pepper. Sauté for 7–10 minutes until softened and golden brown. Remove from heat, stir in red wine vinegar, and pour the mixture over the pasta.
- Cut chicken breasts in half widthwise to create 4 thinner filets. Gently pound each piece to even out thickness. Season both sides with 1/2 teaspoon of salt and pepper each, and divide 1 tablespoon of Italian seasoning evenly over pieces.
- In the same pan, heat oil over high heat. Add chicken in a single layer and cook for 3–4 minutes per side until cooked through (160°F internal temperature). Transfer to a plate, tent with foil, and let rest 5 minutes. Chop chicken and add it to the peppers and onions. Do not rinse the pan!
- Return the pan to medium heat and add butter. Once melted, whisk in flour and cook 1 minute, scraping up any browned bits. Gradually whisk in milk and cook until thickened, about 5 minutes. Season with 1/2 teaspoon each of salt and pepper. Remove from heat and stir in provolone until partially melted. Pour the sauce over chicken, peppers, and pasta. Gently stir until everything is well coated and combined.
- Smooth the top in an even layer, then add provolone slices or Parmesan (see note 1). Place dish in oven, uncovered, and bake about 15 minutes or until cheese is melted and golden brown. Remove from oven, garnish with fresh chopped parsley if desired, and enjoy promptly!
Recipe Notes
Nutrition
Nutrition information is automatically calculated, so should only be used as an approximation.


This looks so good and I’m looking forward to making it! After assembling, can I put it in the fridge and bake later that night? Thanks!
This is a amazing recipe and will make it again. When I made it tonight I added a few teaspoon of sundried tomatoes and the oil when cooking peppers and onions
Delish! Love that idea! Thanks for you comment Heidi! 🙂
DELICIOUS- kids LOVED and they’re picky. Thanks for sharing!!!
This is GOOD! Do you think it would freeze well?
So happy to hear it! 🙂 Unfortunately I don’t think this would freeze well, but I haven’t personally tried freezing this dish. Generally white sauces and cheesy dishes don’t freeze and thaw well (sauce separates).
This looks so good and I’m looking forward to making it! After assembling, can I put it in the fridge and bake later that night? Thanks!
The pasta will absorb more of the cream sauce and could end up dry later on, so I’d make a slightly larger batch of the sauce 🙂
Thanks so much for sharing, lady!! Seriously your photos are beautiful!! xoxo
Thanks Lauren!! Huge congrats on your beautiful book!
hey girl- this ziti looks so delish!