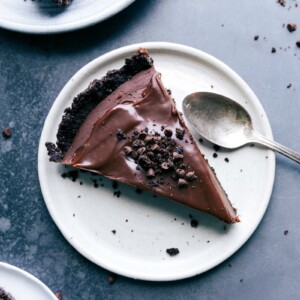
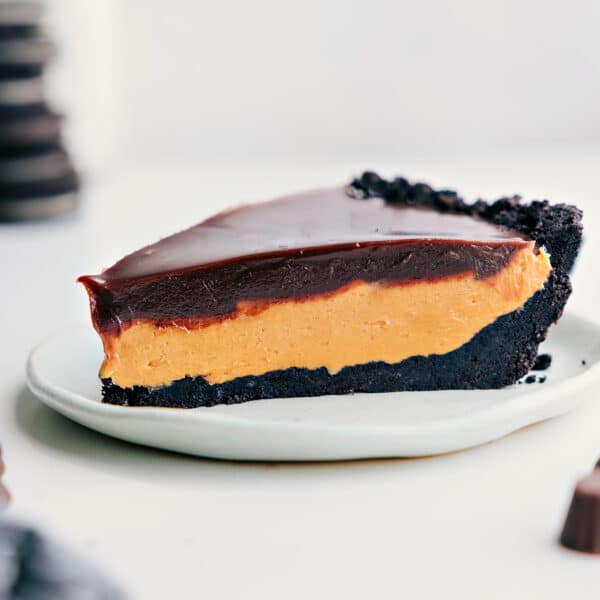
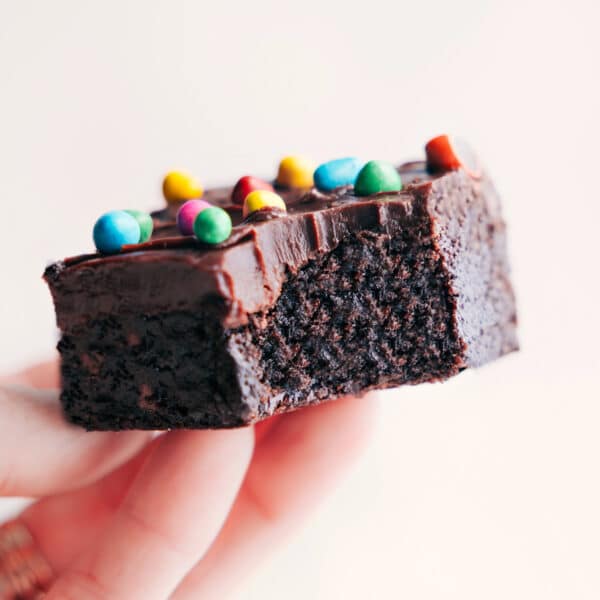
This easy Chocolate Tart Recipe starts with a chocolate cookie crust, followed by a thick and rich chocolate fudge layer, and is finished with a glossy chocolate ganache.


author’s note
The Tart That Stole My Husband’s Heart!
While traveling for work, my husband had a chocolate tart he couldn’t stop talking about. He asked me to recreate it, even though I hadn’t tried it myself, which made things a bit tricky.
After a very detailed description, he shared the essentials: a chocolate cookie crust, an ultra-rich, fudge-like filling, and a silky chocolate topping. After a few test runs and tweaks, he officially declared this version even better. It’s now his favorite dessert on the site (sorry apple pie).
Fair warning: this Chocolate Tart is incredibly rich. Just a small slice hits the spot. It’s decadent, indulgent, and seriously delicious.

Ingredients In Chocolate Tart Recipe
| Star Ingredient | Quick Help |
|---|---|
| Oreos (crust) | Any chocolate sandwich cookie works. Crush to fine crumbs. |
| Heavy cream | Use 36 % fat so the filling sets. Full-fat canned coconut cream also sets well. |
| Semi-sweet or dark chips | The better the quality of chocolate used, the better this chocolate tart will taste. I love Ghirardelli or Guittard. |
| Egg yolks | Separate eggs while cold; yolks enrich the fudge layer. Save whites for later. |
| Light corn syrup | Keeps the ganache glossy—don’t skip it. |
| Unsalted butter | Melt, let it cool a minute, then mix in. Using salted butter? Skip the extra salt. |
| Vanilla extract | Pure vanilla deepens flavor. A tiny pinch of instant espresso boosts chocolate. |

How To Make This Chocolate Tart Recipe
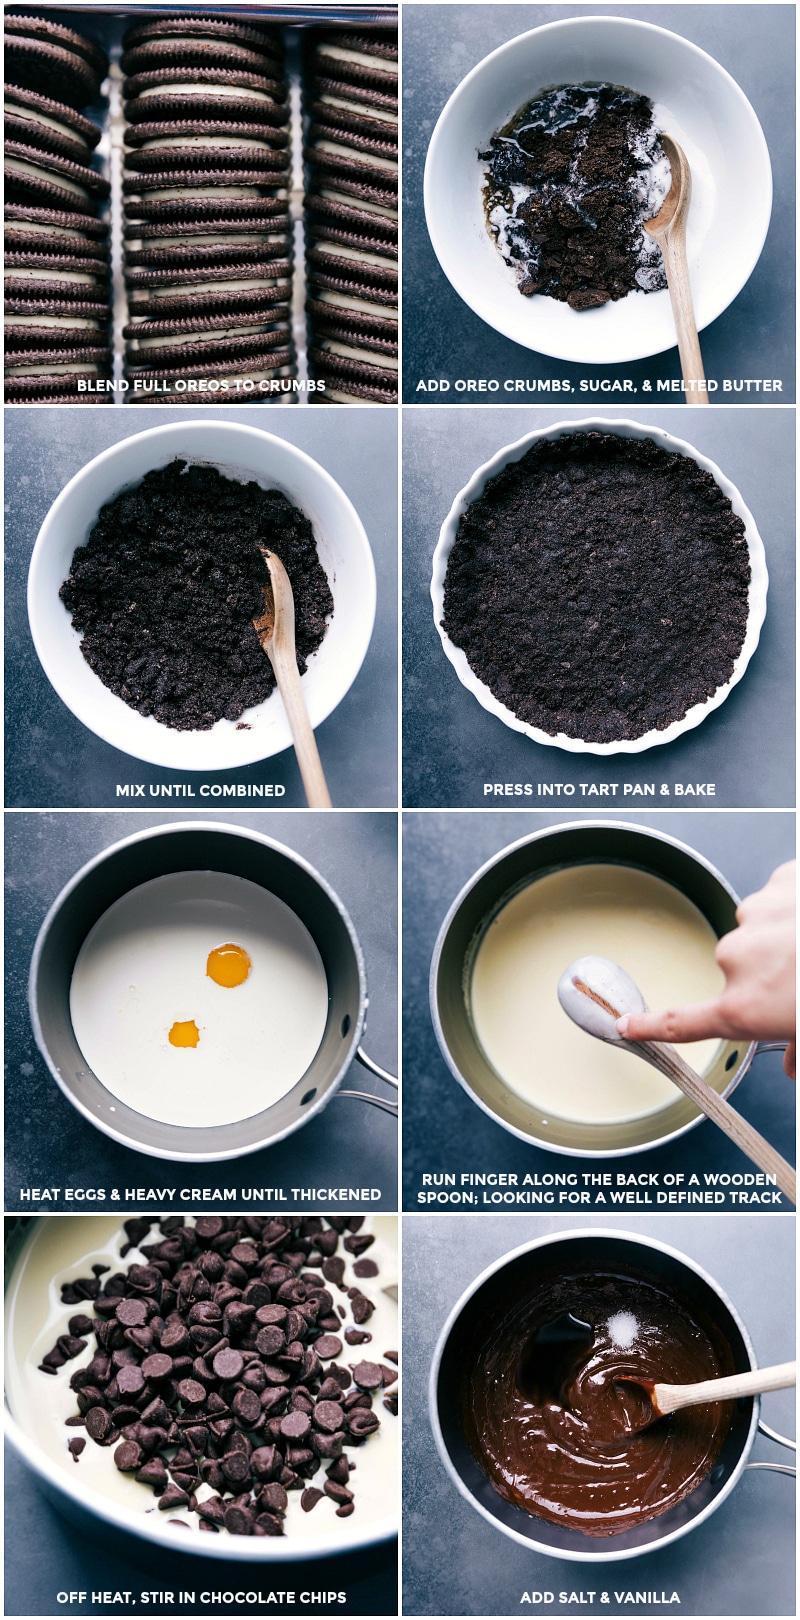
- Crust: Mix cookie crumbs, sugar, and melted butter. Press into a greased tart pan, bake 10 minutes, and cool.
- Filling: Cook cream and yolks until thick, then stir in chocolate, salt, and vanilla.
- Chill: Pour into crust, cover, and chill for 3 hours or overnight.
- Ganache: Melt cream, chocolate, and corn syrup together. Spread on top and chill.
- Serve: Slice with a hot knife, garnish if you want, and keep leftovers in the fridge up to 5 days.
Tips For Success
- Whisk cream and yolks constantly at medium-low heat to prevent egg scrambling.
- Avoid boiling the chocolate tart mixture to prevent curdling.
- Remove from heat when slightly thickened (check with a wooden spoon).
- Salt balances sweetness; adjust to taste. I use fine sea salt.
- Chill the tart for at least 3 hours or overnight with plastic wrap pressed to the surface.
Storage
Store leftover chocolate tart recipe covered in the fridge for up to 5 days. Freezing is not recommended, as it doesn’t thaw well.
More Chocolate Desserts:

Desserts
Easy Chocolate Fondue Recipe
Desserts
Buckeye Brownies Recipe
Chocolate Tart
Ingredients
- Cooking spray
- 20 Oreos or chocolate sandwich cookies
- 2 tablespoons sugar
- 4 tablespoons unsalted butter melted
- 1-1/4 cups heavy cream
- 3 large egg yolks
- 2 cups semi-sweet chocolate chips or dark chocolate chips
- 1/4 teaspoon salt
- 1 teaspoon vanilla extract
- 2 tablespoons heavy cream
- 1/3 cup chocolate chips
- 1 teaspoon light corn syrup
- Toppings as desired see note 1
Instructions
- Preheat oven to 325°F. Lightly grease a 9-inch tart or pie pan with cooking spray. In a powerful blender or food processor, blend the Oreos into crumbs. Measure out 1 level cup of crumbs. Melt the butter in the microwave and allow it to cool slightly.
- In a medium bowl, combine cookie crumbs and sugar, then add melted butter. Stir until well combined. Press crust firmly into the bottom of the greased and prepared pan and 3/4 the way up the sides. Bake for 10 minutes, then remove to a wire rack and cool completely.
- In a small pot, whisk together cream and egg yolks. Heat over medium-low heat, stirring constantly, until the mixture is hot but never boiling and thickens slightly. When you run your finger along the back of a wooden spoon, it should leave a defined track. Remove the pot from the heat and stir in the chocolate chips until they are completely melted and the mixture is smooth. Then, mix in the salt and vanilla extract.
- Pour the filling into the prepared crust and spread into an even layer with the back of a spoon. Cover with plastic wrap (see note 2) and refrigerate for at least 3 hours, up to overnight.
- Add the heavy cream, milk chocolate chips, and light corn syrup to a microwave-safe bowl. Microwave in bursts of 15 seconds, stirring between each burst for 15 seconds, until melted and smooth. Smooth this glaze evenly over the tart and chill for 1 more hour before serving.
- Cut the tart into thin slices. Serve, if desired, garnished with mini chocolate chips, Oreo crumbs, or a sprinkle of powdered sugar.
Recipe Notes
Nutrition
Nutrition information is automatically calculated, so should only be used as an approximation.
Chocolate Tart Recipe FAQs
Yes! Prep the crust up to 2 days ahead and store it covered at room temp. Make the whole tart a day in advance, but wait to add the ganache until just before serving for the best shine.
No problem! A 9-inch pie dish or springform pan works well. Just press the crust about an inch up the sides. It might not look exactly the same, but it will still taste just as good.
Most likely, the cream and egg mixture wasn’t hot enough before you added the chocolate. It should be thick enough to coat the back of a spoon. Also, using chocolate with less than 55% cacao may prevent the filling from setting as firmly.


Does this need to be stored in the refrigerator?
I’d keep leftovers in the fridge! 🙂