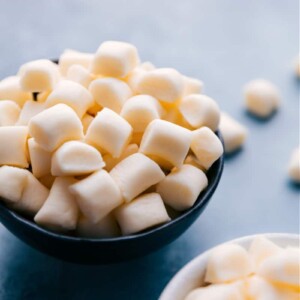
Special thanks to Danish Creamery for making delicious, high-quality butter and for sponsoring this post. As always, all opinions are my own.

This Butter Mints recipe delivers sweet and pepperminty confections with a soft and creamy, melt-in-your-mouth interior. While making candy from scratch can be a big ordeal to make, these mints are so simple to whip together — no candy thermometer needed. Instead of looking where to buy butter mints, give this homemade version a try!

What Are Those Soft Mints Called?

Butter Mints (also sometimes called “Wedding Mints,” “Pillow Mints,” or “Dinner Mints”) are soft and creamy mints that practically melt in your mouth. They’re great after dinner as a way to freshen your breath and offer a nice subtle sweetness. You’ve likely been served these mints at weddings, bridal showers, baby showers, or at a nice restaurant.

A bowl of Butter Mints

Butter Mints Are Better Homemade!

At the restaurant I used to work out, we had a big bowl of mints on the host desk as you’d exit or enter. On slow nights, I probably ate my weight in those mints, ha! My obsession with butter mints runs deep, but I have learned that not all mints are created equally.

It’s very common to get stale and hard mints with flavors that are overly too strong or not minty enough. And, so the last couple of years, I’ve made my own and can confirm, I’m never going back to store-bought mints again!

Everyone that tries these is instantly hooked and impressed by the fact that they’re homemade. While a lot of candy recipes are complicated to create and require a candy thermometer (cough, cough, Toffee or Buttercrunch Candy, or Honeycomb Candy), these mints couldn’t be easier to make. There is no food thermometer required or any special kitchen tools needed. They whip together in minutes in a stand mixer or with a hand mixer and you’ll be on your way to mint heaven before you know it!

Ingredient shot: the butter used for this recipe

Danish Creamery Butter 

Since we’re making butter mints, the butter is key to overall flavor and texture. Because these mints have a higher butter content, they dissolve more readily when eaten, giving them an irresistible “melt-in-your-mouth” quality.

The better the butter, the better the mints! And the best butter (IMO) is Danish Creamery Butter!

Here are a couple of reasons we love this brand so much:

  • Since 1895, the recipe for Danish Creamery Butter hasn’t changed: highquality cream and a touch of sea salt. 
  • Danish Creamery’s Butter is a dream for baking applications, sauces, or just for your morning toast! Nothing better than a batch of old-fashioned butter mints using this brand’s butter.

Process shots-- images of the butter, extracts, cream, salt, and powdered sugar being added and mixed together

What Are Butter Mints Made Of?

The ingredient list for these confections is short and simple: butter, powdered sugar, baking extracts, cream, and salt (if using unsalted butter).

We typically use peppermint extract in this recipe, as opposed to peppermint oil. Keep in mind that oils (oils in the baking aisle, not essential oils!) are stronger than extracts. Oils and extracts typically have a 1:4 ratio (1/4 teaspoon of oil = 1 teaspoon extract)

Quick Tip

Make sure to use peppermint extract, not mint extract. The actual strength of the peppermint extract will also depend on the brand (some are more potent than others), so be sure to taste and adjust to personal preference, adding more for a stronger peppermint flavor. I use McCormick’s® peppermint extract in this butter peppermints recipe.

Process shot of butter mints: add sugar, mix until smooth; knead into a ball; cut into wedges

How To Make Butter Mints

The full written recipe is at the bottom of the post, but here are our top tips for making Butter Mints:

  • Use room-temperature (not melted) butter. For best results, set the butter out at room temperature an hour before using. To speed up the process of getting room-temperature butter, use this great hack. If the butter is too soft or melted, the mint dough will be too wet!
  • Add powdered sugar gradually. This helps to achieve a smooth and creamy dough to work with.
  • Adjust the dough. Measuring powdered sugar can vary quite a bit depending on how it’s packed into the measuring cup. You may need just a touch more heavy cream if the mixture is too dry (only add very little, very gradually!). On the flip side, if the mixture is too wet, you may need a touch more powdered sugar (even up to 1/4 cup more).
  • For soft butter mints

Process shots: roll the dough into a rope; cut into 1/2-inch chunks; set aside to dry

Variations

Ways To Make This Recipe Your Own!

  • If you’d like yellow Butter Mints (or any other color), you’ll need some food coloring. Actually, though, we prefer the mints without any coloring added. 
  • If you’re planning to make Butter Mints for a baby shower, follow the recipe but dye the dough either pink or blue. Or, for a gender reveal party, separate the dough and dye one portion pink and the other portion blue.
  • Use a different extract. Even though Butter Mints are typically peppermint, you can have so much fun with this recipe base by adding in different extracts. I’m thinking coconut extract would be delicious! ๐Ÿ™‚

Butter Mints ready to be served

Storage

Do Butter Mints Expire?

  • Carefully transfer the mints to a sturdy air-tight container (so they won’t get smashed) and store in a cool, dry spot at room temperature. They’ll stay fresh for 1-3 weeks, or 3-4 weeks in the fridge.
  • You’ll know mints are past their prime if they stop giving off that wonderful peppermint aroma or show signs of discoloration. If there are changes to the way these mints look, they are most likely no longer good to eat.
  • How to freeze: Freeze any leftover mints on a large sheet pan. Once mints are firmly frozen, transfer to an airtight container or bag and freeze for up to 2 months. 

Bowls of Butter Mints with a container of butter nearby

More Tasty Treats

5 from 4 votes

Butter Mints

This Butter Mints recipe creates sweet, pepperminty confections with a creamy, melt-in-your-mouth texture. Easy to make without a candy thermometer, these homemade mints are a delightful alternative to store-bought options.
Prep Time: 15 minutes
Resting Time (For Mints To Harden): 10 hours
Total Time: 10 hours 15 minutes
Servings: 150 mints

Equipment

  • Sheet pan lined
  • stand mixer with whisk attachment

Ingredients 
 

  • 1/2 cup Danish Creamery Premium Butter at room temperature
  • 3-3/4 cups powdered sugar see note 1
  • 1 tablespoon heavy cream see note 2
  • 1 teaspoon vanilla extract
  • 1/4 teaspoon peppermint extract see note 3
  • 1/8 teaspoon salt
  • Food coloring optional

Instructions 

  • Line a large sheet pan with parchment paper and set it aside. In a stand mixer with a whisk attachment, beat the softened butter on low speed until smooth. You can also use a hand mixer for this step.
  • Add 1 cup of powdered sugar and the remaining ingredients, then beat on low speed until combined (see note 1). Gradually add the rest of the powdered sugar, about 1 cup at a time, mixing at low to medium speed until smooth. Scrape down the sides of the bowl as needed.
  • Once the powdered sugar is fully incorporated, you can add 2โ€“3 drops of food coloring. Increase the mixer speed to high and beat until a smooth dough forms, scraping the bowl as needed. Once the dough is smooth, turn off the mixer and sprinkle a handful of powdered sugar on a clean surface. Transfer the dough to the counter and gently knead it, shaping it into a thick disc.
  • Use a sharp knife to cut the disc into six equal portions and set one portion aside. Cover the remaining dough with a damp kitchen towel to prevent it from drying out. Roll the removed portion into a long, 1/2-inch thick tube shape, then cut it into 1/2-inch wide mints. Transfer the cut mints to the prepared sheet pan and repeat until all the mints are cut.
  • Let the mints sit uncovered to dry overnight or for 10โ€“12 hours. Keep in mind that these mints will remain softer than commercial varieties, which is what makes them so creamy and delicious!

Video

Recipe Notes

Note 1: Measuring powdered sugar can vary based on how it's packed into the cup. If the mixture is too dry, gradually add a little more heavy cream. If it's too wet, add a bit more powdered sugar, up to 1/4 cup.
Note 2: Unfortunately, milk isn't a great substitute for heavy creamโ€”it's not thick enough!
Note 3: Be sure to use peppermint extract, not peppermint oil, this will completely define the flavor.
Storage: Store in an airtight container in the fridge for up to 4 weeks, or in the freezer for 2 months.

Nutrition

Calories: 8kcal | Carbohydrates: 1g | Protein: 1g | Fat: 1g | Saturated Fat: 1g | Polyunsaturated Fat: 1g | Monounsaturated Fat: 1g | Trans Fat: 1g | Cholesterol: 2mg | Sodium: 6mg | Potassium: 1mg | Sugar: 1g | Vitamin A: 21IU | Vitamin C: 1mg | Calcium: 1mg | Iron: 1mg

Nutrition information is automatically calculated, so should only be used as an approximation.

Meet Chelsea


Hello, and welcome to Chelseaโ€™s Messy Apron! Iโ€™m Chelsea, the recipe developer, food photographer, and writer behind the site. Iโ€™m passionate about creating simple, reliable, and delicious recipes that anyone can make.

Thanks for stopping byโ€”I hope you find something delicious to make!

More Recipes You'll Love

5 from 4 votes (3 ratings without comment)

Leave a comment

Your email address will not be published. Required fields are marked *

Recipe Rating


4 Comments

  1. Ella says:

    5 stars
    I made these yesterday, let them dry and just tasted one…. Oh my gosh are they delicious!! And so easy to make. I made them exactly as written and without any dyes. Just scrumptious! My grandson, who cannot tolerate red dye, will be thrilled to get these. Thank you SO much for this recipe.

    1. Chelsea says:

      I am so happy to hear this! Thanks so much Ella! ๐Ÿ™‚

  2. Mary says:

    What is Danish butter

    1. Chelsea Lords says:

      The brand I used; any butter will work, but better quality = better flavor ๐Ÿ™‚ Enjoy!