Best Chocolate Cake Recipe

This post may contain affiliate links. Please read my disclosure policy.

Three layers of moist and rich Chocolate Cake, frosted with a delicious triple-chocolate buttercream icing. 
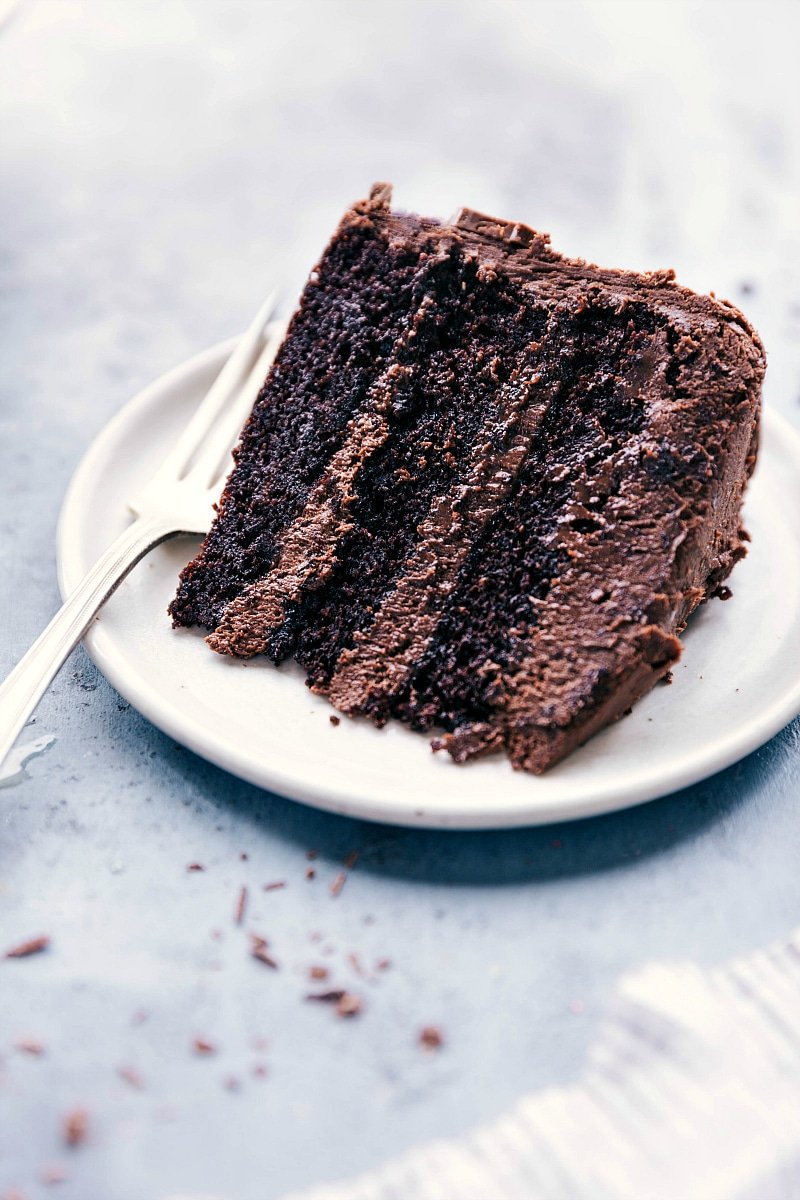
Decorate the outside of the cake or keep it simple with chocolate shavings around the base. This cake pairs perfectly with a large scoop of vanilla bean ice cream or a tall glass of milk. Utterly sublime.


The slice of delicious and rich chocolate cake on a plate, ready to be eaten.

The Best Chocolate Cake 

It’s no secret we’re obsessed with chocolate at my home, and over the years I’ve shared dozens of chocolate-filled recipes (these Oreo Balls or Icebox Cake are favorites on the site). Today, I’m excited to finally share the absolute-best homemade Chocolate Cake I’ve ever tasted. And this gem of a recipe comes from some of my favorite people — Maria and Josh over at their blog, Two Peas and Their Pod.

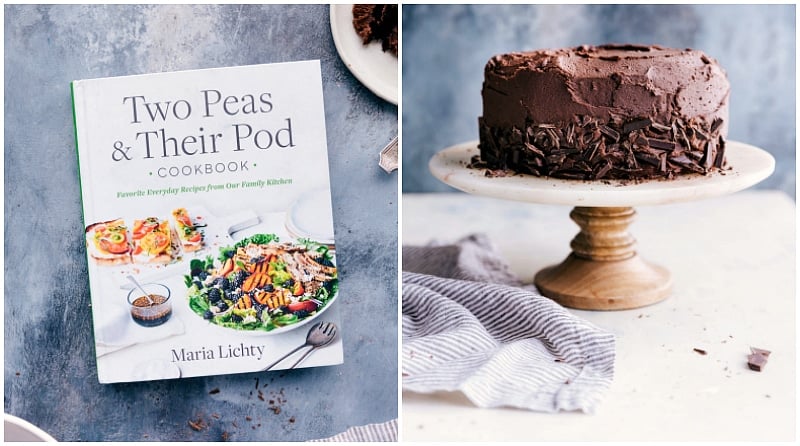
They recently released a cookbook, Two Peas & Their Pod, and if you haven’t gotten a copy yet, let me tell you how much you need one! It is filled with simple and delicious recipes, gorgeous photography for each recipe, and has the prettiest cookbook cover I think I’ve ever seen. Maria and Josh are sharing their favorite everyday recipes from their kitchen and I’m certain you’ll find dozens of recipes to love. My favorite part of the book is her “entertaining” chapter where Maria shares dozens of foodie party ideas — classy and kid friendly. Congrats Maria, Josh, and boys; the book is beautiful! ❤

And if you get your hands on the cookbook (or already have it), be sure to leave a comment and tell me your favorite recipe from the book!

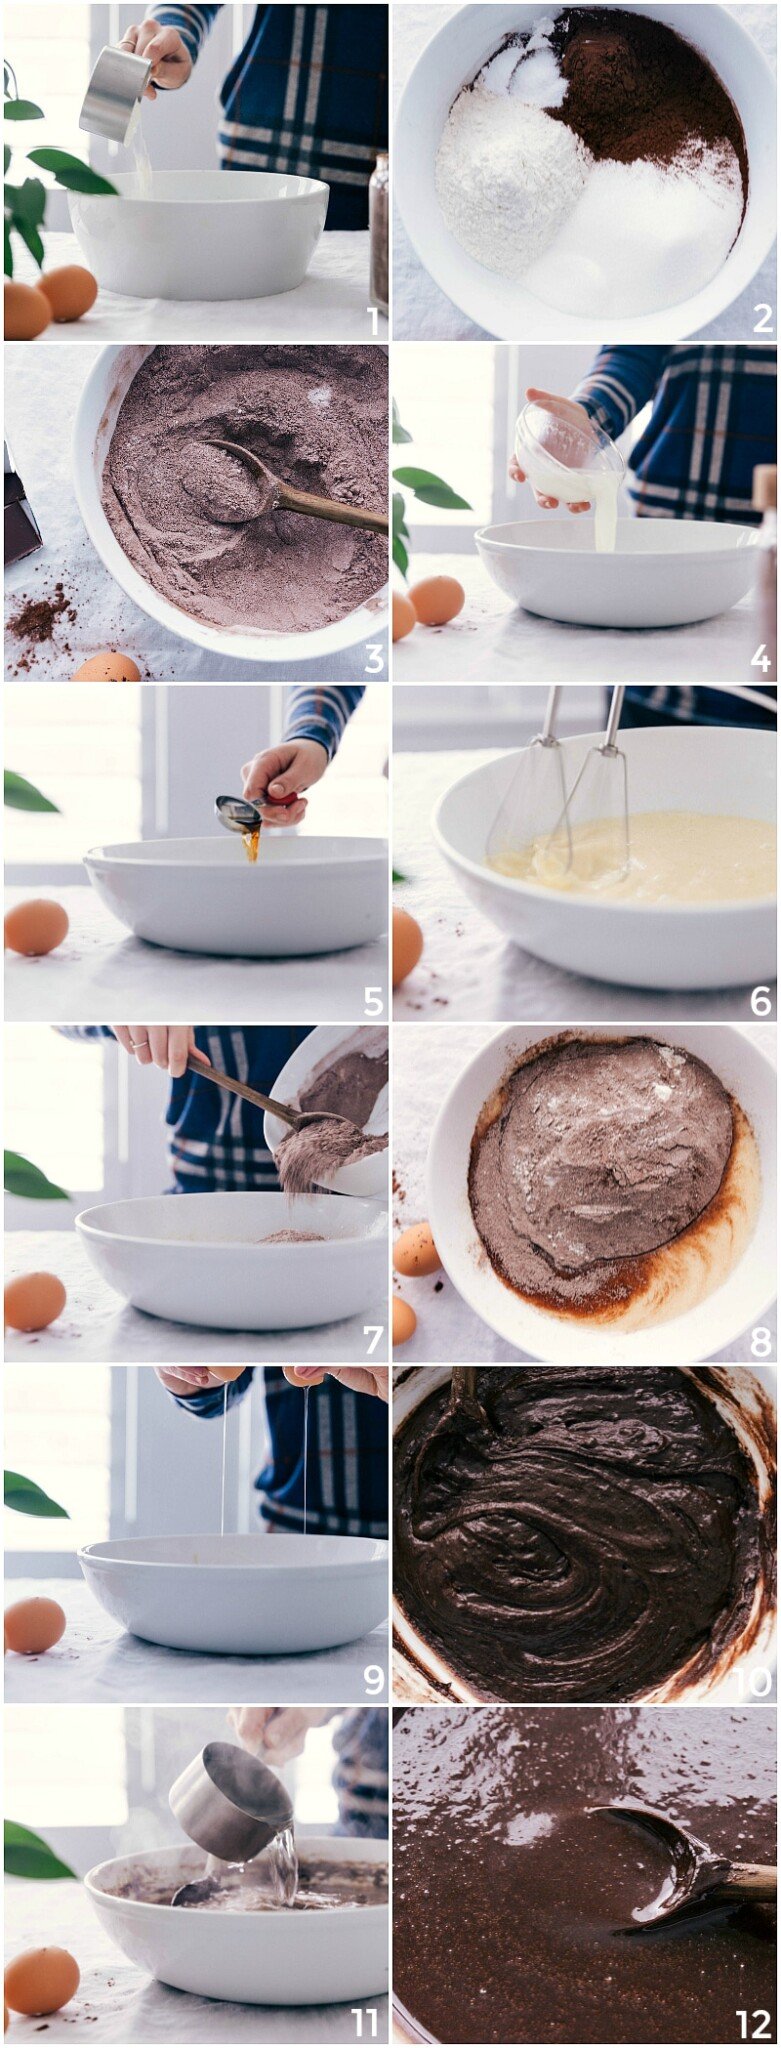
Dry and wet ingredients being measured and then mixed together.

How to make Chocolate Cake

The numbered photos above correspond with the numbered descriptions below.

  1. Add the dry ingredients in a large bowl.
  2. We’ve got flour, sugar, cocoa powder, baking soda, baking powder, and salt. Make sure your baking soda and baking powder are fresh
  3. Dry ingredients are mixed together. 
  4. Add buttermilk and oil into a separate bowl. Make sure the buttermilk is at room temperature– not cold.
  5. Add in the vanilla extract.
  6. Mix the wet ingredients.
  7. Add the dry ingredients to the wet ingredients.
  8. Dry ingredients get mixed into wet.
  9. Add eggs, one at a time, beating after each addition, until just combined.
  10. Texture of batter after all ingredients except for hot water have been added.
  11. Add in hot water. The hot water “blooms” the cocoa powder, making the cake more flavorful. Don’t use cold or room-temperature water.
  12. Finished cake batter.

The cocoa powder matters

The most important ingredient for Chocolate Cake is the cocoa powder. You want to use a good, high quality Dutch-process cocoa powder. And the better the cocoa powder you use, the better this cake turns out!  This is my favorite cocoa powder  and what I use in this recipe.

QUICK TIP

Dutch-process cocoa is made differently than natural (regular) cocoa. Dutch-process is much, much darker than natural. It has a deeper, more intense flavor (kind of like milk chocolate versus dark chocolate), due to a process that amplifies the acidic nature of the roasted cacoa beans. Recipes using Dutch-process cocoa generally use baking powder instead of baking soda, because of that higher acid content. Using the correct cocoa powder in a recipe makes a real difference in the final product! [/quick tip]

The cake pans (and lining them) matter

I tried this chocolate cake recipe in 8- and 9-inch pans and the cake sank a great deal in the larger pans. While I haven’t tested this cake in other sizes (or pans not meant for cake), I assume there would be similar results. Stick to 8-inch cake pans for best results. Here are the exact cake pans I use.

While we’re talking about cake pans, you’ll also want to make sure you line the cake pan with parchment paper. This cake is so fudgy and moist that if the bottom isn’t lined, the cake won’t come out nicely (I speak from experience!).

There’s an easy to way to do this; check out this photo slideshow or read the directions below:

  1. Tear off a sheet of parchment paper, slightly larger than the cake pan.
  2. Fold the parchment in half.
  3. Then fold the parchment in half again.
  4. Fold into a triangle.
  5. Fold the triangle in half again.
  6. Hold the triangle against the bottom of the pan from the center outwards.
  7. Cut the parchment right where it meets the edge of the cake pan along the curve of the cake pan.
  8. Unfold the parchment and press into the bottom of the cake pan.

The finished cake and the cookbook it came from.

Chocolate Cake: troubleshooting

How to get even cake layers

When making a layered cake, it’s important to make sure you are dividing the batter equally between the cake pans. It’s important for the cake to look even and pretty, but even more importantly, the layers need to bake evenly. The easiest way to confirm the layers are even is to weigh them!

Pour even amounts into each pan and then check the accuracy with a kitchen scale. Adjust the batter in each cake pan so that each pan contains perfectly even amounts.

Chocolate Cake tips

  • High-quality chocolate: The better the chocolate, the better the flavor! I love Ghirardelli® or Guittard® chips for the buttercream. Lindt® dark chocolate with sea salt is my favorite chocolate bar to chop for the shavings on the outside of the cake.
  • Spoon and level the flour: If you pack in too much flour, you’ll get dense and dry cake. Here’s a great video showing how to properly measure flour for this recipe.
  • Don’t overbake: To avoid dry cake, you’ll want to make sure you don’t over-bake the layers; they can go from perfectly moist and fudgy to dry and less flavorful in just a few minutes. 
  • Let the cakes cool for 30 minutes: Cool in the pan for a half hour before turning them onto cooling racks to continue cooling. Wait for the cakes to be 100% cool before frosting and decorating.

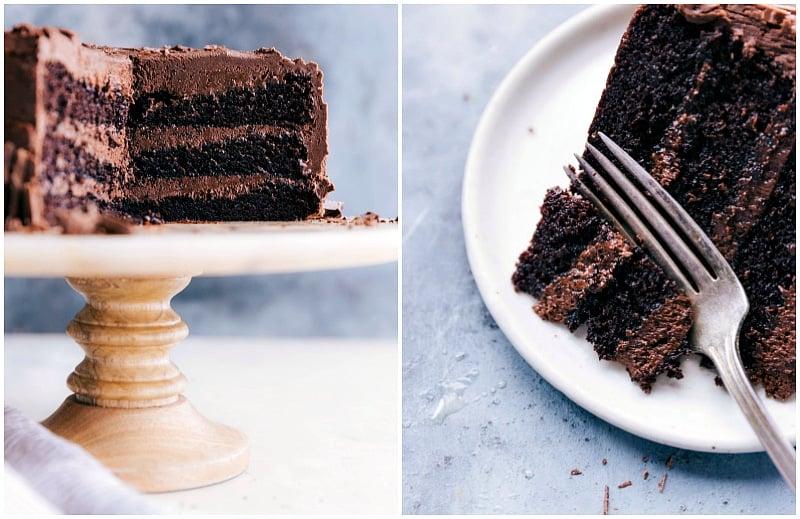
Delicious and fluffy chocolate cake slice with a bite taken out.

Chocolate Cake storage

Finished cake: Store Chocolate Cake at room temperature, tightly wrapped with plastic wrap, or under a cake dome for up to 3 days. The finished and frosted cake doesn’t freeze and thaw well.

Make ahead/Freezing: Carefully wrap the cooled cake layers in plastic wrap and refrigerate for up to 2 days. You could also freeze them wrapped in plastic wrap for up to 1 month. Defrost in the fridge for 24 hours before frosting and assembling.

More delicious desserts

FOLLOW ALONG! Subscribe to my newsletter and follow along on Facebook, Pinterest and Instagram for the latest updates, recipes and content.

Chocolate Cake

5 from 9 votes
Three layers of moist and rich Chocolate Cake are frosted with an incredible chocolate buttercream frosting, made with three kinds of chocolate.
Recipe shared from Two Peas & Their Pod cookbook, from Maria of Two Peas & Their Pod
The slice of delicious and rich chocolate cake on a plate, ready to be eaten.
Print Recipe

Chocolate Cake

The slice of delicious and rich chocolate cake on a plate, ready to be eaten.
5 from 9 votes
Three layers of moist and rich Chocolate Cake are frosted with an incredible chocolate buttercream frosting, made with three kinds of chocolate.
Recipe shared from Two Peas & Their Pod cookbook, from Maria of Two Peas & Their Pod
Course Dessert
Cuisine American
Keyword chocolate cake, chocolate cake recipe
Prep Time 45 minutes
Cook Time 24 minutes
Servings 12 -16 slices
Chelsea Lords
Calories 1213kcal

Equipment

  • 3 (8 inch) round cake pans
  • Parchment paper
  • Nonstick cooking spray

Ingredients

Chocolate Cake

  • 1 cup buttermilk, at room temperature
  • ½ cup vegetable or canola oil
  • 1 tablespoon pure vanilla extract
  • 1 Âľ cup all-purpose white flour
  • 2 cups white granulated sugar
  • Âľ cup Dutch-process cocoa powder (Note 1)
  • 2 teaspoons baking soda
  • 1 teaspoon baking powder
  • 1 teaspoon kosher salt
  • 2 large eggs, at room temperature
  • 1 cup very hot water (Note 2)

Chocolate Buttercream

  • 2 cups (1 pound) unsalted butter, at room temperature
  • 7 cups (2 pounds) confectioners' sugar (powdered sugar), sifted
  • 1 cup Dutch-process cocoa powder
  • 1/4 cup + 2 tablespoons full-fat chocolate milk (or regular milk or heavy cream), at room temperature
  • 2 teaspoons pure vanilla extract
  • ÂĽ teaspoon kosher salt
  • â…” cup semisweet chocolate chips, melted and slightly cooled
  • For decorating: chocolate shavings, sprinkles, or mini chocolate chips (optional)

Instructions

  • PREP: Preheat the oven to 350 degrees F. Grease three 8-inch round cake pans generously with nonstick cooking spray. Line the bottom of the pans with parchment paper (See Note 3), and then spray the parchment paper with the nonstick spray. Set pans aside.
  • WET INGREDIENTS: In a medium bowl, whisk together the buttermilk, oil, and vanilla.
  • DRY INGREDIENTS: In the bowl of a stand mixer fitted with the paddle attachment, mix together the flour, granulated sugar, cocoa powder (See Note 1), baking soda, baking powder, and salt. With the mixer on low speed, add the buttermilk/oil mixture. Add the eggs, one at a time, and mix until well combined. Slowly add in the hot water (hot water "blooms" the cocoa powder, making it more flavorful) and stir just to combine, stopping to scrape down the sides of the bowl with a spatula before mixing briefly again. Do not overbeat or overmix the batter or it will become dense.
  • BAKE: Divide the batter evenly among the three prepared pans and bake for 24 to 28 minutes, or until a cake tester comes out clean when inserted into the centers of the cakes. (My cakes are always done at 24 minutes.)
  • COOL: Set the cakes on wire cooling racks to cool in the pans for 30 minutes. Remove the cakes to the racks to cool completely. (You can refrigerate or freeze the cakes at this time.) Do not frost cakes until they are completely cool.
  • BUTTERCREAM: In the bowl of a stand mixer fitted with the paddle attachment, beat the butter until creamy and light in color, about 3 minutes. Scrape down the bowl halfway through. Add the confectioners' sugar (2 cups at a time) and then the cocoa. Mix on low speed until just incorporated. Pour in the chocolate milk, vanilla, and salt. With the mixer on low speed, add the melted chocolate. Mix for an additional 2 to 3 minutes, until the buttercream is light and fluffy.
  • ASSEMBLE: If the cake layers are slightly domed on top, carefully level them off with a sharp serrated knife or cake leveler. To build the cake, place a tiny bit of frosting in the center of your cake stand (to keep the cake from sliding). Then place the first layer, bottom side up, on a flat plate or cake pedestal. Using a knife or offset spatula, spread the top of the cake evenly with buttercream. Place the second layer on top of the first, top side up, and spread more buttercream evenly over the top. Repeat with the third layer and frost the top and sides of the cake. Decorate with chocolate shavings, sprinkles, or chocolate chips, if desired. Slice and serve.
  • BREAKING UP THE PROJECT: Since this is a bigger undertaking than many desserts, you can break up the project by making the cakes in advance. I like to do this so the cake has time to chill, which makes frosting easier. Carefully wrap the cooled cake layers in plastic wrap and refrigerate for up to 2 days. You can also freeze them, wrapped in plastic wrap, for up to 1 month. Defrost before frosting and assembling.

Video

Recipe Notes

Note 1: Cocoa powder: The cocoa powder must be Dutch-process (not natural cocoa powder) for this cake. Otherwise it will end up dry and bland. See blog post for my recommendation on cocoa powder. 
Note 2: Hot water: Coffee can be used in place of hot water, if preferred.
Note 3: Parchment paper: Make a parchment paper round liner for the bottom of the cake pans by following these steps:
  1. Tear off a sheet of parchment slightly larger than the cake pan.
  2. Fold the parchment in half.
  3. Then fold the parchment in half again.
  4. Fold into a triangle.
  5. Fold the triangle in half again.
  6. Hold the triangle against the bottom of the pan from the center outwards.
  7. Cut the parchment right where it meets the edge of the cake pan, along the curve of the cake pan.
  8. Unfold the parchment and press into the bottom of the cake pan.

Nutrition Facts

Serving: 16slices | Calories: 1213kcal | Carbohydrates: 199g | Protein: 7g | Fat: 48g | Saturated Fat: 26g | Polyunsaturated Fat: 7g | Monounsaturated Fat: 13g | Trans Fat: 1g | Cholesterol: 119mg | Sodium: 506mg | Potassium: 326mg | Fiber: 6g | Sugar: 174g | Vitamin A: 1071IU | Vitamin C: 0.02mg | Calcium: 87mg | Iron: 4mg

We do our best to provide accurate nutritional analysis for our recipes. Our nutritional data is calculated using a third-party algorithm and may vary, based on individual cooking styles, measurements, and ingredient sizes. Please use this information for comparison purposes and consult a health professional for nutrition guidance as needed.

DID YOU MAKE THIS RECIPE?

I love hearing from you when you've made one of my recipes! Tag me on Instagram at @ChelseasMessyApron or leave me a comment below.


Our Favorite Products
More Recipes You'll Love

Banana Chocolate Chip Cake

3 hrs 15 mins

Banana Chocolate Chip Cake

Click the Bookmark Icon to Add to Your Favories

Banana Cupcakes (Cream Cheese Frosting)

33 mins

Banana Cupcakes (Cream Cheese Frosting)

Click the Bookmark Icon to Add to Your Favories

Cake Mix Cupcakes

38 mins

Cake Mix Cupcakes

Click the Bookmark Icon to Add to Your Favories

Bundt Cake

1 hrs 10 mins

Bundt Cake

Click the Bookmark Icon to Add to Your Favories

FREE BONUS

FREE BONUS

EASY MEAL SECRETS:
How to Make Mealtime Hassle Free!

5 secrets to easy, fast and delicious dinners.

[gravityform id="2" title="false" description="false"]

Leave a Comment:

Your email address will not be published. Required fields are marked *

Recipe Rating


22 Comments

  1. This looks absolutely decadent! We’re having friends over for dinner on Saturday and think I’ll make this for dessert. Can it sit in the fridge overnight or should it be made the day of? Thanks so much!

    1. Hi Abbie! The cakes can be made beforehand (and VERY well wrapped up to avoid drying), the frosting can also be made before and stored in an airtight container. Other than that I wouldn’t prepare anything else before the day of and don’t frost the cake or add the other elements until the day of

  2. This chocolate cake is looking so yummy and delicious. It seems like it’s so moist and spongy. Thank you for sharing this lovely recipe, now looking forward to trying it.

  3. Best chocolate cake I have ever had!

    Thanks for sharing the recipe. I had an itch for chocolate cake and wanted to make it myself. I am VERY happy with the results. Great directions, item descriptions (bought the cocoa from Amazon too), and pictures make your site a great resource for DIY-minded people.

    My wife and son now declare me the family baker!!

    1. I am so happy to hear this! This is such a win! Thanks so much for your comment! 🙂

  4. 5 stars
    Absolutely the best chocolate cake I’ve made so far! The taste was incredible. All other recipes I’ve encountered used a cup of coffee or a spoonful of espresso powder with the insistence that you wouldn’t taste it. Well I did and didn’t like it all. This recipe was perfect. My layers came out moist and even. I paired it with a chocolate almond buttercream frosting. Simply amazing! Thank you for sharing such a great recipe.

    1. Oh no! I’m so sorry that happened. Did you have fresh baking agents? Did you change anything about the recipe?

      1. All ingredients were fresh and I followed the receipt to the tee!!!! Tastes really delicious though. Would this happen if under mixed? I just mixed until everything was blended.

    1. Any dutch cocoa powder will work. Hershey’s “Special Dark” is readily accessible at most grocery stores!

  5. I made this cake for my husband’s birthday. I used Ghirardelli’s Premium Baking Cocoa 100% Cocoa Dutch Process. The cake is very moist and flavorful. The buttercream frosting was so stiff my Kitchen-aid mixer didn’t want to mix. Once I started frosting the cake I added additional cream (used instead of chocolate milk) to make the frosting easier to spread.

  6. 5 stars
    Hello! Great recipe, very similar to one my husband used when he worked at the Appalachian Mountain Club in NH years ago. My cakes sunk in the middle but otherwise were moist and spongy. From what understand about Duth Process cocoa, you need more baking powder and less baking soda and thought maybe this was why. But then I wasn’t sure if it’s reversed here because of the buttermilk. I’m hoping you can advise this novice baker!

  7. 5 stars
    Made the cake today for Valentine’s Day and it was amazing! My wife and I agreed it was the best chocolate cake we’ve ever had. Cake was super moist and the butter cream frosting was super creamy. I used Droste Dutch cocoa and 1 1/2 tsp of both baking powder and baking soda. Perfect rise done in 24 minutes. Thank you so much for the recipe.

Never Miss a Recipe

[gravityform id="3" title="false" description="false"]