Four easy & creative Halloween Appetizers that are so delicious: Spiderweb 7-Layer Dip, Walking Dead Mummy Dogs, Monster Meatball Sliders, & Cheesy Monster Fingernail Bread.

Halloween Appetizers: 7-Layer Spider Web Dip
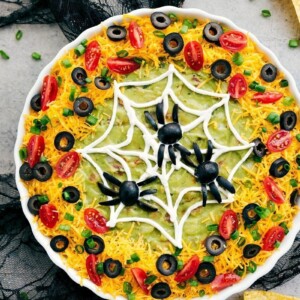
7-Layer Spider Web Dip is a simple Halloween appetizer to throw together that everyone will enjoy! A Halloween twist on the famous 7-layer chip dip. Pipe a spider web with sour cream and add your favorites as the toppings. Most of this appetizer can be made ahead, just make sure to add the guacamole (and finish decorating on top) right before serving.
7-Layer Spider Web Dip
Video
Equipment
- 10 to 12-inch plate or pie tin or tart pan
Ingredients
- 1 (15-ounce) can refried beans
- 1 packet taco seasoning
- 1 cup sour cream divided
- 1 cup chunky salsa mild or medium, not watery
- 1 cup freshly shredded Cheddar cheese or Colby jack cheese
- 1/2 cup cherry tomatoes halved
- 3 to 4 green onions diced
- 1/2 can drained olives divided
- 1 cup guacamole
- Tortilla Chips
Instructions
- In a small bowl, mix taco seasoning with refried beans. Spread mixture evenly on the bottom of a 10 to 12 inch plate/pie tin/tart pan. Spread 3/4 cup sour cream on top, then gently spread.
- Add dollops of salsa and gently smooth on top. Add dollops of guacamole and spread slowly.
- Slice half the olives. Around the edge add freshly grated cheese, thinly sliced green onions, sliced olives, and halved cherry tomatoes. Put the remaining 1/4 cup sour cream into a plastic bag and cut off the tip. Squeeze sour cream into a spider web pattern over guacamole.
- Make olive spiders—halve a few olives lengthwise, then cut a few olives into small strips. Place halved olives in the mix and the strips around the halved olives to look like spiders.
- Enjoy dip immediately or within 10–15 minutes after preparing. Serve with tortilla chips.
Recipe Notes
Nutrition
Nutrition information is automatically calculated, so should only be used as an approximation.

Walking Dead Mummy Dogs
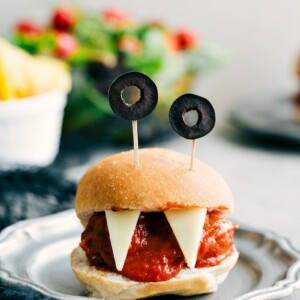
Walking Dead Mummy Dogs make for the perfect spooky Halloween Appetizers to celebrate the Halloween season with. Hot dogs wrapped with ribbons of pastry crust and decorated to look like the walking dead, these are sure to be a party hit! Not to mention they make a kid-friendly Halloween meal. Dip them in some ketchup and/or mustard and you’ll be set with this one!

Walking Dead Mummy Dogs
Equipment
- Sheet pan (15" x 10")
Ingredients
- 1 (8-ounce) container refrigerated crescent rolls
- 10 large hot dogs
- Cooking spray
- Yellow mustard or ketchup or both
Instructions
- Preheat oven to 375℉. Unwrap crescent dough and lay flat on a cutting board. Cut at the perforations to create 4 even rectangles. Press the other perforations to seal.
- With a sharp knife, cut each rectangle lengthwise into 10 strips, making a total of 40 strips of dough.
- Take one hot dog at a time and make two slits along the sides for the mummy’s arms. Make a slit at the bottom for its legs.
- Wrap strips of dough around the individual arms and legs, then around the body of each hot dog, leaving small space for where the mummy’s face will be.
- Place mummies on a large (ungreased) sheet pan and lightly spray the dough with cooking spray.
- Bake 12–15 minutes or until the dough is light golden brown. Pour some mustard in a plastic bag and snip off the tip of the bag with scissors. Pipe “eyes” on the mummies.
- Enjoy mummy dogs with extra mustard and ketchup if desired.
Recipe Notes
Nutrition
Nutrition information is automatically calculated, so should only be used as an approximation.

Halloween Appetizers: Cheesy Bread Fingers
These Cheesy Bread Fingers are always the first thing to go! Yes, of course they are festive and fun, but more than anything they are DELICIOUS. Honestly, the best cheesy bread I’ve ever had, and everyone always begs for this recipe! Make sure to pop these in the oven right before serving them to your party guests!

Cheesy Bread Fingers
Equipment
- Large sheet pan (15" x 21")
- Aluminum foil or parchment paper
Ingredients
- 4 tablespoons unsalted butter softened
- 2 teaspoons minced garlic
- 1 cup Freshly shredded mozzarella cheese not bagged mozzarella
- 2 cups freshly shredded sharp Cheddar cheese
- 1/4 cup mayo
- 1 tablespoon sour cream
- 1 loaf French Bread or ciabatta bread, halved
- 1 (6-ounce) bag pepperoni cut in quarters
Instructions
- Preheat oven to broil on high. Slice loaf of bread in half horizontally (crusts down) and place both halves on a large sheet pan (line with foil, parchment paper, or spay with cooking spray). Set aside.
- In a bowl, mix softened butter and garlic together until smooth. In a separate large bowl, mix together the cheeses, mayo, and sour cream until combined. Combine the two mixtures.
- Spread and smooth cheese mixture evenly on both loaves. Place cheesy bread under the broiler for 2–4 minutes or until nicely browned. Watch carefully to avoid burning!
- Meanwhile, cut pepperoni in quarters to resemble finger nails.
- Remove and allow to slightly cool before cutting (use a sharp bread knife) into thin slices to resemble “fingers.” Place one pepperoni wedge at the top of each thin slice.
- Enjoy immediately with a side of marinara sauce if desired.
Recipe Notes
Nutrition
Nutrition information is automatically calculated, so should only be used as an approximation.

Meatball Sliders
Monster Meatball Sliders make for the perfect spooky meal or Halloween Appetizers to celebrate the season with. Sandwich your favorite meatball recipe (or buy pre-made meatballs in a pinch) in between some slider rolls, add some cheesy “teeth” and finish these monsters off with sliced olive “eyeballs.” These sliders are quick to make, kid and adult friendly, filling, and festive!
Meatball Sliders
Equipment
- Toothpicks
Ingredients
- 1 bag frozen Italian meatballs or see note 1 for my favorite homemade meatballs!
- 1 (24-ounce) jar marinara sauce
- 24 dinner rolls
- 1 (16-ounce) block mozzarella cheese divided
- 1/2 of 1 jar black olives sliced
- Toothpicks
Instructions
- Prepare meatballs according to package directions (or follow the link in the recipe notes for homemade meatballs!)
- Combine cooked meatballs with marinara sauce. Cut 48 “teeth” out of the block of mozzarella cheese (or however many sliders you are making) Grate the rest of the cheese to get about 1 cup.
- When ready to serve, halve the dinner rolls and sprinkle some shredded mozzarella on the bottom rolls. Top each with the hot marinara covered meatballs, more sauce, and the top of the sandwich roll.
- Thinly slice olives and attach one slice to a toothpick. Insert toothpick in the top of the sliders. Press the cut-out mozzarella teeth to the meatballs. Serve immediately.


sd
These Halloween appetizers are such a fun idea! I love how creative and festive they look. Can’t wait to try them out for my Halloween party this year!
I absolutely love these Halloween appetizer ideas! The spooky touches make them perfect for a party. Can’t wait to try the mummy hot dogs and ghostly cheesy dips. Thanks for sharing such creative recipes! 🎃👻
Thrilled to hear this! Can’t wait for you to try them!
These Halloween appetizers are absolutely adorable! I can’t wait to try the stuffed pumpkin peppers for my party. Chelsea always has the best ideas that make entertaining so much fun!
You’re so sweet, thanks so much for your comment. I’m thrilled you’re enjoying what you’re finding!
We made the mummies and 7 layer dip. They were great!!! Thank you!!
Yay! So happy to hear this! Thanks!
I’m a confused regarding how many people the recipe feeds. For the cheese sticks it states 4-6 so does it mean it feeds 4 to 6 people? If I want to feed 14 people do I enter 14? What does the -6 actually stand for? Thank you
Yes, feeds 4 up to 6 people, depending on how hungry guests are/how many other appetizers are being served. If you’re only serving the cheese sticks to 14 people, you can enter in 14.
This recipe was really well-written. You said to slowly smooth the quac over the salsa. Most would have used carefully, but slowly was exactly what was needed to be done.
The dish was fun to put together and was a big hit at the Halloween party. We’ll be making this ever year from now on.
So thrilled to hear that you enjoyed the dip! 🙂 Thank you so much for your kind comment!
Wonderful ideas!
Thank you!!
You’re welcome! 🙂