This post may contain affiliate links. Please read my disclosure policy.
Simple Halloween Oreo Pops — Spider Oreo Pops, Skeleton Oreo Pops, Frankenstein Oreo Pops, and Monster Oreo Pops
There is a video tutorial (1 min, 6 seconds) above this text and below are specific instructions for each of these Halloween oreo pops. ? Note that each recipe makes about 20-25 Oreo pops so if you want to do a variety of the pops then you’ll want to halve (or third or forth) each of the individual recipes.
Also, if you’re looking for the cake pop holder for these Halloween Oreo Pops (like the one used in the video) I love and highly recommend this Nordic Ware one! (<– click on text). You’ll also want to have Parchment Paper to lay all of these Halloween Oreo pops on (after making them) so they can harden, but be pulled up easily.
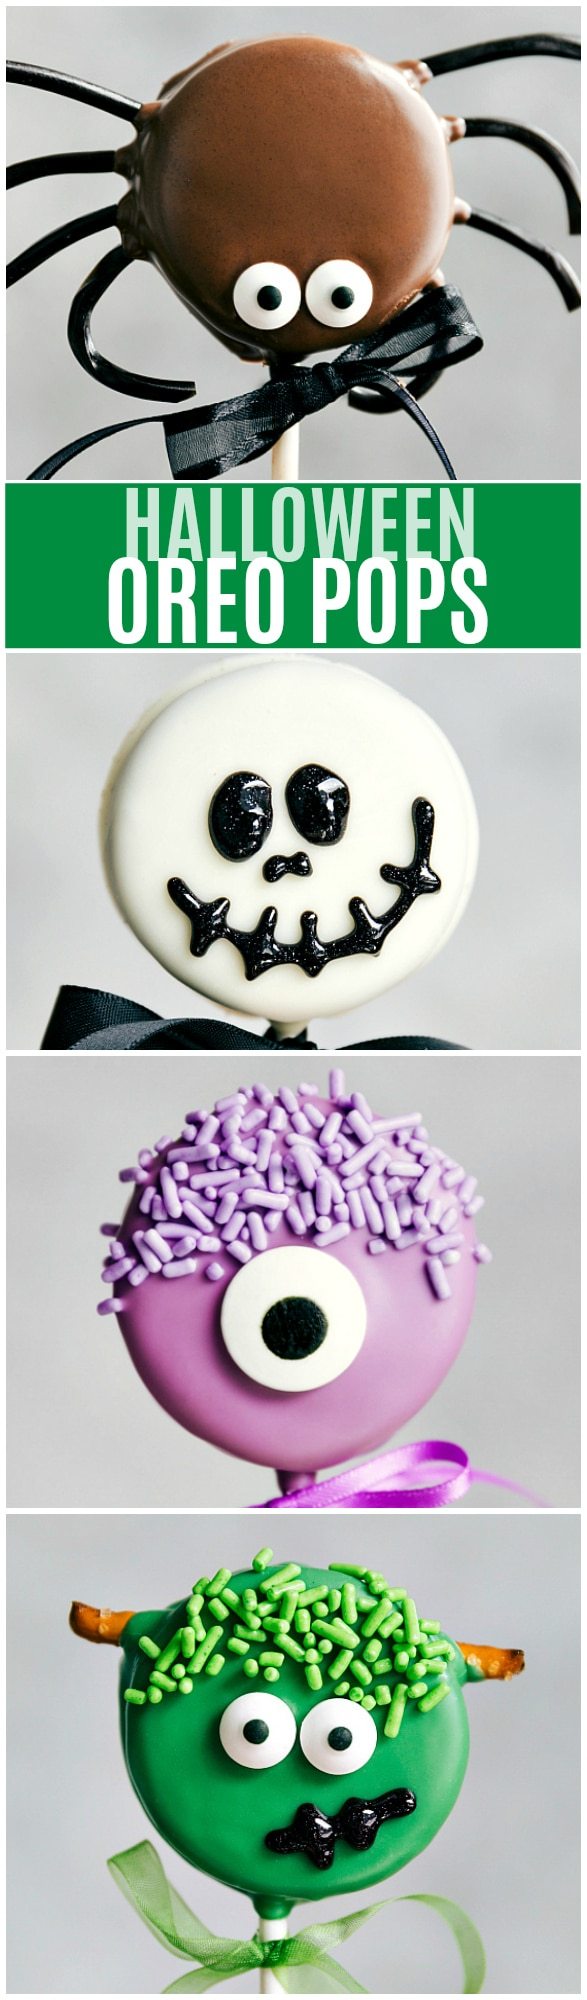
SPIDER OREO POPS
In case you prefer the convenience of shopping online, you can purchase the ingredients to make these by clicking the links below:
- Parchment Paper
- Lollipop Sticks
- Candy Eyeballs (large, small, or bundle)
- Black Licorice Laces
- Black Ribbon
Spider Oreo Pops
Video
Equipment
- Large sheet pan (15" x 21")
Ingredients
- 1 package Oreos use your favorite!
- 1 (12-ounce) bag milk chocolate chips
- 48 candy eyeballs
- 1 bag string black licorice laces
- 1-1/2 teaspoons vegetable oil or shortening; optional, makes the chocolate easier to work with
- Lollipop sticks
Instructions
- Line a large sheet pan with parchment paper and set aside. Gently separate Oreos by slowly twisting them apart. (Some will break. It’s okay; just try to be gentle.)
- Separate the chocolate chips into 3 parts (this keeps it from getting hard while you decorate) and place each section in a microwave safe bowl.
- Into each bowl of chocolate chips, optionally add about 1/2 teaspoon vegetable oil or shortening (more if needed to thin it even more).
- Melt in 20 second bursts in the microwave, stirring for 20 seconds between each burst. Be patient to avoid burning the chocolate.
- Dip one end of the lollipop stick into the melted chocolate and press that side into the cream side of the Oreo. Cut the licorice laces into even pieces, about an inch long. Press 4 cut licorice laces into the cream of the right side of the Oreo and 4 more into the cream on the left of the Oreo.
- Place the other half of the oreo on top and gently press and hold. Let harden.
- Gently spoon melted chocolate over the top of the Oreos, being careful to avoid the licorice (it’s okay if some chocolate gets on the licorice).
- Gently place two candy eyes into the melted chocolate and set the finished (but still wet) Oreos onto the prepared tray lined with parchment paper (if you don’t use parchment paper they won’t come up nicely).
- Allow to harden at room temperature.
Recipe Notes
Nutrition
Nutrition information is automatically calculated, so should only be used as an approximation.

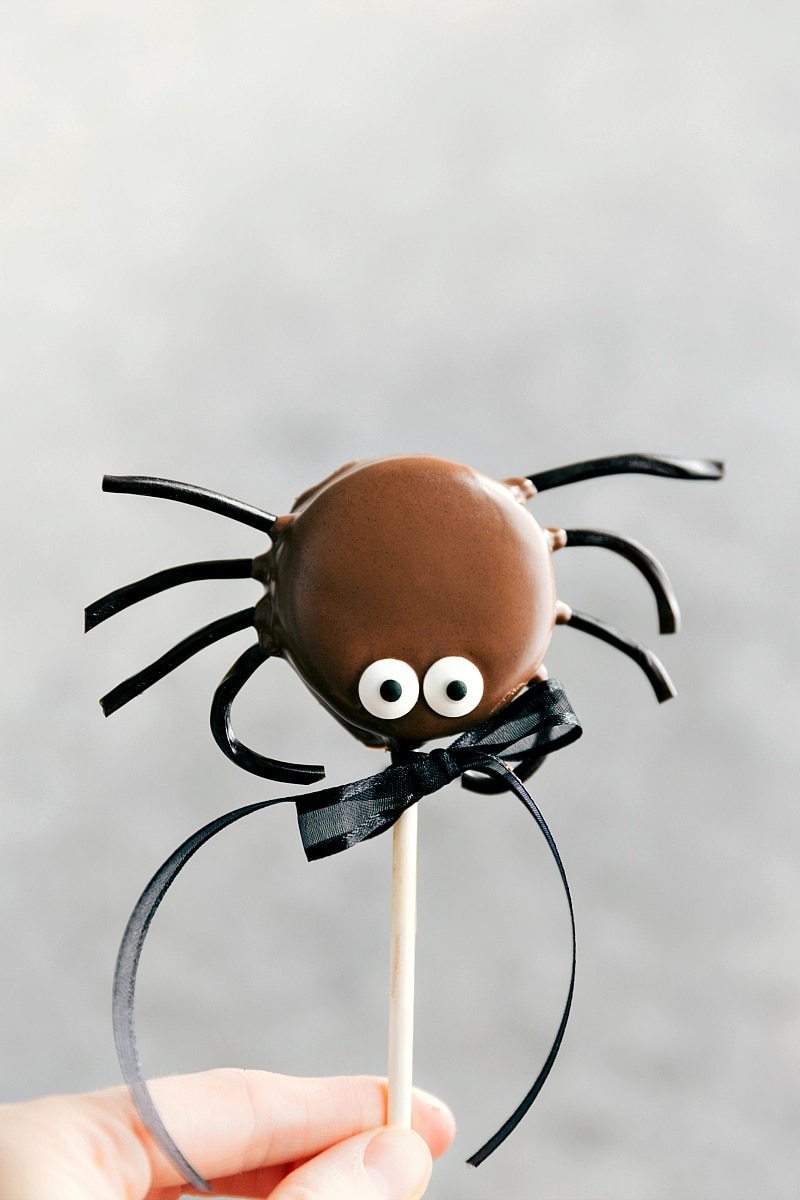
SKELETON OREO POPS
In case you prefer the convenience of shopping online, you can purchase the ingredients to make these by clicking the links below:

Skeleton Oreo Pops
Equipment
- Large sheet pan (15" x 21")
Ingredients
- 1 package Oreos use your favorite!
- 1 (12-ounce) bag white chocolate chips
- Black decorating gel
- 1-1/2 teaspoons vegetable oil or shortening; optional, makes the chocolate easier to work with
- Lollipop sticks
Instructions
- Line a large sheet pan with parchment paper and set aside. Gently separate Oreos by slowly twisting them apart. (Some will break. It’s okay; just try to be gentle.)
- Separate white chocolate into 3 parts (this keeps it from getting hard while you decorate) and place each section in a microwave safe bowl.
- Optionally add about 1/2 teaspoon vegetable oil or shortening into each bowl of chocolate chips (more if needed to thin it even more).
- Melt in 20 second bursts in the microwave, stirring for 20 seconds between each burst. Be patient to avoid burning the chocolate.
- Dip one end of the lollipop stick into the melted chocolate and press that side into the cream side of the Oreo. Place the other half of the Oreo on top and gently press and hold.
- Spoon melted white chocolate over the Oreo pop evenly. Gently tap the Oreo pop on the edge of the bowl to get the chocolate to cover the Oreo evenly. You may want to do a few coats of the chocolate to make sure it is thoroughly white.
- Place white-chocolate Oreo pops on the prepared tray and allow to completely harden at room temperature.
- Once hardened, use the black sparkle gel and draw two large round eye sockets, two small lines for the “nose,” and a half moon for the mouth. Draw little lines through the mouth as shown in the picture and video. Place in the fridge or freezer to allow the gel to harden before placing into a Oreo pop stand/holder.
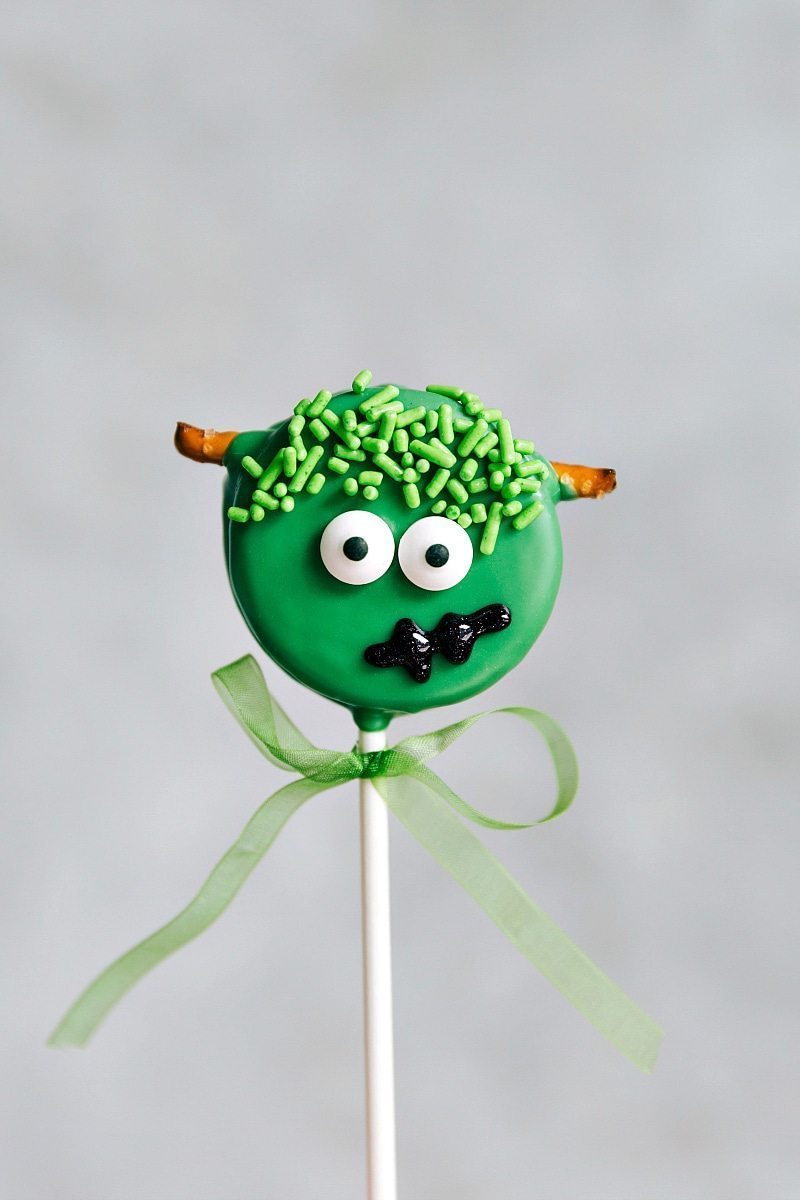
FRANKENSTEIN OREO POPS
In case you prefer the convenience of shopping online, you can purchase the ingredients to make these by clicking the links below:
- Parchment Paper
- Lollipop Sticks
- Candy Eyeballs (small)
- Dark Green Candy Melts
- Green Sprinkles
- Black Sparkle Gel
- Green Ribbon

Frankenstein Oreo Pops
Equipment
- Large sheet pan (15" x 21")
Ingredients
- 1 package Oreos use your favorite!
- 1 (12-ounce) bag green candy melts
- 24 pretzel sticks
- 48 candy eyeballs
- Green jimmies sprinkles
- 1-1/2 to 3 teaspoons vegetable oil or shortening; optional, makes the candy melts easier to work with
- Lollipop sticks
Instructions
- Line a large sheet pan with parchment paper and set aside. Gently separate Oreos by slowly twisting them apart. (Some will break. It’s okay; just try to be gentle.)
- Separate green candy melts into 3 parts (this keeps it from getting hard while you decorate) and place each section in a microwave safe bowl.
- Optionally add about 1/2 to 1 full teaspoon vegetable oil or shortening into each bowl of chocolate chips (more if needed to thin it even more).
- Melt in 20 second bursts in the microwave, stirring for 20 seconds between each burst. Be patient to avoid burning the candy melts.
- Dip one end of the lollipop stick into the melted chocolate and press that side into the cream side of the oreo. Press the pretzel stick into the top of the cream on the oreo.
- Place the other half of the oreo on top and gently press and hold. Let harden.
- Spoon melted green candy melts over the Oreo pop evenly, being careful to avoid the pretzel. Gently tap the Oreo pop on the edge of the bowl to get the chocolate to cover the Oreo evenly.
- Press two candy eyes into the Oreo pop, then sprinkle Green Jimmies above the eyes.
- Transfer Oreo pops to the prepared pan and allow to harden completely at room temperature.
- Once hardened, use the black edible gel to draw on a crooked “smile” for the Frankenstein. Place in the fridge or freezer to allow the gel to harden before placing into a Oreo pop stand/holder.
Recipe Notes
Nutrition
Nutrition information is automatically calculated, so should only be used as an approximation.
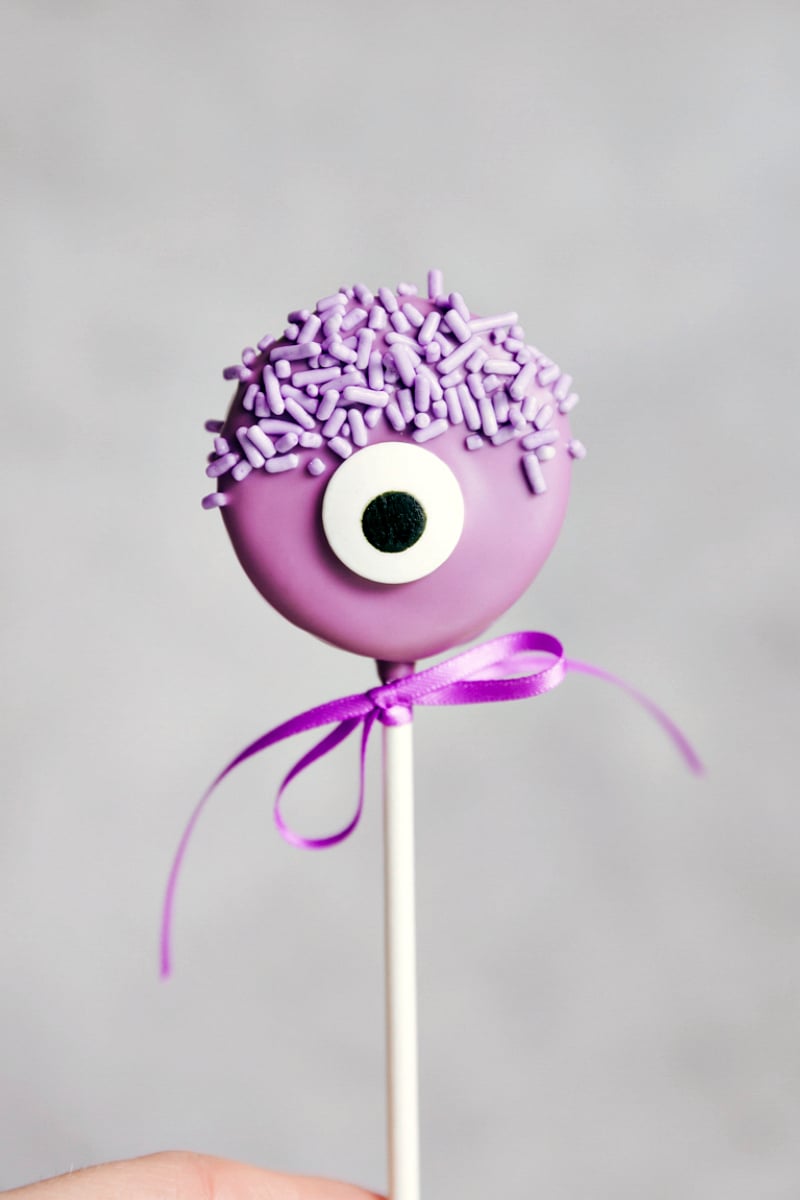
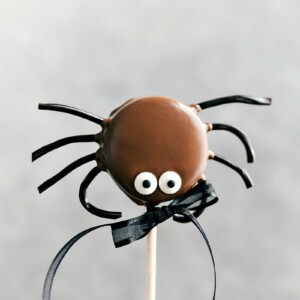
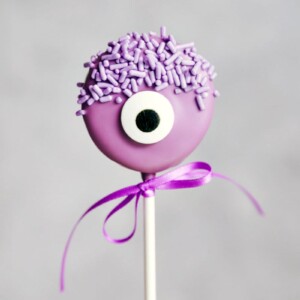
MONSTER OREO POPS
In case you prefer the convenience of shopping online, you can purchase the ingredients to make these by clicking the links below:
- Parchment Paper
- Lollipop Sticks
- Candy Eyeballs (large)
- Purple Candy Melts
- Purple Sprinkles
- Purple Ribbon
Monster Oreo Pops
Equipment
- Large sheet pan (15" x 21")
Ingredients
- 1 package Oreos use your favorite!
- 1 (12-ounce) bag purple candy melts
- 24 Large candy eyeballs or an assortment of small edible eyes—you can do the eyes however you like!
- Purple jimmies sprinkles
- 1-1/2 to 3 teaspoons vegetable oil or shortening; optional, makes the chocolate easier to work with
- Lollipop sticks
Instructions
- Line a large sheet pan with parchment paper and set aside. Gently separate Oreos by slowly twisting them apart. (Some will break. It’s okay; just try to be gentle.)
- Separate purple candy melts chocolate into 3 parts (this keeps it from getting hard while you decorate) and place each section in a microwave-safe bowl.
- Optionally add about 1/2 to 1 full teaspoon vegetable oil or shortening (more if needed to thin it even more).
- Melt in 20 second bursts in the microwave, stirring for 20 seconds between each burst. Be patient and stir well to avoid burning the candy melts.
- Dip one end of the lollipop stick into the melted candy melts and press that side into the cream side of the Oreo. Place the other half of the Oreo on top and gently press and hold.
- Spoon melted chocolate over the Oreo pop evenly. Gently tap Oreo pop on the edge of the bowl to get the purple candy melts to cover the Oreo evenly and smoothly.
- Immediately press one large edible eye in the center of the Oreo pop, or do an assortment of eyes (for example, three small eyes in the center).
- Sprinkle purple Jimmie sprinkles over the edible eye(s).
- Transfer the Oreo pops to the prepared sheet pan. Allow to harden at room temperature.
Recipe Notes
Nutrition
Nutrition information is automatically calculated, so should only be used as an approximation.
More Halloween Fun:

Halloween Oreo Balls (5 ingredients)


Monster eyeballs, witches hats, witches brooms, & bat bites.


Such a great idea!
Thank you! 🙂
Are both sides if the cookie covered when you use the spoon? Can the cookies be placed in bags with the gel?
So adorable
Thanks so much! 🙂
Love these pops
Thanks Linda! 🙂
Do you have any birthday girl iseas?
I don’t; sorry! Hopefully soon (I had a little girl this past January :))
do you do both front and back of cookies with the chocolate? my cookies keep breaking apart when i dip them what am i doing wrong??
Are you making sure you let the chocolate harden on the lollipop stick in the middle first? Also, I just coat the front by spooning chocolate over it. You don’t want too much chocolate or it will be too heavy.
I can’t wait to make these with my daughter! How many days in advance can I make these?
I hope you have a blast making them 🙂 Honestly I think they are best eaten within 1-2 days 🙂
Love these. Any thanksgiving suggestions??
Thanks Deb! I don’t have any Thanksgiving Oreo Pops yet, but will definitely try to come up with some 🙂
These are very cute and I like them a lot, but do you have ideas for using the oreos for Christmas, would like to see ideas Thank you
Yes I do! 🙂 Here are some Christmas Oreo pops: https://www.chelseasmessyapron.com/christmas-oreo-pops/ https://www.chelseasmessyapron.com/christmas-oreo-pops-2/
And some Christmas oreo truffles: https://www.chelseasmessyapron.com/five-christmas-oreo-truffles/
The skeleton cookie is so cute!! I almost wouldn’t want to eat it… almost 😀