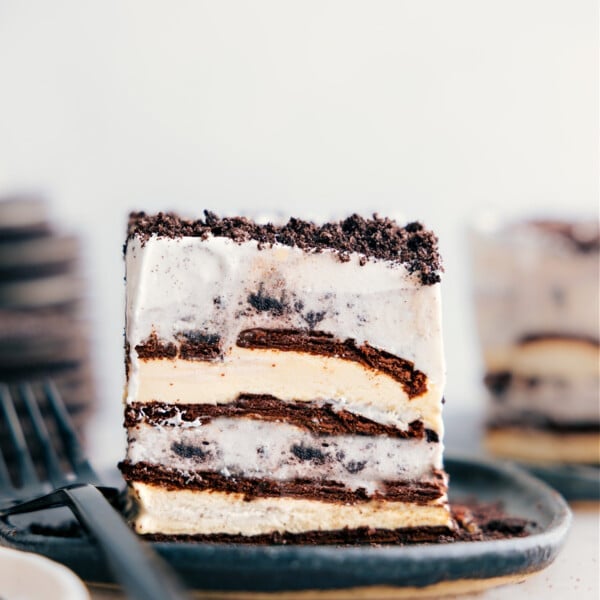
Rice Krispies Treats Ice Cream Sandwich is the frozen dessert of your dreams—chewy, gooey krispie layers stuffed with creamy vanilla ice cream. Incredible!

Rice Krispies Treats Ice Cream Sandwich
Okay, if you haven’t heard—Rice Krispies Treats just dropped their brand-new Ice Cream Sandwiches in vanilla and chocolate, and people are losing it online. Either they’ve tried them and are obsessed, or they can’t find them anywhere.
I’m here to tell you: skip the store run and make them at home. These homemade Rice Krispies Ice Cream Sandwiches are one of the best desserts I’ve ever had.
I’ve made them four times this week—three batches of vanilla, one chocolate—and not only have I had more than my share, but all my kids and their friends agree: best. dessert. ever.
They’re no-bake, super easy, and honestly way more fun to make anyway!

Making Rice Krispies Treats Ice Cream Sandwich
Here’s the deal: instead of making one big batch and splitting, it works much better to make two smaller batches.
Why?
- It helps the top and bottom layers stay perfectly even.
- Smaller batches are also easier to mix and press into the pan.
I use one 12-ounce box of Rice Krispies and 1/2 gallon of ice cream. It’s always better to have a little extra—especially with the ice cream!

Ingredients
Here’s what you need to make Rice Krispies Treats Ice Cream Sandwiches:
- Butter: Unsalted works best so the treats aren’t too salty.
- Mini marshmallows: Use fresh ones—they melt better and make the bars soft and gooey.
- Rice Krispies: Use fresh cereal! Try plain, cocoa, or fruity pebbles.
- Salt: Helps balance the sweet and brings out flavor.
- Vanilla ice cream: Pick a flavor that fits your cereal—chocolate for cocoa, strawberry for fruity, or classic vanilla for plain.
Rice Krispies Treats Ice Cream Sandwich Tips
- Keep the ice cream layer thin: If it’s too thick, the bars will be too hard to bite.
- Use fresh marshmallows: Old ones don’t melt well and make the bars hard.
- Don’t overcook the marshmallows: Melt just until smooth. If they get too hot, the bars turn stiff after freezing.
- Freeze long enough: Let the bars freeze at least 4 hours or the ice cream will squish out when you bite into them.
- Work fast with the ice cream: Spread it quickly so it doesn’t melt before you add the top layer.

Storage
Wrap each sandwich tightly in plastic wrap or foil. Keep in the freezer and enjoy within a week for the best texture and flavor.
More Easy Dessert Recipes:
- No Bake Cookies chocolate and peanut butter
- Ice Cream Pie with a graham cracker crust
- Ice Cream Sandwich Cake made with cookies and cream ice cream
- Pistachio Icebox Cake with whipped cream
- Cinnamon Roll Cheesecakes with cream cheese frosting

Rice Krispies Treats Ice Cream Sandwich
Video
Equipment
- 2 9 x 13-inch baking pan plus parchment paper
Ingredients
- Cooking spray
- 10 tablespoons unsalted butter divided
- 16 cups miniature marshmallows divided, see note 1
- 12 cups Rice Krispies cereal divided, see note 2
- 1/2 teaspoon salt divided
- 1 gallon vanilla bean ice cream
Instructions
- Line two 9×13-inch pans with parchment paper, leaving an overhang. Lightly spray with cooking spray and set aside.
- In a large pot, melt 5 tablespoons butter over medium-low heat. Once melted, reduce heat to low and stir in 8 cups marshmallows. Stir constantly until just melted, then remove from heat. Remove the urge to increase the heat!
- Remove from heat and stir in ¼ teaspoon salt and 6 cups Rice Krispies. Mix until evenly coated. Transfer to one prepared pan and gently press into an even layer (don’t press too firmly—keep them soft and chewy). Lightly spray hands with cooking spray if needed to prevent sticking.
- Make a second batch in the same way using the remaining ingredients. Press into the second prepared pan. Let both pans cool at room temperature for 30 minutes.
- Scoop a thin (1-inch) layer of ice cream over one pan of treats. Spread and press it into an even layer. (Any thicker of an ice cream layer will make it harder to eat.)
- Lift the second block of treats out of the pan using the parchment paper. Flip it over and place it on top of the ice cream. Press down firmly and evenly, then peel off the parchment.
- Cover tightly and freeze until solid, about 4-8 hours.
- Use the parchment to lift the sandwich block onto a cutting board. Cut into bars using a very sharp knife that’s been run under hot water and dried. If the bars are too hard, let sit at room temperature for 5–10 minutes. Return any extras to the freezer promptly. Cover any leftovers tightly.
Recipe Notes
Nutrition
Nutrition information is automatically calculated, so should only be used as an approximation.