Fudge Stripe Cookies are buttery, sweet, and coated in smooth chocolate with a hint of vanilla and salt. They’re impossible to stop at just one!

Fudge Stripes Cookies
Growing up, there were two store-bought cookies that were my favorite. I absolutely loved Oreos and Keebler’s Fudge Stripe Cookies. (Sure, when Girl Scout Cookies were in season, it was a different story!) I still enjoy these cookies to this day. In fact, I love incorporating Oreos into various recipes – they make everything better! And during the summer, my top choices for S’mores are Fudge-Striped Cookies and Samoa cookies. We skip the traditional graham crackers and opt for these cookies instead! Can anything top a massive, toasted marshmallow nestled between two fudge-striped cookies?!
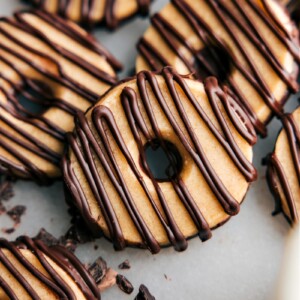
After polishing off a fair amount of fudge-striped cookies during our last camping trip, I was inspired to try my hand at making my own. Not only was it fun to experiment and perfect this recipe, but these cookies also turned out to be surprisingly easy to make! Plus, no special cookie cutters are necessary! Instead of struggling with two cookie cutters, we shape the dough into a log and slice off rounds. A piping tip makes removing the center a breeze.
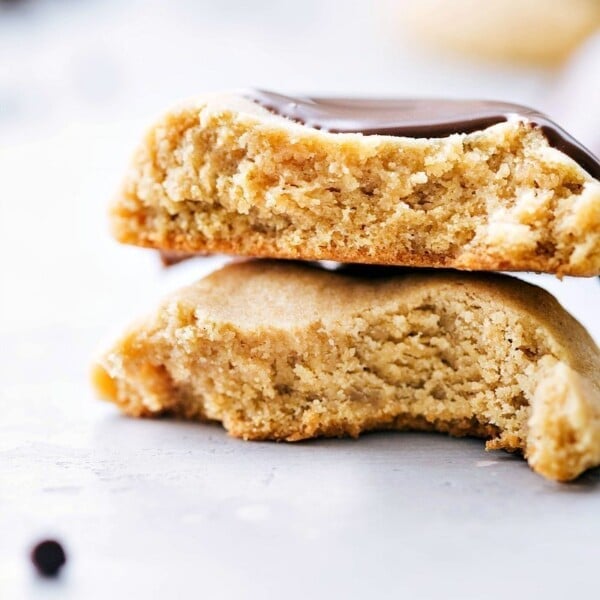
These Fudge-Striped Cookies blend buttery goodness with sweet, creamy chocolate. They deliver a delightful crunch, followed by a smooth finale of chocolate drizzle. Simply put, they’re absolutely delectable! And while the store-bought ones are still delicious, they can’t hold a candle to this homemade version!

Fudge Stripe Cookie Ingredients
- Cold unsalted butter: Use unsalted to control salt and keep it chilled so cookies hold.
- Light brown sugar: Make sure it’s soft and fresh for easy creaming.
- Pure vanilla extract: Gives deeper flavor than imitation.
- Fine sea salt: Balances sweetness and blends evenly into dough.
- Cornstarch: Creates tender cookies.
- All-purpose flour: Measure carefully to avoid tough or overly spread cookies.
- Semi-sweet chocolate chips: Swap with dark or milk if preferred.
- Vegetable oil: Smooths and thins chocolate for dipping and drizzling.
High-quality ingredients make the biggest difference in flavor and texture.

How To Cut Out The Center Of The Cookie
Typically, Fudge-striped cookie recipes out there suggest using two different cookie cutters. I prefer to take a simpler approach by slicing the dough into rounds and then removing the center with the top of a large round piping tip. I rely on this kit in my kitchen all the time. These piping tips are some of my most-used–fantastic for decorating cupcakes or cookies!

How To Make Fudge Stripe Cookies (Tips)
Here are a few tips to ensure the best results when making these Fudge Stripe Cookies:
- Butter temperature: The temperature of your butter plays a significant role in the texture of your cookies. Cold butter will prevent the cookies from spreading too much and maintain their shape. It will also ensure the proper texture.
- Measuring flour: Over-measuring your flour can lead to dry, crumbly cookies. Be sure to spoon in the flour and level off the top of the measuring cup with the flat side of a table knife for the most accurate measurement.
- Chilling the dough: Don’t skip the chilling step! Chilling the dough allows the flavors to meld together and helps the cookies keep their shape during baking. For even more flavorful cookies, chill the dough overnight!
- Even slices: When slicing the dough into cookies, try to make each slice as uniform as possible. This will ensure even baking for all your cookies.
- Monitor the oven: Baking times can vary based on individual ovens. Keep a close eye on your cookies to avoid over-baking. They are ready when the edges start to turn golden.
- Cooling the cookies: Allow the cookies to cool completely before dipping them in the melted chocolate. If the cookies are too warm, the chocolate may not set properly.
- Melting the chocolate: Melt the chocolate in short bursts in the microwave and stir frequently to prevent it from burning.
- Dipping and drizzling chocolate: After dipping the cookies in chocolate, allow the excess to drip off for a neat finish. For the drizzle, if you don’t have a piping bag, a zipper-top plastic bag with the corner cut off works just as well.
- Setting the chocolate: Let the chocolate harden fully before serving the cookies. You can speed this process by placing the cookies in the refrigerator or freezer.

Why COLD Butter?
Cold butter keeps these Fudge Stripe Cookies from spreading by melting slowly, letting the dough set before softening.
When creamed with brown sugar, it forms air pockets that expand in the oven for lift and texture. Creaming also blends butter and sugar evenly, ensuring consistent flavor and a smooth cookie.
Quick Tip
Why cut the cold butter into cubes? Faster and easier creaming! The creaming process, where butter and sugar are beaten together, is faster and more efficient when the butter is cut into smaller pieces. Large chunks of butter can be more difficult to break down and incorporate with the sugar.
Storage
Fudge Stripe Cookie Storage
- Cool completely: Only store cookies fudge stripes once they’re completely cool– to prevent sogginess. Use airtight plastic containers or resealable plastic bags to keep cookies fresh.
- Room temperature: Cookies typically stay fresh at room temperature for about 2-3 days.
- Freezing: You can freeze both baked cookies and unbaked dough for longer storage. Layer baked cookies with parchment paper in an airtight container. Or freeze dough as slices on a sheet pan, and then transfer and store in freezer bags. To enjoy, bake frozen dough directly, adding a couple of minutes to the original baking time.
More Cookie Recipes:
Fudge-Striped Cookies
Video
Equipment
- Sheet pan (15" x 10")
- Parchment paper or silicone baking mat
- Large piping tip to cut out centers
Ingredients
- 16 tablespoons unsalted butter cold, 1 cup, cut into small cubes
- 3/4 cup light brown sugar soft, packed gently
- 1-1/2 teaspoons vanilla extract
- 1/2 heaping teaspoon fine sea salt
- 1 teaspoon cornstarch
- 2-1/4 cups all-purpose flour see note 1
- 2 cups chocolate chips divided, see note 2
- 4 teaspoons vegetable oil divided
Instructions
- In a stand mixer fitted with a paddle attachment, beat the butter and brown sugar together until creamy, similar in consistency to peanut butter. This should take about 3–5 minutes. Scrape the sides of the bowl as needed.
- Add in vanilla extract, salt, and cornstarch. Beat just until combined. Add flour and beat just until incorporated—avoid overmixing. The dough may seem a bit crumbly at first, but it will come together with some mixing/kneading.
- Form the dough into one large ball, then divide it in half. Shape each half into a log about 9 inches long and roughly 2 inches in diameter. Roll it on the counter to help even it out. Wrap each log tightly in plastic wrap and chill in the fridge for at least 2 hours.
- Preheat oven to 350°F. Line a sheet pan with parchment paper or a silicone liner. Unwrap one dough log at a time from the fridge and slice each dough log into 1/4-inch thick cookies (thin!). Use the tip of a piping tip to cut out the center. Place the cookies on your prepared sheet pan, spacing them 1 inch apart.
- Bake until the edges are just starting to lightly brown, about 8–12 minutes. Keep a close eye on them to prevent overbaking.
- Remove the cookies from the oven and transfer them to a cooling rack. Let them cool completely. Repeat with the rest of the dough.
- In a microwave-safe bowl, combine 1 cup chocolate chips with 2 tsp vegetable oil. Microwave in 20-second increments, stirring for 15 seconds between each burst, until chocolate is melted and smooth. Dip the bottom half of each cooled cookie into the melted chocolate, tapping the cookie to the edge of the bowl to even out the chocolate and let the excess drip down. Place the dipped cookie chocolate side up on a lined sheet pan. Let chocolate fully set/harden (pop in the fridge or freezer to speed this up!). Dip all the bases of the cookies.(Melt remaining 1 cup chocolate chips and remaining 2 teaspoons vegetable oil as needed. Rewarm chocolate as needed in short microwave bursts.)
- Line a tall cup with a resealable plastic bag. With whatever chocolate is left over, use a spatula to transfer it into the plastic bag, seal the bag without air, then snip off the tip and drizzle it over the other side of the cookies. Allow the chocolate to set at room temperature (so they aren’t cold!) before serving.
Recipe Notes
Nutrition
Nutrition information is automatically calculated, so should only be used as an approximation.