Twix Bars with buttery shortbread, gooey caramel, and rich chocolate – like the classic candy bar, but homemade and even better!

Why We Love These Twix Bars:
- Amazing Homemade Flavors: Beats store-bought every time!
- Perfect Mix: Crumbly and buttery crust, gooey caramel, smooth chocolate.
- Wow Factor: Sure to impress at any event.
- No Nasty Stuff: Skip the additives or preservatives like in commercial candy.
- Fun Baking Project: A great way to spend time in the kitchen, solo or with others.

Twix Bar Ingredients
- Unsalted Butter: Gives flavor to crust and caramel.
- Brown Sugar: Light or dark; dark for deeper, caramel-like flavor.
- Vanilla Extract: Enhances sweetness and balances flavors.
- Salt: Balances and enhances sweetness.
- All-Purpose Flour: Gives crust structure; measure carefully to avoid dryness.
- Sweetened Condensed Milk: Must be full-fat for the right caramel texture.
- Semi-Sweet Chocolate Chips: Balances sweetness; use milk chocolate for a closer match to Twix.
- Vegetable Oil: Smooths chocolate melt and prevents cracking; coconut oil also works.

Variations
Change Things Up!
- Sprinkle flaky sea salt on the chocolate for a salted caramel twist.
- Add crushed nuts or crisp rice to the chocolate for crunch.
- Swap vegetable oil with coconut oil, use coconut extract instead of vanilla, and top with toasted coconut for a coconut twist.

Tips For Making Twix Bars
- Parchment Paper Sling: Use it for easy lift and neat cuts; prevents caramel from hardening at edges.
- Butter Temperature: Melted but not hot for the shortbread crust (to avoid greasy bars).
- Even Layers: Press shortbread evenly for consistent thickness and texture.
- Poking Holes In Crust: Allows caramel to bond with the crust (don’t poke all the way through).
- Cooling: Follow cooling instructions for each layer to keep textures and flavors distinct.
- Sharp Knife: Use a hot, dry sharp knife for clean cuts.

Use The Right Size Pan!
- Right Size Pan: Use a 9×9-inch pan for perfect layer thickness and baking accuracy. The 9×9 size ensures ideal proportions and correct baking times.
- 8×8-Inch Pan Results: Caramel ends up too thick and baking time varies. If determined to use this size, watch caramel layer for tiny bubbles and slight jiggle—this means it’s done. Too much wobble? Bake a bit longer.

Storage
Twix Bar Storage
- Store Twix bars in an airtight container at room temp for 3-5 days.
- On hotter days, refrigerate to keep layers from melting.
- For best flavors, serve at room temp.
More Dessert Recipes:
- Nutella Stuffed Chocolate Chip Cookies
- No-Bake Cookies
- Microwave Caramel Corn
- Caramel Cookie Bars
- Chocolate Caramel Cookies
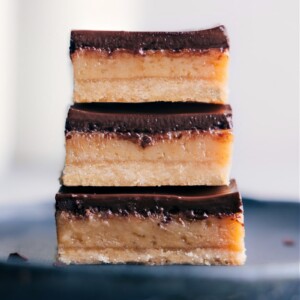
Twix Bar
These homemade Twix Bars feature buttery shortbread, gooey caramel, and rich chocolate—just like the candy bar, but even better!
Video
Equipment
- 9 x 9-inch baking pan see note 1
Ingredients
Crust
- 8 tablespoons unsalted butter melted but not hot
- 1/4 cup light brown sugar firmly packed
- 1 teaspoon vanilla extract
- 1/4 teaspoon salt
- 1 cup + 1 tablespoon flour
Caramel Filling
- 8 tablespoons unsalted butter cut into cubes
- 1/2 cup light brown sugar lightly packed
- 1/8 tsp salt
- 1 (14-ounce) can sweetened condensed milk see note 2
- 1 teaspoon vanilla extract
Chocolate Topping
- 1 cup + 2 tablespoons semi-sweet chocolate chips or milk chocolate chips, see note 3
- 3 teaspoons vegetable oil
Instructions
- Preheat oven to 325°F. Line a 9x9-inch metal baking pan with parchment paper (leaving an overhang for easy removal) and grease with cooking spray.
- In a medium bowl, combine melted (but not hot!) butter, brown sugar, vanilla, and salt. Stir in flour until completely combined. The dough will be thick. Press dough firmly and evenly into your prepared pan. (I like to place a piece of parchment paper on top and press down). Bake 17–23 minutes or until the edges are slightly browned. Remove from oven, and using a fork, poke holes all over just the top half of the warm crust (do not press the fork all the way through). Let crust cool slightly while you prepare the caramel.
- Place cubed butter and brown sugar in a small pot over medium-low heat. Leave mixture alone until butter is melted, then whisk it with the sugar until emulsified (butter isn’t separating from sugar). Leave mixture alone until it comes to a simmer. As soon as small bubbles appear, add sweetened condensed milk and salt. Whisk constantly for 5 minutes or until big slow bubbles start appearing. Remove from heat and whisk for an additional minute before stirring in the vanilla extract. Pour this caramel over the crust and spread it out in an even layer with a spatula.
- Bake 12–17 minutes or until the caramel develops a bubbly surface all over and exhibits only a slight jiggle when the pan is lightly shaken. This indicates that the caramel has set. (See picture!)
- Allow the bars to cool at room temperature for 25 minutes, then transfer to fridge for another 25 minutes to cool further. Make sure the bars aren’t cold, as this might prevent the chocolate from setting properly.
- In a microwave-safe bowl, combine chocolate chips and vegetable oil. Microwave in 30-second intervals, stirring for 20 seconds in between, until chocolate is fully melted and smooth. Pour melted chocolate over the caramel layer and spread it out smoothly with a spatula. To ensure a flat surface, gently tap the pan a few times.
- Refrigerate the bars until they’re fully set, about 1 hour. Before cutting, let the bars stand at room temperature for about 10 minutes. Use the parchment paper overhang to remove the bars. To cut them, use a sharp knife that’s been warmed under hot water (dry the knife with a towel after each warming). Repeat this process with each cut to make slicing easier.
Final step! Please let us know how it was by leaving a review.
Recipe Notes
Note 1: A 9x9-inch pan is important for success. An 8x8 can work but requires careful caramel monitoring for tiny bubbles and minimal jiggle when pan is shaken. Too much wobble means it’s not set yet, so keep it in the oven a bit longer.
Note 2: Use only full-fat sweetened condensed milk; reduced-fat or sugar-free won’t give the same results. Avoid accidentally using evaporated milk.
Note 3: Semi-sweet chocolate chips cut sweetness, but milk chocolate is closer to Twix's taste. High-quality chocolate like Ghiradelli or Guittard melts smoother and tastes better.
Storage: Store Twix bars at room temperature in an airtight container for 3–5 days. On hotter days, refrigerate to keep layers from melting. For best flavors, serve at room temperature.
Nutrition
Serving: 1serving | Calories: 338kcal | Carbohydrates: 39.7g | Protein: 4.4g | Fat: 18.5g | Cholesterol: 44.3mg | Sodium: 32.8mg | Fiber: 44.3g | Sugar: 32.8g
Nutrition information is automatically calculated, so should only be used as an approximation.


Chelsea these are just STUNNING! Saw them on FG and they’re just so beautiful! The lighting is exquisite! And the bars…salted caramel AND twix. Two big time favorites for me! pinned
OH MY WORD. This is fabulous!