FOLLOW ALONG! Subscribe to my newsletter and follow along on Facebook, Pinterest and Instagram for the latest updates, recipes and content.

Crispy Chicken Wraps
These Crispy Chicken Wraps deliver a delightful fusion of flavors with smoky, spiced shredded chicken and rich, creamy refried beans, and melty Cheddar cheese nestled inside a crispy, golden-brown tortilla. Not only are these wraps incredibly tasty, but they also provide a convenient meal option that can be prepared quickly and easily!Using mild taco seasoning (McCormick®) and mild enchilada sauce (Old El Paso®), these wraps have a bit of heat, but we find them well balanced when topped with a cooling element like sour cream or avocado.
Servings 6 wraps
Calories 344kcal
Cost $12.13
Ingredients
- 2 cups cooked, shredded (or diced) chicken (Note 1)
- 1 oz. packet mild taco seasoning (about 2 tbsp; See Note 2)
- ¾ cup mild enchilada sauce (Note 3)
- 2 cups freshly grated sharp Cheddar cheese (Note 4)
- 6 large (burrito-sized) flour tortillas
- 1 can (16 oz) refried beans
- Olive oil cooking spray
- Optional, for serving: favorite toppings such as sour cream and fresh lime, guac or avocado, salsa or pico de gallo
Instructions
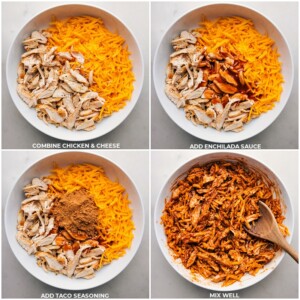
- COMBINE: Add first 4 ingredients to a large bowl. Stir the ingredients gently with a wooden spoon. Taste and season with salt and pepper (if needed, depending on the saltiness of taco seasoning).
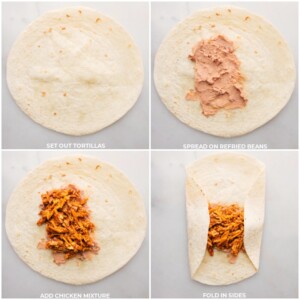
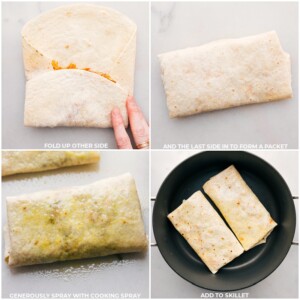
- ASSEMBLE: Arrange the tortillas on a clean, flat surface. Divide the refried beans evenly in the center of each of the 6 tortillas (~a heaping ¼ cup per tortilla). Evenly distribute the filling right in the center of the 6 tortillas (~½ cup of the mixture per tortilla). Fold up like a packet (See Note 5). Microwave each wrap (one at a time) for 20-30 seconds.
- BROWN: After microwaving, spray each wrap generously on all sides with olive oil cooking spray. Heat a non-stick skillet over medium-high heat. Place the wraps into the skillet, seam side down, cooking 2 or 3 at a time to avoid crowding. Use the tongs to rotate the wraps every 1-2 minutes, or until each side turns golden brown and crispy. Continue this process until all wraps are crisped.
- ENJOY: Serve the chicken wraps hot, straight out of the skillet with your favorite toppings. We love mixing 2 tbsp sour cream with 1 tbsp lime juice for a cooling quick crema. A ripe avocado or guac and a scoop of pico is also so good!

- STORAGE: Should you find yourself with leftover wraps and wish to refrigerate or freeze them for later, please refer to the "Storage" section within this post for comprehensive instructions.
Video
Notes
Note 1: Chicken: Many grocery and warehouse stores offer hot-and-ready rotisserie chickens that are flavorful and loaded with meat - enough to yield a decent number of wraps! However, for the quickest prep time, I suggest buying rotisserie chicken meat that has already been pulled from the bones and shredded. You can usually find this in the deli section of most grocery stores.
- OR: Leftover cooked or grilled chicken: If you have some on hand, leftover cooked or grilled chicken with a basic salt and pepper seasoning can also work well for this recipe. Don't worry about heating it beforehand; the chicken will warm up nicely as we cook the wraps.
- Lay the tortilla flat on your work surface and spoon the filling onto the center, ensuring to leave a generous border around all edges.
- Fold both sides of the tortilla into the center partially covering the filling.
- Next, fold the edge of the tortilla that's closest to you over the filling and the folded-in sides.
- Finally, grasp the last edge of the tortilla furthest away from you and, while keeping it tight, pull it over the other side until you have a neatly wrapped packet. The filling should now be completely enclosed.
Nutrition
Serving: 1serving | Calories: 344kcal | Carbohydrates: 21g | Protein: 23g | Fat: 18g | Saturated Fat: 9g | Polyunsaturated Fat: 2g | Monounsaturated Fat: 4g | Cholesterol: 73mg | Sodium: 1144mg | Potassium: 173mg | Fiber: 2g | Sugar: 4g | Vitamin A: 1040IU | Vitamin C: 3mg | Calcium: 316mg | Iron: 2mg