FOLLOW ALONG! Subscribe to my newsletter and follow along on Facebook, Pinterest and Instagram for the latest updates, recipes and content.
Coffee Cake Cookies
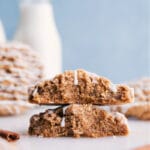
Coffee Cake Cookies are big, bakery-style cinnamon-spiced cookies with a brown sugar streusel and simple vanilla glaze. If you love coffee cake, you're going to love these cookies!
Servings 5 large, bakery-style cookies
Calories 592kcal
Cost $6.12
Ingredients
Cookie
- 8 tablespoons unsalted butter, melted
- 1 cup light brown sugar, tightly packed
- 1 large egg
- 1/2 teaspoon vanilla bean paste (OR 1 teaspoon vanilla extract)
- 1/2 teaspoon baking soda
- 1/2 teaspoon baking powder
- 3/4 teaspoon fine sea salt
- 1 -1/2 teaspoon ground cinnamon
- 1-1/4 cup cake flour Note 1
- 1-1/4 cup all-purpose white flour Note 2
Streusel
- 2 tablespoons unsalted butter, melted
- 1/4 cup all-purpose white flour
- 3 tablespoons light brown sugar, tightly packed
- 1/2 teaspoon ground cinnamon
Glaze
- 1/2 cup powdered sugar
- 1 tablespoon whole milk
- 1/4 teaspoon vanilla extract
- Tiniest pinch of salt
Instructions
- BUTTER AND SUGAR: Melt butter in a microwave-safe bowl in the microwave. Use a spatula to scrape every bit of melted butter into a large bowl and then set aside until it returns to room temperature. This is very important or the cookies will end up greasy (hot butter melts sugar). Once the butter is at room temperature, add in the brown sugar. With a hand whisk, briskly whisk until combined and smooth, about 1-2 minutes.
- EGG AND VANILLA: Add in the egg and vanilla bean paste (or vanilla). Mix until integrated.
- DRY INGREDIENTS: Add in baking soda, baking powder, fine sea salt (only add 1/4 teaspoon if using table salt), and ground cinnamon. Mix until combined. Measuring correctly (this is very important -- read note 1), measure both types of flour and add in. Mix to incorporate -- it will get tough, but keep mixing until flour is fully integrated. Cover tightly and place dough in the freezer just while making the streusel.
- STREUSEL: Melt the butter in the microwave and then let stand until it returns to room temperature. Once cooled, add remaining streusel ingredients. Mix until the streusel is evenly combined and forms small clumps; you may need to use your fingers to mix into crumbles. If streusel is too wet, add 1 extra tablespoon of flour.
- DOUGH BALLS: Divide dough evenly into 5 parts-- about 4.25 ounces or 130g per cookie (with a tiny bit leftover for a little snack for the baker ;)). Don't make smaller cookie dough balls -- this recipe doesn't work the same. Roll each portion of dough into equal-sized balls. Divide the streusel evenly into cookies, pressing into the top and sides, but not on the bottom (where it will burn).
- CHILL: Place streusel-topped cookie balls on a parchment-paper-lined sheet pan or plate and cover. Chill (in fridge) for at least 1 hour up to overnight. (Note 3)
- BAKE: Place 2 to 3 cookie dough balls at a time on a Silpat-lined baking sheet spaced far apart. Bake at 325 degrees F (162 degrees C) for 18-24 minutes or until ever-so-slightly golden at the edges and no longer gooey looking at the top. Err on the side of slightly under-baking to keep them soft and chewy; cookies will firm up to a nice and chewy cookie as they set (Note 4.) Remove from the oven and right out of the oven, press edges of the cookie inwards with the back of a metal spatula to get the perfect round bakery-style cookie. Let cool on cookie sheet for 10 minutes before transferring to a wire cooling rack. Repeat baking with remaining cookies. Allow cookies to fully cool on a wire rack before adding the glaze.
- GLAZE: In a small bowl, use a whisk to mix all ingredients together until combined and smooth. Add a touch more milk if you'd like the glaze to be slightly thinner. Transfer to a small plastic bag and cut off the tip. Pipe glaze evenly over all of the cookies -- as much or as little as you'd like.
- STORAGE: We like these cookies best within 2-3 days of baking. They do last up to a week, but they begin to lose texture and flavor after 3-4 days. To store: Place in an airtight container and keep at room temperature. Wait until cookies are completely cooled before adding to the container. Rewarm in increments of 10-15 seconds in the microwave.
- FREEZING: Instead of freezing the baked cookies, freeze the dough! Drop the cookie dough balls on a large sheet pan and freeze until solid. Once solid, transfer the frozen cookie dough balls to an airtight container or bag and freeze for up to three months. To bake: You can bake these cookies straight from the freezer. There is no need to thaw, but you may need to add a few extra minutes to the baking time. Bake until the edges are lightly browned, and the center is still soft.
Video
Notes
Note 1: Cake flour: This flour is responsible for giving the cookies a fluffier, more delicate, and more tender crumb. It helps keep these cookies soft and chewy. We combine cake flour with all-purpose flour to get the perfect texture. Cake flour is usually found on the baking supplies aisle in the grocery store near other types of flour. Wait to make these cookies until you have cake flour-- I don't recommend any other flour, substitute, or homemade/DIY cake flour -- it doesn't work the same in this recipe.
Note 2: Measuring flour correctly: If you press a measuring cup into a bag of cake or regular flour and scoop, you will pack in way too much flour which affects the texture of these cookies (they will have less flavor and be too puffy!). To properly measure your flour, use a spoon to spoon the flour into the measuring cup until it’s overfilled. Then use the back of a table knife to level the measuring cup at the top. (Video visual here)
Note 3: Chill the dough: Don’t rush the chilling time or you’ll find yourself with cookies that spread too much.
Note 4: Ever-so-slightly under-bake: If cookies are over-baked, the taste and texture will be off. Slightly under-baking these cookies keeps them soft, chewy, and flavorful. Remember, the residual heat on the pan continues to bake the cookies for a couple of minutes even after they’re pulled out of the oven. Visual cues to look for: firm edges and set center (they shouldn't be overly gooey/wet looking).
Nutrition
Serving: 1serving | Calories: 592kcal | Carbohydrates: 89g | Protein: 5g | Fat: 25g | Saturated Fat: 15g | Polyunsaturated Fat: 1g | Monounsaturated Fat: 7g | Trans Fat: 1g | Cholesterol: 100mg | Sodium: 536mg | Potassium: 131mg | Fiber: 1g | Sugar: 65g | Vitamin A: 791IU | Vitamin C: 1mg | Calcium: 94mg | Iron: 2mg