FOLLOW ALONG! Subscribe to my newsletter and follow along on Facebook, Pinterest and Instagram for the latest updates, recipes and content.
Chocolate Cake
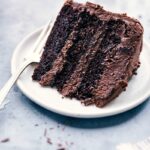
Three layers of moist and rich Chocolate Cake are frosted with an incredible chocolate buttercream frosting, made with three kinds of chocolate.Recipe shared from Two Peas & Their Pod cookbook, from Maria of Two Peas & Their Pod
Servings 12 -16 slices
Calories 1213kcal
Equipment
- 3 (8 inch) round cake pans
- Parchment paper
- Nonstick cooking spray
Ingredients
Chocolate Cake
- 1 cup buttermilk, at room temperature
- ½ cup vegetable or canola oil
- 1 tablespoon pure vanilla extract
- 1 ¾ cup all-purpose white flour
- 2 cups white granulated sugar
- ¾ cup Dutch-process cocoa powder (Note 1)
- 2 teaspoons baking soda
- 1 teaspoon baking powder
- 1 teaspoon kosher salt
- 2 large eggs, at room temperature
- 1 cup very hot water (Note 2)
Chocolate Buttercream
- 2 cups (1 pound) unsalted butter, at room temperature
- 7 cups (2 pounds) confectioners' sugar (powdered sugar), sifted
- 1 cup Dutch-process cocoa powder
- 1/4 cup + 2 tablespoons full-fat chocolate milk (or regular milk or heavy cream), at room temperature
- 2 teaspoons pure vanilla extract
- ¼ teaspoon kosher salt
- ⅔ cup semisweet chocolate chips, melted and slightly cooled
- For decorating: chocolate shavings, sprinkles, or mini chocolate chips (optional)
Instructions
- PREP: Preheat the oven to 350 degrees F. Grease three 8-inch round cake pans generously with nonstick cooking spray. Line the bottom of the pans with parchment paper (See Note 3), and then spray the parchment paper with the nonstick spray. Set pans aside.
- WET INGREDIENTS: In a medium bowl, whisk together the buttermilk, oil, and vanilla.
- DRY INGREDIENTS: In the bowl of a stand mixer fitted with the paddle attachment, mix together the flour, granulated sugar, cocoa powder (See Note 1), baking soda, baking powder, and salt. With the mixer on low speed, add the buttermilk/oil mixture. Add the eggs, one at a time, and mix until well combined. Slowly add in the hot water (hot water "blooms" the cocoa powder, making it more flavorful) and stir just to combine, stopping to scrape down the sides of the bowl with a spatula before mixing briefly again. Do not overbeat or overmix the batter or it will become dense.
- BAKE: Divide the batter evenly among the three prepared pans and bake for 24 to 28 minutes, or until a cake tester comes out clean when inserted into the centers of the cakes. (My cakes are always done at 24 minutes.)
- COOL: Set the cakes on wire cooling racks to cool in the pans for 30 minutes. Remove the cakes to the racks to cool completely. (You can refrigerate or freeze the cakes at this time.) Do not frost cakes until they are completely cool.
- BUTTERCREAM: In the bowl of a stand mixer fitted with the paddle attachment, beat the butter until creamy and light in color, about 3 minutes. Scrape down the bowl halfway through. Add the confectioners' sugar (2 cups at a time) and then the cocoa. Mix on low speed until just incorporated. Pour in the chocolate milk, vanilla, and salt. With the mixer on low speed, add the melted chocolate. Mix for an additional 2 to 3 minutes, until the buttercream is light and fluffy.
- ASSEMBLE: If the cake layers are slightly domed on top, carefully level them off with a sharp serrated knife or cake leveler. To build the cake, place a tiny bit of frosting in the center of your cake stand (to keep the cake from sliding). Then place the first layer, bottom side up, on a flat plate or cake pedestal. Using a knife or offset spatula, spread the top of the cake evenly with buttercream. Place the second layer on top of the first, top side up, and spread more buttercream evenly over the top. Repeat with the third layer and frost the top and sides of the cake. Decorate with chocolate shavings, sprinkles, or chocolate chips, if desired. Slice and serve.
- BREAKING UP THE PROJECT: Since this is a bigger undertaking than many desserts, you can break up the project by making the cakes in advance. I like to do this so the cake has time to chill, which makes frosting easier. Carefully wrap the cooled cake layers in plastic wrap and refrigerate for up to 2 days. You can also freeze them, wrapped in plastic wrap, for up to 1 month. Defrost before frosting and assembling.
Video
Notes
Note 1: Cocoa powder: The cocoa powder must be Dutch-process (not natural cocoa powder) for this cake. Otherwise it will end up dry and bland. See blog post for my recommendation on cocoa powder.
Note 2: Hot water: Coffee can be used in place of hot water, if preferred.
Note 3: Parchment paper: Make a parchment paper round liner for the bottom of the cake pans by following these steps:
- Tear off a sheet of parchment slightly larger than the cake pan.
- Fold the parchment in half.
- Then fold the parchment in half again.
- Fold into a triangle.
- Fold the triangle in half again.
- Hold the triangle against the bottom of the pan from the center outwards.
- Cut the parchment right where it meets the edge of the cake pan, along the curve of the cake pan.
- Unfold the parchment and press into the bottom of the cake pan.
Nutrition
Serving: 16slices | Calories: 1213kcal | Carbohydrates: 199g | Protein: 7g | Fat: 48g | Saturated Fat: 26g | Polyunsaturated Fat: 7g | Monounsaturated Fat: 13g | Trans Fat: 1g | Cholesterol: 119mg | Sodium: 506mg | Potassium: 326mg | Fiber: 6g | Sugar: 174g | Vitamin A: 1071IU | Vitamin C: 0.02mg | Calcium: 87mg | Iron: 4mg