FOLLOW ALONG! Subscribe to my newsletter and follow along on Facebook, Pinterest and Instagram for the latest updates, recipes and content.
Cashew Ice Cream
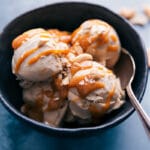
The creamiest Cashew Ice Cream made without any dairy or refined sugars! You won't believe how deliciously indulgent and sweet this ice cream tastes with such great ingredients -- plus only three required ingredients and no ice cream maker needed!
Servings 6 servings (small servings, the ice cream is rich!)
Calories 311kcal
Cost $6.17
Equipment
- High powered blender (Note 1)
- Ice cube trays OR ice cream maker (Note 2)
Ingredients
- 1 cup whole plain cashews
- 1 can (13.66 oz.; 403mL) coconut cream OR coconut milk (Note 3)
- 1/2 cup pure maple syrup (Note 4)
- 1-1/2 teaspoons vanilla extract
- 1/4 teaspoon fine sea salt
- Optional: caramel sauce and Maldon sea salt flakes
Instructions
- SOFTEN THE CASHEWS: We need to get the cashews soft before blending; a few different ways to go about this:*Add to a bowl and cover with water. Let stand for 6-8 hours or until soft and bloated. Thoroughly drain.*Place cashews in a heatproof bowl. Pour 2 cups boiling water over the cashews. Let stand for 30 minutes to an hour or until soft and bloated. Thoroughly drain.*Add cashews to a small pot and cover with 1 inch of water. Bring to a boil and boil for 10 minutes or until cashews are soft and bloated. Thoroughly drain.
- BLEND: Meanwhile, add the entire can of coconut cream (including the liquid that may have settled) into a large and powerful blender. Add remaining ingredients and well-drained cashews. Blend on high speed until very smooth, 2-3 minutes.
- FREEZE: Pour mixture evenly into ice cube trays (we use 2). (Reserve 1/3 cup and chill in the fridge if you don't have a high-powered blender -- Note 1). Freeze in ice cube trays for at least 8 hours.OR if using an ice cream maker: Chill mixture in the fridge for 30 minutes (it gets warm from blending!); then add to an ice cream maker and churn per ice cream maker instructions.
- ENJOY: Pull out the ice cube trays and run the bottoms under hot water for about 30 seconds or until they release easily. Add ice cream cubes to a high-powered blender. (No liquid needed, unless using a lower-powered blender-- then add in the reserved 1/3 cup.) Blend the cubes into smooth and creamy ice cream. This takes a little patience -- scrape down the sides of the blender frequently and stir everything to get it all to blend evenly. Once smooth and creamy, scoop out into bowls and serve. We like it drizzled with a caramel sauce and a few sprinkles of Maldon sea salt -- delish!
Video
Notes
Note 1: High-powered blender: (we use a Blend-tec®). It's imperative the blender can handle the cashews without overheating. You'll also need a lot of power to break down the ice cream "cubes" into smooth and creamy ice cream without making it watery. If you do not have a high-powered blender, use caution in blending the mixture to avoid overheating. You may need to blend an additional minute or 2. Additionally, if you don't have a high-powered blender, set aside 1/3 cup of the mixture to blend with the frozen ice cream ice cubes later on.
Note 2: Ice cream maker/ ice cube trays: If you use an ice cream maker, just be sure to chill the mixture before adding it to the maker. Here’s the one I use and love. Otherwise, add the mixture to ice cube trays and blend the frozen ice cubes -- works like a charm!
Note 3: Coconut milk versus coconut cream: Both are made from the same ingredients, but coconut cream has a higher fat content than coconut milk (more coconut, less water) so it is richer and thicker. They both taste very similar, so it's more about consistency. We want rich and creamy ice cream which is why we use coconut cream. If using coconut milk, be sure to use a good brand that is full fat. Lite coconut milk will yield a thinner and icier dessert.
Note 4: Maple syrup: This is a natural sweetener (not to be confused with corn syrup or pancake syrup) made from the sap of a maple tree which gets boiled down to a thicker consistency. Maple syrup is just one ingredient and is all natural!
Nutrition
Serving: 1serving | Calories: 311kcal | Carbohydrates: 26.3g | Protein: 5.4g | Fat: 22.3g | Sodium: 13.4mg | Fiber: 0.8g | Sugar: 17.3g